STM32CubeProgrammer

Applicable for STM32MP13x lines, STM32MP15x lines

This article gives a short introduction to the official STM32CubeProgrammer tool: What are the flashing principles? Where to download the software? How to install it? How to use it?

STM32CubeProgrammer.png

1 STM32CubeProgrammer overview[edit]

STM32CubeProgrammer is the official STMicroelectronics tool for creating partitions into any Flash device available on STM32 platforms.
Once created, STM32CubeProgrammer allows populating and updating the partitions with the prebuilt binaries.

The connection between the host PC and the board can be done through UART or USB serial links.

Any Flash device supported on STM32MPU boards can be flashed using STM32CubeProgrammer. For example, for the STM32MP157 Evaluation board:

  1. microSDTM card
  2. eMMC
  3. NAND Flash memory
  4. NOR Flash memory
Info white.png Information
During development, it is recommended to use a microSD card; you can then switch to eMMC or NAND Flash memory.

More details on supported Flash memory technologies and mapping can be found in Flash mapping articles, e.g. STM32 MPU Flash mapping.

Warning white.png Warning
OpenSTLinux generates flashlayout files only for USB programming mode.
For UART usage, refer to Using_STM32Programmer_over_UART article to modify those files.

2 STM32CubeProgrammer installation[edit]

2.1 Installing the STM32CubeProgrammer tool[edit]

STM32CubeProgrammer for Linux® host PC STM32CubeProgrammer for Windows® host PC
Download

Version v2.16.0

  • Go on st.com to download the STM32CubeProgrammer software
  • Download the archive file on your host PC in a temporary directory
  • Uncompress the archive file to get the STM32CubeProgrammer installers:


unzip en.stm32cubeprog.zip

Installation
  • Execute the Linux installer, which guides you through the installation process.
$> ./SetupSTM32CubeProgrammer-2.16.0.linux
  • The path to the STM32CubeProgrammer binary must be added to the PATH environment variable
    • either in each Terminal program in which the STM32CubeProgrammer binary needs to be used, using the following command:
$> export PATH=<my STM32CubeProgrammer install directory>/bin:$PATH
  • or once for all by creating a link to the STM32CubeProgrammer binary in a directory already present in PATH. For example, if "/home/bin" is in the PATH environment variable, run the following command:
$> ln -s <my STM32CubeProgrammer install directory>/bin/STM32_Programmer_CLI /home/bin/STM32_Programmer_CLI
  • Execute the Windows installer, which guides you through the installation process.
User manual
Detailed release note
  • Details about the content of this tool version are available from ST web site at Release Note .


2.2 Preparing the USB serial link for flashing[edit]

It is recommended to use the USB (in DFU mode) for flashing rather than the UART, which is too slow.

Below indications on how to install the USB in DFU mode under Linux and Windows OS, respectively.

  • For Linux host PC or Windows host PC with VMWare:

The libusb1.0 package (including USB DFU mode) must be installed to be able to connect to the board via the USB port. This is achieved by typing the following command from the host PC terminal:

 sudo apt-get install libusb-1.0-0

To allow STM32CubeProgrammer to access the USB port through low-level commands, proceed as follows:

 cd <your STM32CubeProgrammer install directory>/Drivers/rules 
sudo cp *.* /etc/udev/rules.d/
  • For Windows host PC:

Run the “STM32 Bootloader.bat” file to install the STM32CubeProgrammer DFU driver and activate the STM32 microprocessor device in USB DFU mode. This driver (installed by STM32 Bootloader.bat) is provided within the STM32CubeProgrammer release package. It is located in the DFU driver folder, \Drivers\DFU_Driver.

In case of issue, refer to How to proceed when the DFU driver installation fails on Windows host PC.

To validate the installation, the DFU driver functionality can be verified by following the FAQ instructions provided in how to check if the DFU driver is functional.

STM32CubeProgrammer is now ready to use: to know more about this tool, continue reading; otherwise, jump to the Starter or Distribution Package article corresponding to your board: Category:Starter Package or Category:Distribution Package.

3 Flash programming principles[edit]

Flash programming consists in transferring the binaries stored on the host computer into the platform Flash memory(ies), via a serial interface.
This operation requires a communication interface between the STM32CubeProgrammer and an embedded programming service.

The selection of the binaries to download and the Flash memory destination is done through the flashlayout.tsv file.
The STM32Cubeprogrammer tool uses the Flashlayout.tsv file as an input.
The Flashlayout.tsv file includes a formal description of the partitions (ID, naming, type, offset) as well as the identification of the Flash memory to be populated.

Some default "tsv" files aligned with the STM32 Flash memory mapping (e.g.STM32_MPU_Flash_mapping) are provided in the STM32Cubeprogrammer tool. They can be used as a starting point and can be further adapted to specific application needs.

More examples as well as information on the description format are available in STM32CubeProgrammer flashlayout.

See AN5275: USB DFU/USART protocols used in STM32MP1 series bootloaders for protocol details.

4 How to flash with STM32CubeProgrammer[edit]

Once the STM32CubeProgrammer has been installed, complete flashing procedures for STM32 boards are available in Starter Package and Distribution Package articles. Select the article corresponding to your STMicroelectronics platform.


The generic syntax of the STM32CubeProgrammer command is explained below.

  • With Linux host PC, the main command is:
 ./bin/STM32_Programmer_CLI  + options given below
  • With Windows host PC, the main command is:
 ./bin/STM32_Programmer_CLI.exe + options given below

The Linux related information provided below can be extrapolated for other host PC operating systems:

  • Complete flashing command (for Linux host PC):
  STM32_Programmer_CLI -c port=<DEVICE_PORT_LOCATION> -w [<file.tsv>]
where 
 w:
     Write
 <file.tsv>:PathToFlashlayout/flashlayout.tsv file (see above) 
         if Flashlayout and binaries are not in the same directory, then the path to the Flashlayout files must be precised.
 <DEVICE_PORT_LOCATION>:
         e.g. usb1 (case sensitive): for other options, refer to How to find the DEVICE_PORT_LOCATION parameter value for the USB link.

Populating all partitions can take a few minutes (depending mainly on the rootfs size).

5 FAQs[edit]

5.1 Where to find the STM32CubeProgrammer user manual[edit]

The user manual is available in ST deliveries under <STM32CubeProgrammer installation directory>/doc/UM2336.pdf (see Installing the STM32CubeProgrammer tool).

5.2 How to check if the DFU driver is functional[edit]

Prerequisites: STM32CubeProgrammer installation completed and STM32 board connected to the host PC.

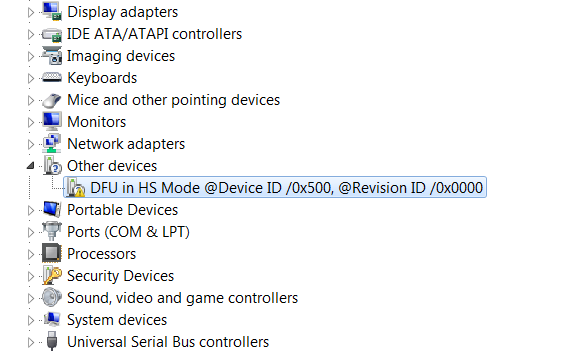
First, activate the USB driver on Ubuntu on VMware Workstation Player (use VM Player menu "removable devices" to connect to STMicroelectronics DFU in HS mode), then execute the following command and check the result:

  STM32_Programmer_CLI -l usb
  • If the DFU is functional, the result is similar to the following
     -------------------------------------------------------------------
                       STM32CubeProgrammer <tool version>                  
     -------------------------------------------------------------------

Total number of available STM32 device in DFU mode: 1

 Device Index           : USB1
 USB Bus Number         : 002
 USB Address Number     : 008
 Product ID             : USB download gadget@Device ID /0x500, @Revision ID /0x0000
 Serial number          : 0000000000
 Firmware version       : 0x0110
 Device ID              : 0x0500
  • Otherwise, the DFU is not functional and the result is the following:
 ------------------------------------------------------------------
                      STM32CubeProgrammer <tool version>
 ------------------------------------------------------------------
 

  Warning: No STM32 device in DFU mode connected

5.3 How to proceed when the DFU driver installation fails on Windows host PC[edit]

Prerequisites: STM32CubeProgrammer installation completed.


The STM32 Bootloader.bat allows to install the DFU driver on a Windows PC (see Preparing the USB serial link for flashing). In case of failure, here is a typical error log:

c:\demo\MPU\stm32_programmer_package_v1.0.3_MPU\Drivers\DFU_Driver>"STM32 Bootloader.bat"
c:\demo\MPU\stm32_programmer_package_v1.0.3_MPU\Drivers\DFU_Driver>echo off Microsoft PnP Utility
Processing inf :            DFU_in_HS_Mode.inf
Failed to install the driver on any of the devices on the system : No more data is available.
Total attempted:              1
Number successfully imported: 0

This error occurs either because the STM32CubeProgrammer DFU driver is already installed or because the DFUSE driver is installed.


To verify if the STM32CubeProgrammer DFU driver is correctly installed on your Windows host PC, proceed as follow:

  1. Connect the board to the Windows host PC.
  2. Launch the Device Manager utility and execute the below action depending on your use case:
  • The STM32CubeProgrammer DFU driver is not installed:
Execute the STM32 Bootloader.bat script to install it (see Preparing the USB serial link for flashing).
DfuSe
Figure 1: STM32CubeProgrammer’s DFU driver is not installed


  • The DfuSe driver is installed and you must uninstall it.
Right click STM Device in DFU Mode and select Uninstall.
DfuSe
Figure 1: STM32 DFU Device with DfuSe Driver


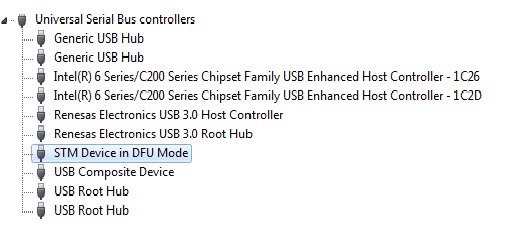
  • The STM32CubeProgrammer DFU driver is installed and ready to be used.
DFUDevice
Figure 2: STM32 DFU Device with STM32_Programmer Driver

5.4 How to find the DEVICE_PORT_LOCATION parameter value for the USB link[edit]

Prerequisites: STM32CubeProgrammer installation completed and STM32 board connected to the host PC.


To find the value of the DEVICE_PORT_LOCATION corresponding to the USB link, use the following command:

 STM32_Programmer_CLI -l usb
     -------------------------------------------------------------------
                       STM32CubeProgrammer <tool version>                  
     -------------------------------------------------------------------

Total number of available STM32 device in DFU mode: 1

 Device Index           : USB1
 USB Bus Number         : 002
 USB Address Number     : 008
 Product ID             : USB download gadget@Device ID /0x500, @Revision ID /0x0000
 Serial number          : 0000000000
 Firmware version       : 0x0110
 Device ID              : 0x0500

You can then report the value returned by the command line as explained in the How to flash with STM32CubeProgrammer chapter. Pay attention that the value must be written in lower case.

5.5 How to explore all the partitions of a populated microSD card[edit]

A populated microSD card can contain more than eight partitions, exceeding the number of partitions allowed by default in a Linux system.
At insertion step, you may get an 'Error mounting /dev/mmcblk0p9' or 'mount: cannot mount /dev/mmcblk0p9 read-only' error message.
Screenshot ubuntu 16.04 mmc block 8.png

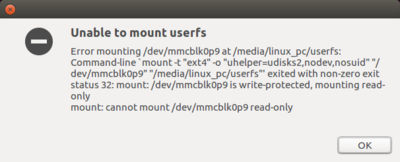
By adding some options to modprobe, it is possible to allow more than eight partitions on a storage device:

 echo 'options mmc_block perdev_minors=16' > /tmp/mmc_block.conf
 sudo mv /tmp/mmc_block.conf /etc/modprobe.d/mmc_block.conf

5.6 How to update partitions[edit]

For partial Flash memory update, the flashlayout.tsv must be edited to select only the partition that needs to be updated (first column =1).
See STM32CubeProgrammer_flashlayout#Updating partitions for details and example, the rest of the procedure is the same.

On ST boards, if FSBL or SSBL partitions need to be updated, the Bin2boot fields must be configured with ST binaries, as described in STM32CubeProgrammer_flashlayout#Updating partitions using official bootloaders.

5.7 How to populate a microSD card inserted in a Linux host PC[edit]

STMicroelectronics distribution is delivered with the create_sdcard_from_flashlayout.sh script that allows to prepare and flash a microSD card image.


5.8 How to fuse STM32MP15x OTP[edit]

STM32CubeProgrammer exports several capabilities that can be used to manage the OTP registers via the command line interface. U-boot program should be preceding installed which is necessary to expose the OTP partition having 0xF1 as partition ID. It's feasible to flash a simple TSV Flashlayout that contains the boot partitions 0x1 and 0x3 for testing.

Example: Flashlayout for OTP exposing

#opt	Id	Name		Type		Device	Offset		Binary
-	0x01	fsbl-boot	Binary		none	0x00000000	tf-a-stm32mp157f-dk2-usb.stm32
-	0x03	fip-boot	Binary	        none	0x00000000	fip-stm32mp157f-dk2-trusted.bin 

Once the device is in the correct state, it’s possible to Read and Display all the OTP registers in table format highlighting three regions (BSEC CONTROL, LOWER SHADOW REGISTERS, UPPER SHADOW REGISTERS)

Syntax: -c port=usb1 -d FlashLayout_stm32mp157f-dk2.tsv -otp displ
Figure 1:Example of LOWER SHADOW REGISTERS


5.8.1 Connection[edit]

STM32CubeProgrammer requires to be connected to U-Boot in order to access OTP alternate.

To do it, you have to initiate a flash process but selecting only the 2 first "boot" partitions TF-A( 0x1) and U-Boot( 0x03) of a .tsv.

Using STM32CubeProgrammer GUI this can done without editing by using any available .tsv but selecting only the 2 first partitions thanks to "Select" column tick boxes on the left, as follow:

link

Perform the "Download" till success popup then disconnect from the GUI and switch to CLI in a terminal without rebooting the board:

  STM32_Programmer_CLI -c port=usb1

5.8.2 Display status[edit]

It will also displayed the status for each OTP words (Shadow lock read/write, program stick lock, permanent write lock):

  • All lower OTP
  • Only upper that are available for non secure (defined in TF-A device tree).

To display the OTP:

  STM32_Programmer_CLI -c port=usb1 -otp displ

-------------------------------------------------------------------
                 STM32CubeProgrammer v2.9.0                  
-------------------------------------------------------------------


USB speed   : High Speed (480MBit/s)
Manuf. ID   : STMicroelectronics
Product ID  : USB download gadget@Device ID /0x500, @Revision ID /0x0000
SN          : 002500253338510534383330
FW version  : 0x0110
Device ID   : 0x0500
Device name : STM32MPxxx
Device type : MPU
Device CPU  : Cortex-A7


UPLOADING OTP STRUCTURE ...
  Partition     : 242
  Size          : 1024 Bytes 

Uploading OTP data:
[==================================================] 100% 

OTP Partition read successfully

 
OTP STRUCTURE VERSION          :0x00000001

BSEC CONTROL REGISTERS:

BSEC_OTP_CONFIG                :0x0000000e
                               |_[08] TR[1]                     : 0
                               |_[07] TR[0]                     : 0
                               |_[06] PRGWIDTH[3]               : 0
                               |_[05] PRGWIDTH[2]               : 0
                               |_[04] PRGWIDTH[1]               : 0
                               |_[03] PRGWIDTH[0]               : 1
                               |_[02] FRC[1]                    : 1
                               |_[01] FRC[0]                    : 1
                               |_[00] PWRUP                     : 0

BSEC_OTP_Status                :0x00000041
                               |_[07] BIST2LOCK                 : 0
                               |_[06] BIST1LOCK                 : 1
                               |_[05] PWRON                     : 0
                               |_[04] PROGFAIL                  : 0
                               |_[03] BUSY                      : 0
                               |_[02] INVALID                   : 0
                               |_[01] FULLDBG                   : 0
                               |_[00] SECURE                    : 1

BSEC_OTP_LOCK                  :0x00000002
                               |_[04] GPLOCK                    : 0
                               |_[03] FENREG                    : 0
                               |_[02] DENREG                    : 0
                               |_[00] OTP                       : 0

BSEC_DENABLE                   :0x0000047f
                               |_[10] DBGSWENABLE               : 1
                               |_[09] CFGSDISABLE               : 0
                               |_[08] CP15SDISABLE[1]           : 0
                               |_[07] CP15SDISABLE[0]           : 0
                               |_[06] SPNIDEN                   : 1
                               |_[05] SPIDEN                    : 1
                               |_[04] HDPEN                     : 1
                               |_[03] DEVICEEN                  : 1
                               |_[02] NIDEN                     : 1
                               |_[01] DBGEN                     : 1
                               |_[00] DFTEN                     : 1

BSEC_FENABLE                   :0x00000000
                               |_[03] CAN_disable               : 0
                               |_[02] GPU_disable               : 0
                               |_[01] Dual_A7_disable           : 0
                               |_[00] Crypto_disable            : 0

 
OTP LOWER SHADOW REGISTERS:

ID     value    disturbed    error     R_SLock    W_SLock    Prog_SL    Perm_L

00  0x00000017      0          0          1          1          0          0 
01  0x00008000      0          0          0          1          0          1 
02  0x00000000      0          0          0          1          1          0
03  0x00000000      0          0          0          0          0          0
04  0x00000000      0          0          0          0          0          0
05  0x00000000      0          0          0          0          0          0
06  0x00000000      0          0          0          0          0          0
07  0x00000000      0          0          0          0          0          0
08  0x00000000      0          0          0          1          0          0
09  0x00000000      0          0          0          0          0          0
10  0x00000000      0          0          0          0          0          0
11  0x00000000      0          0          0          0          0          0
12  0x7ce7f0ee      0          0          0          0          0          1
13  0x00250025      0          0          0          0          0          1
14  0x33385105      0          0          0          0          0          1
15  0x34383330      0          0          0          0          0          1
16  0x125575aa      0          0          0          1          1          1
17  0x1f41185b      0          0          0          0          0          1
18  0x7a200140      0          0          1          1          0          0
19  0x0690147c      0          0          0          0          0          1
20  0x5de00048      0          0          0          0          0          1
21  0x00000000      0          0          0          0          0          1
22  0x00000000      0          0          0          0          0          1
23  0x3fec2fd7      0          0          0          0          0          1
24  0x00000000      0          0          0          1          0          0
25  0x00000000      0          0          0          1          0          0
26  0x00000000      0          0          0          1          0          0
27  0x00000000      0          0          0          1          0          0
28  0x00000000      0          0          0          1          0          0
29  0x00000000      0          0          0          1          0          0
30  0x00000000      0          0          0          1          0          0
31  0x00000000      0          0          0          1          0          0

OTP UPPER SHADOW REGISTERS:

ID     value    disturbed    error     R_SLock    W_SLock    Prog_SL    Perm_L

32  0x00000000      0          0          1          1          1          1
33  0x00000000      0          0          1          1          1          1
34  0x00000000      0          0          1          1          1          1
35  0x00000000      0          0          1          1          1          1
36  0x00000000      0          0          1          1          1          1
37  0x00000000      0          0          1          1          1          1
38  0x00000000      0          0          1          1          1          1
39  0x00000000      0          0          1          1          1          1
40  0x00000000      0          0          0          1          1          1
41  0x00000000      0          0          0          1          1          1
42  0x00000000      0          0          0          1          1          1
43  0x00000000      0          0          0          1          1          1
44  0x00000000      0          0          0          1          1          1
45  0x00000000      0          0          0          1          1          1
46  0x00000000      0          0          0          1          1          1
47  0x00000000      0          0          0          1          1          1
48  0x00000000      0          0          0          1          1          1
49  0x00000000      0          0          0          1          1          1
50  0x00000000      0          0          0          1          1          1
51  0x00000000      0          0          0          1          1          1
52  0x00000000      0          0          0          1          1          1
53  0x00000000      0          0          0          1          1          1
54  0x00000000      0          0          0          1          1          1
55  0x00000000      0          0          0          1          1          1
56  0x00000000      0          0          1          1          0          0
57  0x42e18000      0          0          0          0          0          0
58  0x0000fd51      0          0          0          0          0          0
59  0x12722301      0          0          0          0          0          0
60  0x00000000      0          0          0          0          0          0
61  0x00000000      0          0          0          0          0          0
62  0x00000000      0          0          0          0          0          0
63  0x00000000      0          0          0          0          0          0
64  0x00000000      0          0          0          0          0          0
65  0x00000000      0          0          0          0          0          0
66  0x00000000      0          0          0          0          0          0
67  0x00000000      0          0          0          0          0          0
68  0x00000000      0          0          0          0          0          0
69  0x00000000      0          0          0          0          0          0
70  0x00000000      0          0          0          0          0          0
71  0x00000000      0          0          0          0          0          0
72  0x00000000      0          0          0          0          0          0
73  0x00000000      0          0          0          0          0          0
74  0x00000000      0          0          0          0          0          0
75  0x00000000      0          0          0          0          0          0
76  0x00000000      0          0          0          0          0          0
77  0x00000000      0          0          0          0          0          0
78  0x00000000      0          0          0          0          0          0
79  0x00000000      0          0          0          0          0          0
80  0x00000000      0          0          0          0          0          0
81  0x00000000      0          0          0          0          0          0
82  0x00000000      0          0          0          0          0          0
83  0x00000000      0          0          0          0          0          0
84  0x00000000      0          0          0          0          0          0
85  0x00000000      0          0          0          0          0          0
86  0x00000000      0          0          0          0          0          0
87  0x00000000      0          0          0          0          0          0
88  0x00000000      0          0          0          0          0          0
89  0x00000000      0          0          0          0          0          0
90  0x00000000      0          0          0          0          0          0
91  0x00000000      0          0          0          0          0          0
92  0x00000000      0          0          0          0          0          0
93  0x00000000      0          0          0          0          0          0
94  0x00000000      0          0          0          0          0          0
95  0x00000000      0          0          0          0          0          0

BSEC_HWCFGR                    :0x00000014
                               |_[07] ECC_USE[3]                : 0
                               |_[06] ECC_USE[2]                : 0
                               |_[05] ECC_USE[1]                : 0
                               |_[04] ECC_USE[0]                : 1
                               |_[03] SAFMEM_SIZE[3]            : 0
                               |_[02] SAFMEM_SIZE[2]            : 1
                               |_[01] SAFMEM_SIZE[1]            : 0
                               |_[00] SAFMEM_SIZE[0]            : 0


BSEC IP REV                    :1.1

BSEC IP ID                     :0x00100032

BSEC IP MAGIC ID               :0xa3c5dd04

5.8.3 Update value[edit]

It is now possible to use programmer to manage new fuses values: bit to bit for Lower, only programmable once for Upper.

For example: Set the value 0x21458000 into the word 57 (0x39)

 STM32_Programmer_CLI -c port=usb1 -otp program wordID=0x39 value=0x21458000

Words are written as a 32bit word. It is important to take care of the bit order once using the value in software.

Example: Mac address 00:80:e1:42:45:e5 must be written as:

  • Word 57 : 0x42e18000
  • Word 58 : 0x0000e545
Warning white.png Warning
MAC address / board Id OTP write should not be performed on ST boards ! They are written and protected by ECC during factory production. Any further write will break the board with no way to recover if these OTP are not locked

5.8.4 Update lock[edit]

Lock (no other programmation could occured) could be added per word; the permanent lock access will only be refreshed after boot.

For example: permanent lock (pl=1) the word 57 (0x39)

 STM32_Programmer_CLI -c port=usb1 -otp program wordID=0x39 value=0x21458000 pl=1

5.8.5 Download file[edit]

Description: to fuse a binary file from a start word ID

Syntax: -otp fwrite {lock} [path.bin] wordid=[index]

{lock} is optional to indicate the operation type, update, or permanent lock.

[path.bin] is 32-bits aligned file, the tool makes padding values if the file is not aligned {warning message will be displayed}

[index] value in hex/dec format {from 0 to 95 in decimal}

Note:

At the execution time the tool will display the operation that goes to be performed and prompt a message for confirmation.

Note:

To skip the prompt confirmation, use the (-y or --yes) command.

5.9 How to fuse STM32MP13x OTP[edit]

STM32CubeProgrammer exports several capabilities that can be used to manage the OTP registers via the command line interface.

All STM32MP13xx devices have OTP memory map that based on structure v2.

Firmware program should be preceding installed which is necessary to expose the OTP partition having 0xF1 as partition ID.

there's two alternatives for easier OTP management :

1. Flash a TSV Flashlayout that contains the boot partitions 0x1 and 0x3 for testing.

2. Flash a simple TSV flashlayout basing on a single partition named STM32PRGFW_UTIL

5.9.1 Programming SAFMEM[edit]

Description: This command allows the user to program SAFMEM memory by modifying the OTP words. Able to write up to 96 words in the same command line.

Syntax: -otp write {lock} {word=[index] value=[val]…}

{lock} is optional to indicate that a lock was requested. If lock option is mentioned, all words passed in line will be locked. With lock: write the word then perform permanent lock. Without lock: update the word.

[index] The word index can be written in decimal or hex format.

[val] The value option should always accept hex values.


The tool will print the requests and the user can verify the operation before going head and It will prompt a confirmation message then the user can press yes/y or no/n to pursuit or stop the write operation.

Example STM32_Programmer_CLI.exe --connect port=usb1 –otp write word=52 value=0xAAAAAAA word=0x50 value=0xBBBBBBBB
Figure 1:OTP write command for OTP structure v2

5.9.2 Lock OTP command[edit]

Description: This command allows to permanent lock the mentioned words which are already written before. Able to write up to 96 words in the same command line.

Syntax: -otp lock {word=[index]…]

[index] word index can be written in decimal or hex format.

The tool will print the requested modifications and the user can verify the operation before going head (use yes/y or no/n to pursuit or stop)

Example STM32_Programmer_CLI.exe --connect port=usb1 –otp lock word=20 word=0x30

5.9.3 Display command[edit]

Description: This command allows the user to display all or parts of the OTP structure.

Syntax: -otp displ {word=[index]…}

{word=[index]…}  : is optional, able to display up to 96 specific words in the same command, The index value used to indicate the OTP word ID: value in decimal or hex format.

-otp displ  : Display all OTP words {version + Global State + OTP words}. Highlight the status word containing a state information {prog lock, read lock, read error, invalid}

Example
STM32_Programmer_CLI.exe --connect port=usb1 –otp displ word=8 word=0x10
STM32_Programmer_CLI.exe --connect port=usb1 –otp displ
Figure 1:Display all OTP words for strcuture v2

5.9.4 Download file command[edit]

Description: to fuse a binary file from a start word ID

Syntax: -otp fwrite {lock} [path.bin] word=[index]

{lock} : is optional to indicate the operation type, update, or permanent lock.

[path.bin] : is 32-bits aligned file, the tool makes padding values if the file is not aligned {warning message will be displayed}

[index] : value in hex/dec format {from 0 to 95 in decimal}

Example Program a PKH binary file starting from word number 24
STM32_Programmer_CLI.exe --connect port=usb1 -otp fwrite lock /user/home/pkh.bin word=24
Download file.png

5.10 How to program STPMIC NVM[edit]

Warning white.png Warning
Available on STM32MP15, STM32MP13 and in Trusted boot mode. It is not possible to program, with the STM32CubeProgrammer, the STPMIC NVM in OP-TEE based solution.

STM32CubeProgrammer requires to be connected to U-Boot in order to access STPMIC NVM alternate (0xF4).

Refer to #How to fuse STM32MP15x OTP chapter and follow same procedure to flash only the 2 first "boot" partitions with GUI.
Then disconnect from GUI and switch to CLI in a terminal.

This is procedure to modify NVM values.

  • Read partition of PMIC and load it into a .bin file via USB
 STM32_Programmer_CLI -c port=usb1  -rp 0xf4 0x0 0x8 $MySelectedPATH\PMIC_NVM_read.bin
  • Read partition of PMIC and load it into a .bin file via UART
 STM32_Programmer_CLI -c port=COM11 -rp 0xf4 0x0 0x8 $MySelectedPATH\PMIC_NVM_read.bin
  • Backup it by creating a copy PMIC_NVM_write.bin
  • Use a binary editor in HEX format ( eg "vi -b file.bin" then :%!xxd ) to edit the copy PMIC_NVM_write.bin with new values.

The binary format display the shadow register from 0xF8 to 0XFF. Refer to STPMIC1 DataSheet DS12792.

00000000: EE92 C002 F280  0233                      .......3
respectively SHR address :  F8F9 FAFB FCFD FEFF
  • Program back the STPMIC1 with modified NVM via USB using following command:
 STM32_Programmer_CLI -c port=usb1 -pmic "PMIC_NVM_write.bin"
  • Program back the STPMIC1 with modified NVM via UART using following command:
 STM32_Programmer_CLI -c port=COM11 -pmic "PMIC_NVM_write.bin"