The STM32CubeMP15 Package / STM32CubeMP1 Package is part of the STM32 MPU embedded software offer. It runs on the Arm® Cortex®-M4 coprocessor.
It is included in the three software packages proposed by the Linux® Yocto-based embedded software:
- in the starter package as pre-built examples (firmware),
- in the developer package as full source code for development (associated with an IDE),
- in the distribution package as a dedicated recipe (that integrates the full source code) in the OpenSTLinux distribution.
Therefore, this article explains how to develop, build and run existing or new examples thanks to these three software packages.
1. Prerequisites[edit | edit source]
In the next chapters, it is assumed that the selected board is assembled according to the information provided in its hardware description article (e.g., STM32MP157x-EV1 - hardware description for STM32MP157x-EV1 Evaluation boards), and that the different boot related switches of the board are also known (e.g., boot related switches for STM32MP157x-EV1 Evaluation boards).
Refer also to the Which Package better suits your needs article for further information on all packages.
There are two ways (boot modes) to load the firmware into the Arm® Cortex®-M4 coprocessor:
- the production boot mode (the firmware is loaded into the coprocessor by the Arm® Cortex®-A7 processor running the Linux® distribution,
- the engineering boot mode (the firmware is loaded from the IDE).
The How to use engineering and production modes article details the differences between these two different boot modes, and suggests the boot mode to use depending on the development phase.
2. Starter Package for STM32CubeMP15[edit | edit source]
The Linux Yocto-based starter packages (STM32MP15 Discovery kits - Starter Package and STM32MP15 Evaluation boards - Starter_Package) contain pre-built examples (firmware) that are located in the Linux file system (userfs folder: /usr/local/Cube-M4-examples/<board_name>/Examples), and that be run from an host console thanks to a dedicated script (fw_cortex_m4.sh).
This chapter, and its sub-chapters, aims to explain all steps needed to run an existing example.
2.1. Starter Package prerequisites[edit | edit source]
Refer to the Starter Package for STM32MP15 Eval Board or Starter Package for STM32MP15 Discovery Board for all the information describing how to install the Starter Package.
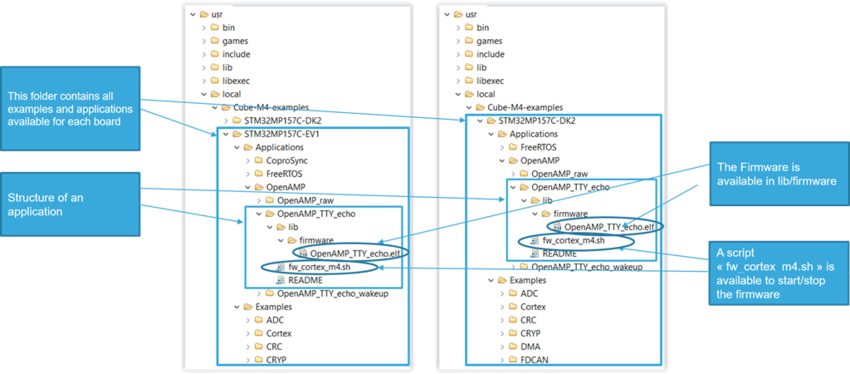
2.2. User file system for Arm® Cortex®-M4 examples[edit | edit source]
The folder structure of Linux User File System for STM32Cube M4 firmware is described below for each STM32MP1 board (STM32MP157x-EV1 ![]() and STM32MP157x-DK2
and STM32MP157x-DK2 ![]() ):
):
2.3. How to run examples[edit | edit source]
After flashing images onto your board, you need to open a Linux console (Refer to How to get Terminal), and follow the steps defined in chapters below.
2.3.1. Select boot mode for M4 examples[edit | edit source]
When booting the Linux image, you need to select a dedicated device tree configuration for M4 examples, which allows the allocation of specific clock and pin control assignments related to them.
This means that you need to select, by example, the boot mode stm32mp157c-ev1-m4-examples-sdcard during the U-Boot stage, as described in the following log:
U-Boot 2018.11-stm32mp-19-01-04 (Jan 04 2019 - 09:59:10 +0000)
CPU: STM32MP157CAA Rev.B
Model: STMicroelectronics STM32MP157C eval daughter on eval mother
Board: stm32mp1 in trusted mode (st,stm32mp157c-ev1)
Board: MB1263 Var1 Rev.C-01
...
...
Found /mmc0_stm32mp157c-ev1_extlinux/extlinux.conf
Retrieving file: /mmc0_stm32mp157c-ev1_extlinux/extlinux.conf
616 bytes read in 1 ms (601.6 KiB/s)
Retrieving file: /mmc0_stm32mp157c-ev1_extlinux/../splash.bmp
46180 bytes read in 3 ms (14.7 MiB/s)
Select the boot mode
1:      stm32mp157c-ev1-sdcard
2:      stm32mp157c-ev1-a7-examples-sdcard
3:      stm32mp157c-ev1-m4-examples-sdcard           <- Select stm32mp157c-ev1-m4-examples-sdcard
Enter choice: 3
3:      stm32mp157c-ev1-m4-examples-sdcard
Retrieving file: /uImage
[edit | edit source]
cd /usr/local/Cube-M4-examples/<board_name>
- Example of output log:
root@stm32mp1:/usr/local/Cube-M4-examples/STM32MP157C-EV1# ls -l *
Applications:
total 3
drwxr-xr-x 3 root root 1024 Mar  9  2018 CoproSync
drwxr-xr-x 3 root root 1024 Mar  9  2018 FreeRTOS
drwxr-xr-x 5 root root 1024 Mar  9  2018 OpenAMP

Demonstrations:
total 1
drwxr-xr-x 3 root root 1024 Mar  9  2018 AI_Character_Recognition

Examples:
total 15
drwxr-xr-x 3 root root 1024 Mar  9  2018 ADC
drwxr-xr-x 3 root root 1024 Mar  9  2018 CRC
drwxr-xr-x 3 root root 1024 Mar  9  2018 CRYP
drwxr-xr-x 3 root root 1024 Mar  9  2018 Cortex
drwxr-xr-x 3 root root 1024 Mar  9  2018 DAC
drwxr-xr-x 3 root root 1024 Mar  9  2018 DMA
drwxr-xr-x 3 root root 1024 Mar  9  2018 GPIO
drwxr-xr-x 3 root root 1024 Mar  9  2018 HASH
drwxr-xr-x 4 root root 1024 Mar  9  2018 I2C
drwxr-xr-x 3 root root 1024 Mar  9  2018 PWR
drwxr-xr-x 3 root root 1024 Mar  9  2018 QSPI
drwxr-xr-x 4 root root 1024 Mar  9  2018 SPI
drwxr-xr-x 3 root root 1024 Mar  9  2018 TIM
drwxr-xr-x 3 root root 1024 Mar  9  2018 UART
drwxr-xr-x 3 root root 1024 Mar  9  2018 WWDG
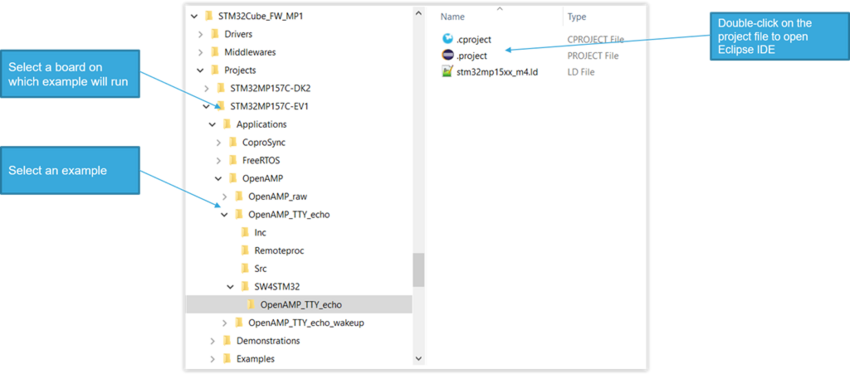
2.3.3. Select the example or application to run[edit | edit source]
- For an example, use the following command:
cd /usr/local/Cube-M4-examples/<board_name>/Examples/<example_type>/<example_to_run>
- For an application, use the following command :
cd /usr/local/Cube-M4-examples/<board_name>/Applications/<application_type>/<application_to_run>
                                    |-- fw_cortex_m4.sh
                                    |-- README
                                    |--lib
                                        |--firmware
                                            |-- ELF file for <board_name>
- fw_cortex_m4.sh : script to start / stop firmware
- README : all information about example
- Example output log:
root@stm32mp1:/usr/local/Cube-M4-examples/STM32MP157C-EV1/Examples/QSPI/QSPI_ReadWrite_IT# ls -l
total 8
-rwxr-xr-x 1 root root 5513 Aug 31  2018 README
-rwxr-xr-x 1 root root  854 Aug 31  2018 fw_cortex_m4.sh
drwxr-xr-x 3 root root 1024 Aug 31  2018 lib

root@stm32mp1:/usr/local/Cube-M4-examples/STM32MP157C-EV1/Examples/QSPI/QSPI_ReadWrite_IT# ls -l lib/firmware/
total 26
-rwxr-xr-x 1 root root 210364 Mar  9  2018 QSPI_ReadWrite_IT.elf
2.3.4. Read the README file carefully[edit | edit source]
It provides all the information about the example setup and verdict.
2.3.5. Start the firmware[edit | edit source]
Use the following command to start the selected example:
./fw_cortex_m4.sh start
- Example output log:
root@stm32mp1:/usr/local/Cube-M4-examples/STM32MP157C-EV1/Examples/QSPI/QSPI_ReadWrite_IT# ./fw_cortex_m4.sh start
fw_cortex_m4.sh: fmw_name=QSPI_ReadWrite_IT.elf
[16876.378399] remoteproc remoteproc0: powering up m4
[16876.382908] remoteproc remoteproc0: Booting fw image QSPI_ReadWrite_IT.elf, size 210104
[   82.822243] remoteproc remoteproc0: header-less resource table
[   82.827069] remoteproc remoteproc0: not resource table found for this firmware
[   82.834064] remoteproc remoteproc0: header-less resource table
[   82.873522] rproc-srm-dev m4@0:m4_system_resources:adc@48003000: Linked as a consumer to regulator.9
[   82.943959] rproc-srm-core m4@0:m4_system_resources: bound m4@0:m4_system_resources:timer@40000000 (ops 0xc0bd47f0)
[   82.958620] rproc-srm-core m4@0:m4_system_resources: bound m4@0:m4_system_resources:serial@4000f000 (ops 0xc0bd47f0)
[   82.979759] rproc-srm-core m4@0:m4_system_resources: bound m4@0:m4_system_resources:i2c@40015000 (ops 0xc0bd47f0)
[   82.990388] rproc-srm-core m4@0:m4_system_resources: bound m4@0:m4_system_resources:dac@40017000 (ops 0xc0bd47f0)
[   83.001066] rproc-srm-core m4@0:m4_system_resources: bound m4@0:m4_system_resources:timer@44000000 (ops 0xc0bd47f0)
[   83.010866] rproc-srm-core m4@0:m4_system_resources: bound m4@0:m4_system_resources:spi@44004000 (ops 0xc0bd47f0)
[   83.020759] rproc-srm-core m4@0:m4_system_resources: bound m4@0:m4_system_resources:dma@48001000 (ops 0xc0bd47f0)
[   83.035481] rproc-srm-core m4@0:m4_system_resources: bound m4@0:m4_system_resources:adc@48003000 (ops 0xc0bd47f0)
[   83.044288] rproc-srm-core m4@0:m4_system_resources: bound m4@0:m4_system_resources:hash@4c002000 (ops 0xc0bd47f0)
[   83.055075] rproc-srm-core m4@0:m4_system_resources: bound m4@0:m4_system_resources:rng@4c003000 (ops 0xc0bd47f0)
[   83.065018] rproc-srm-core m4@0:m4_system_resources: bound m4@0:m4_system_resources:crc@4c004000 (ops 0xc0bd47f0)
[   83.075279] rproc-srm-core m4@0:m4_system_resources: bound m4@0:m4_system_resources:cryp@4c005000 (ops 0xc0bd47f0)
[   83.085529] rproc-srm-core m4@0:m4_system_resources: bound m4@0:m4_system_resources:qspi@58003000 (ops 0xc0bd47f0)
[   83.095857] rproc-srm-core m4@0:m4_system_resources: bound m4@0:m4_system_resources:button (ops 0xc0bd47f0)
[   83.105563] rproc-srm-core m4@0:m4_system_resources: bound m4@0:m4_system_resources:m4_led (ops 0xc0bd47f0)
[   83.117791] remoteproc remoteproc0: remote processor m4 is now up
This loads and starts the firmware using the Linux Remote Processor component in Arm® Cortex®-M4
2.3.6. Stop the firmware[edit | edit source]
Use the following command to stop the example that is running:
./fw_cortex_m4.sh stop
- Example output log:
root@stm32mp1:/usr/local/Cube-M4-examples/STM32MP157C-EV1/Examples/QSPI/QSPI_ReadWrite_IT# ./fw_cortex_m4.sh stop
fw_cortex_m4.sh: fmw_name=QSPI_ReadWrite_IT.elf
[  320.965374] remoteproc remoteproc0: warning: remote FW shutdown without ack
[  320.978380] rproc-srm-dev m4@0:m4_system_resources:adc@48003000: Dropping the link to regulator.9
[  320.996540] remoteproc remoteproc0: stopped remote processor m4
This stops the firmware using the Linux Remote Processor component.
It releases the relevant resource settings used by the example.
2.4. How to go further[edit | edit source]
Jump to #Developer Package for STM32CubeMP15.
3. Developer Package for STM32CubeMP15[edit | edit source]
The STM32MPU Developer Package article explains how to get the source code for the STM32CubeMP15 Package, and the associated tools (e.g., IDE).
As stated in the How to use engineering and production modes article, it is recommended to use the engineering boot mode when developing or debugging an application running on the Arm® Cortex®-M4 coprocessor.
This chapter and its sub-chapters aim to explain all steps needed to run an existing example using STM32CubeIDE. Once done, you can jump to the chapter #How to go further with the Developer Package to enhance your experience with the STM32CubeMP1 Developer Package.
3.1. Developer Package prerequisites[edit | edit source]
- Refer to the Installing the STM32CubeMP1 Package to obtain and install the source code
- Refer to the new recommended IDE: STM32CubeIDE
3.2. How to run an existing example with the Eclipse IDE[edit | edit source]
|
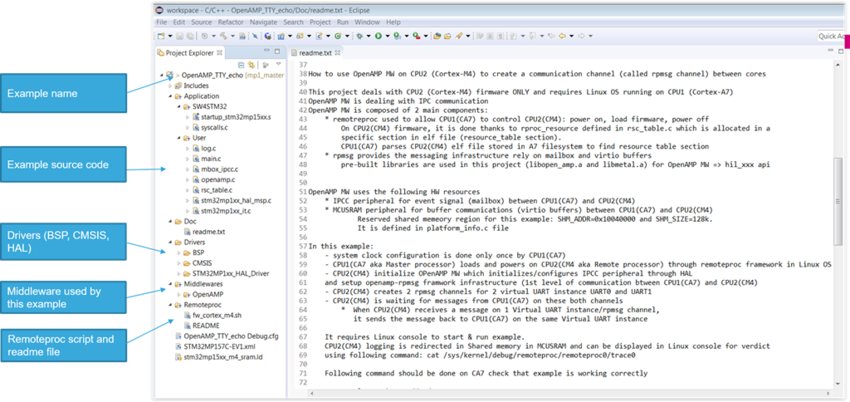
3.2.1. Rebuild an example[edit | edit source]
- Open the folder containing the example and double-click on file .project to open Eclipse IDE:
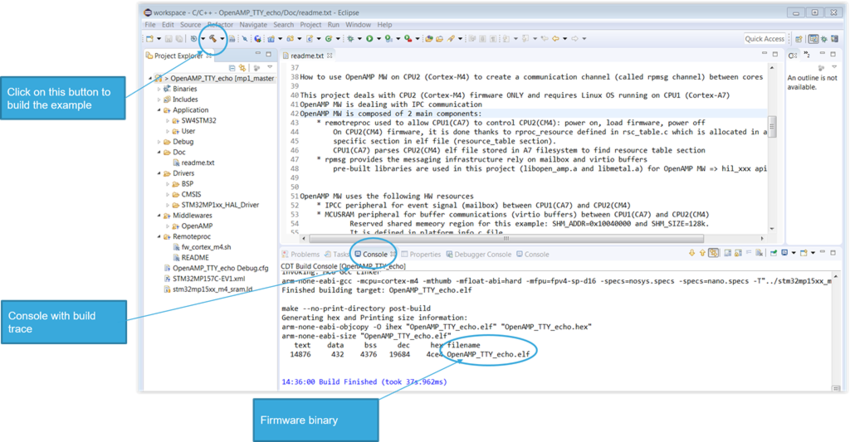
- Click on following button to build the example:
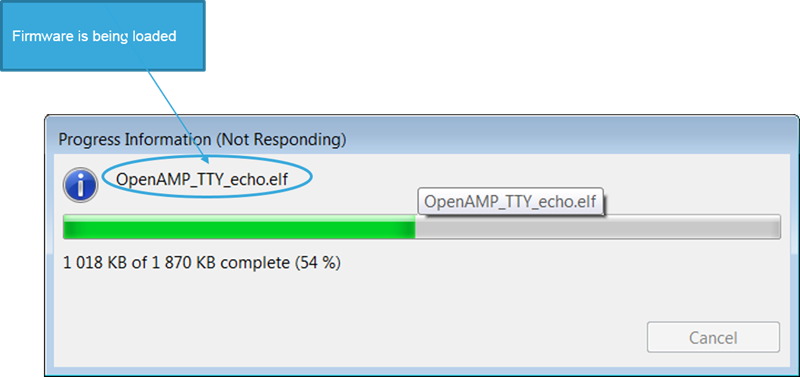
3.2.2. Download and run an example[edit | edit source]
|
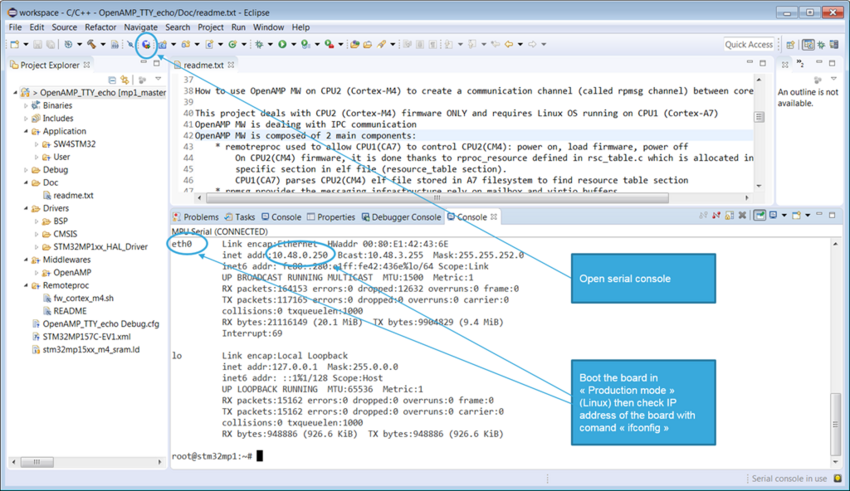
- Open the Serial Console to check the IP address of the board:
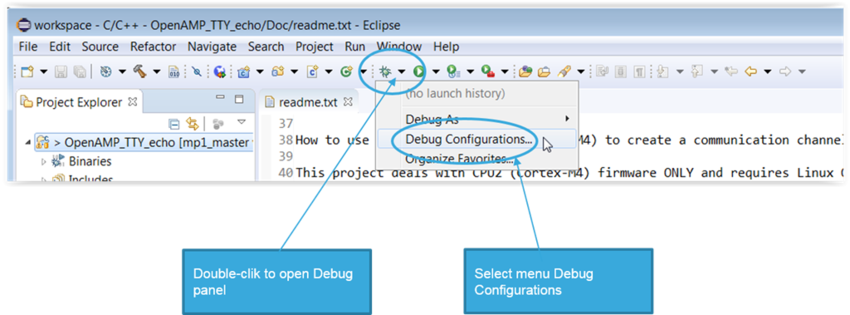
- Open the Debug Configurations panel:
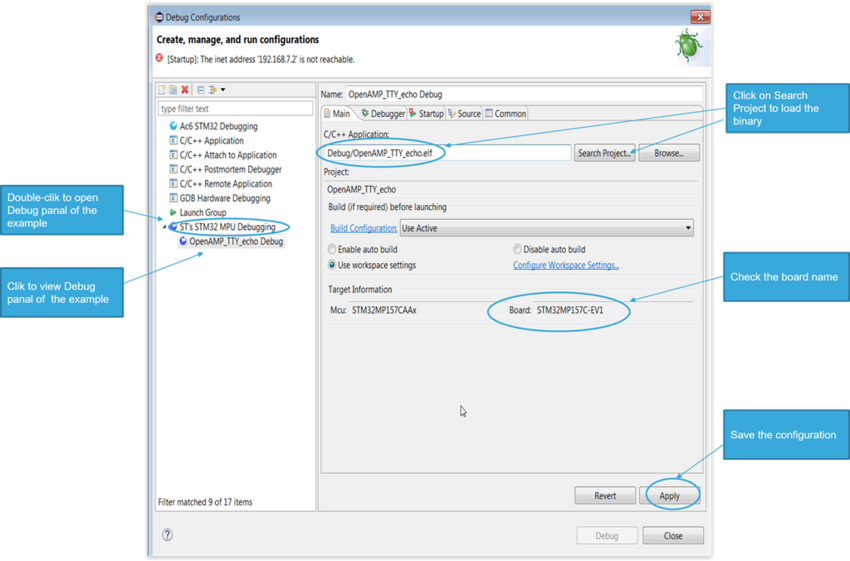
- Configure the Main panel to add the firmware binary:
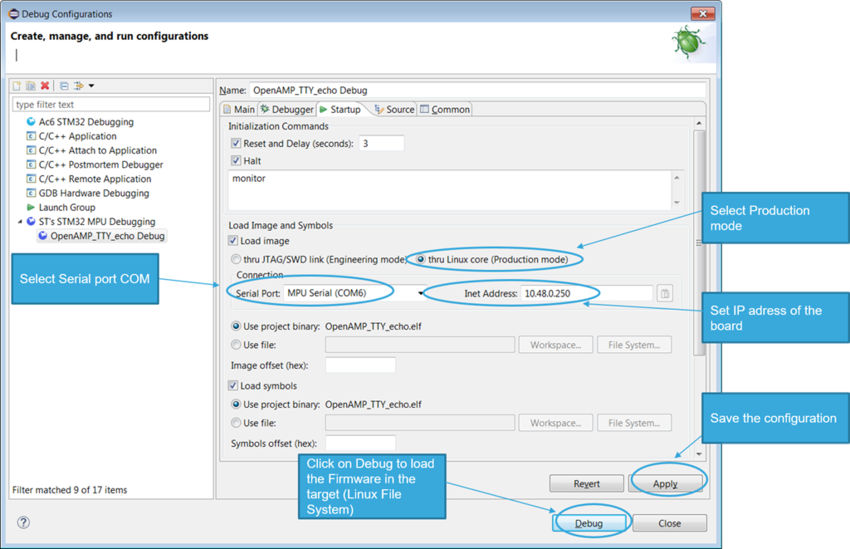
- Configure the Startup panel to load and run the Firmware in the target:
|
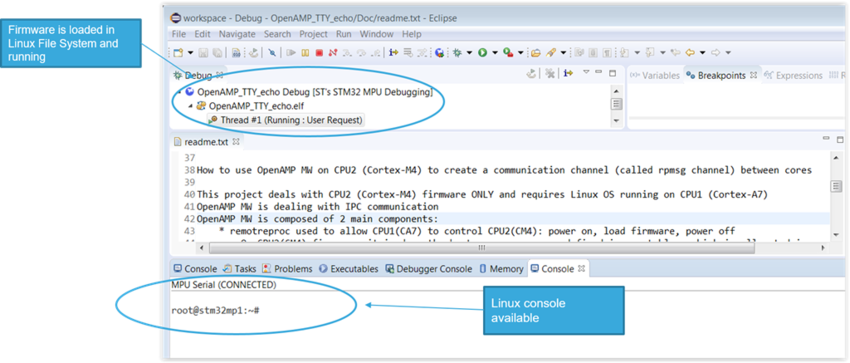
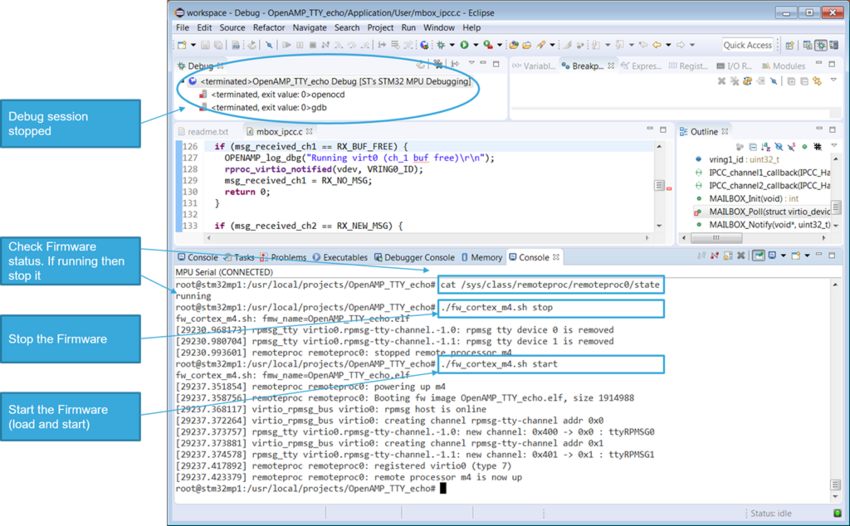
3.2.3. Start/stop an example[edit | edit source]
- Locate path where the firmware has been loaded
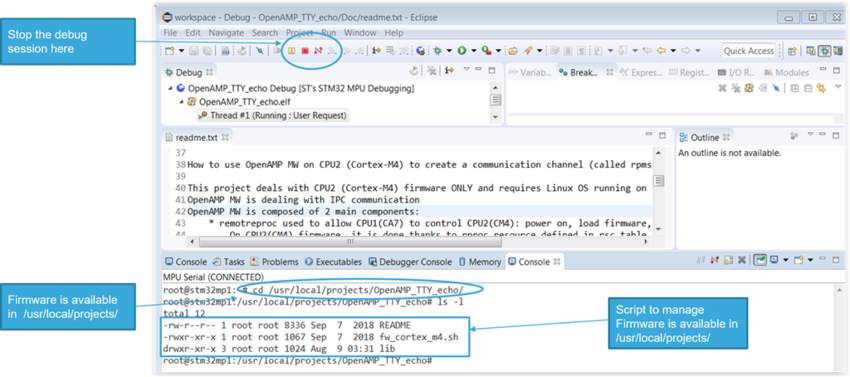
- Use a script to start/stop the firmware
3.3. How to go further with the Developer Package[edit | edit source]
3.3.1. How to develop on Arm® Cortex®-M4[edit | edit source]
Refer to Getting_started/STM32MP1_boards/STM32MP157x-DK2/Develop_on_Arm®_Cortex®-M4 and Getting_started/STM32MP1_boards/STM32MP157x-EV1/Develop_on_Arm®_Cortex®-M4
3.3.2. How to develop an application on Arm® Cortex®-M4 within OpenSTLinux distribution[edit | edit source]
For this use case, production mode must be set (How to use engineering and production modes#Boot_modes).
In How to structure the software to develop STM32Cube examples article, the structure, recommended for an STM32CUbe examples, is described.
3.3.2.1. Create your project for your board[edit | edit source]
A project is board and application specific. To create a new project, you start
- either from the Template project,
- or any available project from Examples or Applications
|
The Template project provides empty main loop function. It is also a good starting point to get familiar with the STM32CubeMP15 project settings.
The Template project has the following characteristics:
- It contains the source code of HAL, CMSIS and BSP drivers which are the minimum components required to develop a code for a given board.
- It contains the include paths for all the firmware components.
- It defines the STM32MP15 supported devices, which defines the CMSIS and HAL driver configuration settings.
- It provides pre-configured user files which are ready-to-use as shown below:
- HAL initialized with default time base with ARM Core SysTick.
- SysTick ISR implemented for delay management purpose (HAL_Delay()).
|
3.3.2.2. Add middleware to your project (optional)[edit | edit source]
Your project may need to support additional middleware. This support is available from these middleware stacks: OpenAMP and FreeRTOS.
Refer to the documentation to understand which middleware source files have to be used.
If you have the experience, it is also possible to look in the application source code to find out which source files and which include paths must be added.
- Applications for board STM32MP157x-EV1
 : Projects/STM32MP157C-EV1/Applications
 - Applications for board STM32MP157x-DK2 : Projects/STM32MP157C-DK2/Applications
3.3.2.3. Configure the firmware components[edit | edit source]
The HAL and middleware components offer a set of build time configuration options using macros #define, declared in a header file. A template configuration file is provided for each component. It has to be copied to the project folder (usually the configuration file is named xxx_conf_template.h, and the word ‘_template’ needs to be removed when copying it to the project folder).
The configuration file provides enough information to understand the impact of each configuration option. More detailed information is available in the documentation provided with each component.
3.3.2.4. Start the HAL Library[edit | edit source]
After jumping to the main program, the application code must call the function HAL_Init() to initialize the HAL Library. It includes the following tasks:
a) Configuration of the SysTick to generate an interrupt every 1 millisecond with the SysTick interrupt priority TICK_INT_PRIO defined in the file stm32mp1xx_hal_conf.h.
- In engineering mode, the SysTick clock is not configured and so the system is running from the internal 64 MHz HSI.
- In production mode, the SysTick clock is already configured by FSBL running on Arm® Cortex®-A7.
b) Set NVIC Group Priority to 0.
c) Call to the HAL_MspInit() function defined in the stm32mp1xx_hal_msp.c user file performs global low-level hardware initializations like HSEM clock enable.
3.3.2.5. Configure the system clock (engineering mode only)[edit | edit source]
The system clock configuration is done by calling the two APIs described below:
a) HAL_RCC_OscConfig(): this API configures the internal and/or external oscillators, as well as the PLL source and factors. The user chooses to configure either one oscillator or all oscillators. The PLL configuration can be skipped if there is no need to run the system at high frequency.
b) HAL_RCC_ClockConfig(): this API configures the system clock source and bus prescalers
3.3.2.6. Initialize the peripheral[edit | edit source]
a) Edit the file stm32mp1xx_hal_msp.c to write to the peripheral HAL_PPP_MspInit() function. Proceed as follows:
- Enable the peripheral clock.
- Configure the peripheral GPIOs.
- Configure the DMA channel and enable DMA interrupt (if needed).
- Enable peripheral interrupt (if needed).
b) Edit the stm32xxx_it.c file to call on the required interrupt handlers (peripheral and DMA), if needed.
c) Write process complete callback functions if you plan to use peripheral interrupt or DMA.
d) In the main.c file, initialize the peripheral handler structure then call the function HAL_PPP_Init() to initialize your peripheral.
3.3.2.7. Develop your application[edit | edit source]
At this stage, your system is ready and you can start developing your application code.
- The HAL provides intuitive and ready-to-use APIs to configure the peripheral. It supports polling, interrupts and a DMA programming model, to accommodate any application requirement.
- For more details on how to use each peripheral and how to manage real-time constraints, refer to the full set of examples and applications provided in the STM32CubeMP1 Package (List of available projects)
4. Distribution Package for STM32CubeMP15[edit | edit source]
The Linux Yocto-based distribution package (STM32MPU Distribution Package) integrates the STM32CubeMP15 Package source code in a dedicated recipe in the OpenSTLinux distribution. It allows to build all the examples provided in the STM32CubeMP15 Package and generates a Linux Yocto-based embedded software in which all examples (firmware) are integrated in the Linux file system.
This chapter and its sub-chapters aim to explain all steps needed to run an existing example using the Distribution Package. Once done, you can jump to the chapter #How to go further with the Distribution Package to enhance your experience with the STM32CubeMP1 Distribution Package.
4.1. Distribution Package prerequisites[edit | edit source]
- OpenSTLinux Distribution Package article gives further information about the OpenSTLinux distribution.
- Installing the OpenSTLinux distribution article explains how to install and initialize the OpenSTLinux environment.
Refer also to
- STM32 MPU OpenSTLinux layer article for further information about the dedicated M4 project recipe (named m4projects-stm32mp1)
- OpenEmbedded_-_devtool article for further information related to devtool largely used in these chapters.
4.2. m4projects recipe[edit | edit source]
All M4 firmware (Examples) are provided inside a dedicated recipe named m4projects in the OpenSTLinux distribution
Find below the OpenSTLinux and M4projects structure:
- OpenSTLinux structure :
openstlinux-<release_version>        OpenSTLinux distribution
├── layers/meta-openembedded                Collection of layers for the OpenEmbedded-Core universe (OpenEmbedded standard)
├── layers/meta-qt5                         QT5 layer for OpenEmbedded (standard)
├── layers/meta-st
│   ├── meta-st-openstlinux          STMicroelectronics layer that contains the frameworks and images settings for the OpenSTLinux distribution
│   ├── meta-st-stm32mp              STMicroelectronics layer that contains the description of the BSP for the STM32MP1 devices
│   │   ├── recipes-bsp
│   │   │   ├── alsa                 Recipes for ALSA control configuration
│   │   │   ├── drivers              Recipes for Vivante GCNANO GPU kernel drivers
│   │   │   ├── trusted-firmware-a   Recipes for TF-A
│   │   │   └── u-boot               Recipes for U-Boot
│   │   ├── recipes-connectivity
│   │   │   └── wifi                 Recipes for Wifi
│   │   ├── recipes-extended
│   │   │   ├── linux-examples       Recipes to manage Linux examples for Cortex-A
│   │   │   ├── m4coredump           Recipes to manage coredump for Cortex-M
│   │   │   └── m4projects           Recipes to manage STM32CubeMP1 Package examples and applications within the OpenSTLinux distribution
│   │   ├── recipes-graphics
│   │   │   ├── gcnano-userland      Recipes for Vivante libraries OpenGL ES, OpenVG and EGL (multi backend)
│   │   │   └── [...]
│   │   ├── recipes-kernel
│   │   │   ├── linux                Recipes for Linux kernel
│   │   │   └── linux-firmware       Recipes for Linux firmwares (example, Bluetooth firmware)
│   │   ├── recipes-security
│   │   │   └── optee                Recipes for OPTEE
│   │   ├── recipes-st
│   │   │   └── images               Recipes for the bootfs and userfs partitions binaries
│   │   └── [...]
│   ├── meta-st-stm32mp-addons       STMicroelectronics layer that helps managing the STM32CubeMX integration
│   └── scripts
│       ├── envsetup.sh              Environment setup script for Distribution Package
│       └── [...]
└── openembedded-core                Core metadata for current versions of OpenEmbedded (standard)
- M4projects structure :
openstlinux-<release_version>        OpenSTLinux distribution
├── layers/meta-st
│   ├── meta-st-stm32mp              STMicroelectronics layer that contains the description of the BSP for the STM32MP1 devices
│   │   ├── recipes-extended
│   │   │   ├── m4projects           Recipes for STM32CubeMP1 Package within the OpenSTLinux distribution
│   │   │   │   ├── files
│   │   │   │   │   ├── Makefile.stm32                    Makefile used to build M4 examples
│   │   │   │   │   ├── parse_project_config.py           Specific parser to retrieve examples names / board names and paths
│   │   │   │   │   ├── st-m4firmware-load-default.sh
│   │   │   │   │   └── st-m4firmware-load.service
│   │   │   │   ├── m4projects.inc                        Definition of rules to be applied to build/install Firmwares and scripts in Linux File System
│   │   │   │   └── m4projects-stm32mp1.bb                List of examples splitted according to supported boards
This recipe is in charge of:
- building all examples and applications listed in m4projects.bb and initially located in Firmware/Projects/<Board_name> from STM32CubeMP1 Package source code
- installing built examples in the Linux File System (/usr/local/Cube-M4-examples/), including all generated firmware binaries (elf files), the script to start/stop the firmware (fw_cortex_m4.sh) and a README file for each example
        /usr/local/Cube-M4-examples/
                     |-- <BOARD_NAME> (ie STM32MP157x-EV1  )
                         |-- <EXAMPLE_TYPE> (ie Examples or Applications)
                            |-- <PROJECT_NAME> (ie OpenAMP_TTY_echo)
                                    |-- fw_cortex_m4.sh
                                    |-- README
                                    |--lib
                                        |--firmware
                                            |-- ELF file for <BOARD_NAME> (ie OpenAMP_TTY_echo.elf)
                     |-- <BOARD_NAME> (ie STM32MP157x-DK2 )
                             ...
4.3. How to get STM32CubeMP1 package software[edit | edit source]
To retrieve the source code, you need to follow the steps described below, once you have initialized and built the OpenSTLinux environment for the first time:
- Go into your workspace
cd openstlinux-<release_version>
- Call devtool with the name of the recipe you want to retrieve (m4projects-stm32mp1), and specify a location in which to load the source code (sources/m4projects-stm32mp1)
devtool modify m4projects-stm32mp1 sources/m4projects-stm32mp1
- Check status
devtool status
NOTE: Starting bitbake server...
m4projects-stm32mp1: <path_to_your_workspace>/sources/m4projects-stm32mp1
- Go in STM32CubeMP1 Firmware source code
cd <path_to_your_workspace>/sources/m4projects-stm32mp1
m4projects-stm32mp1 ├── COPYING ├── Drivers │ ├── BSP │ ├── CMSIS │ └── STM32MP1xx_HAL_Driver ├── _htmresc ├── Middlewares │ └── Third_Party ├── package.xml ├── Projects │ ├── STM32CubeProjectsList.html │ ├── STM32MP157x-DK2
|
4.4. How to develop/modify/build/download an existing example without OpenEmbedded[edit | edit source]
4.5. How to go further with the Distribution Package[edit | edit source]
4.5.1. How to add a new example with OpenEmbedded[edit | edit source]
The list of examples to be included in the Linux File System is defined in the file m4projects-stm32mp1.bb of the recipe m4projects
- go into recipe m4projects
cd <path_to_your_workspace>/layers/meta-st/meta-st-stm32mp/recipes-extended/m4projects
- Edit the file m4projects-stm32mp1.bb and add your new example to be built according to the board you want to use (EVAL/EVx or DISCO/DKx)
PROJECTS_LIST_EVAL = " \
'STM32MP157C-EV1/Examples/ADC/ADC_SingleConversion_TriggerTimer_DMA' \
'STM32MP157C-EV1/Examples/Cortex/CORTEXM_MPU' \
'STM32MP157C-EV1/Examples/CRYP/CRYP_AES_DMA' \
'STM32MP157C-EV1/Examples/CRC/CRC_UserDefinedPolynomial' \
'STM32MP157C-EV1/Examples/DAC/DAC_SimpleConversion' \
'STM32MP157C-EV1/Examples/DMA/DMA_FIFOMode' \
'STM32MP157C-EV1/Examples/GPIO/GPIO_EXTI' \
'STM32MP157C-EV1/Examples/HASH/HASH_SHA224SHA256_DMA' \
'STM32MP157C-EV1/Examples/I2C/I2C_TwoBoards_ComDMA' \
'STM32MP157C-EV1/Examples/I2C/I2C_TwoBoards_ComIT' \
'STM32MP157C-EV1/Examples/PWR/PWR_STOP_CoPro' \
'STM32MP157C-EV1/Examples/QSPI/QSPI_ReadWrite_IT' \
'STM32MP157C-EV1/Examples/SPI/SPI_FullDuplex_ComDMA_Master/' \
'STM32MP157C-EV1/Examples/SPI/SPI_FullDuplex_ComDMA_Slave/' \
'STM32MP157C-EV1/Examples/TIM/TIM_DMABurst' \
'STM32MP157C-EV1/Examples/TIM/TIM_MyFirmware'        <- Adding new example TIM_MyFirmware
'STM32MP157C-EV1/Examples/UART/UART_TwoBoards_ComIT' \
'STM32MP157C-EV1/Examples/UART/UART_Receive_Transmit_Console' \
'STM32MP157C-EV1/Examples/WWDG/WWDG_Example' \
'STM32MP157C-EV1/Applications/FreeRTOS/FreeRTOS_ThreadCreation' \
'STM32MP157C-EV1/Applications/OpenAMP/OpenAMP_Dynamic_ResMgr' \
'STM32MP157C-EV1/Applications/OpenAMP/OpenAMP_raw' \
'STM32MP157C-EV1/Applications/OpenAMP/OpenAMP_TTY_echo' \
'STM32MP157C-EV1/Applications/OpenAMP/OpenAMP_TTY_echo_wakeup' \
'STM32MP157C-EV1/Applications/CoproSync/CoproSync_ShutDown' \
'STM32MP157C-EV1/Demonstrations/AI_Character_Recognition' \
"
PROJECTS_LIST_DISCO = " \
'STM32MP157C-DK2/Examples/ADC/ADC_SingleConversion_TriggerTimer_DMA' \
'STM32MP157C-DK2/Examples/Cortex/CORTEXM_MPU' \
'STM32MP157C-DK2/Examples/CRYP/CRYP_AES_DMA' \
'STM32MP157C-DK2/Examples/CRC/CRC_UserDefinedPolynomial' \
'STM32MP157C-DK2/Examples/DMA/DMA_FIFOMode' \
'STM32MP157C-DK2/Examples/GPIO/GPIO_EXTI' \
'STM32MP157C-DK2/Examples/HASH/HASH_SHA224SHA256_DMA' \
'STM32MP157C-DK2/Examples/I2C/I2C_TwoBoards_ComIT' \
'STM32MP157C-DK2/Examples/LPTIM/LPTIM_PulseCounter' \
'STM32MP157C-DK2/Examples/PWR/PWR_STOP_CoPro' \
'STM32MP157C-DK2/Examples/SPI/SPI_FullDuplex_ComDMA_Master' \
'STM32MP157C-DK2/Examples/SPI/SPI_FullDuplex_ComDMA_Slave' \
'STM32MP157C-DK2/Examples/SPI/SPI_FullDuplex_ComIT_Master' \
'STM32MP157C-DK2/Examples/SPI/SPI_FullDuplex_ComIT_Slave' \
'STM32MP157C-DK2/Examples/TIM/TIM_DMABurst' \
'STM32MP157C-DK2/Examples/UART/UART_TwoBoards_ComDMA' \
'STM32MP157C-DK2/Examples/UART/UART_TwoBoards_ComIT' \
'STM32MP157C-DK2/Examples/UART/UART_Receive_Transmit_Console' \
'STM32MP157C-DK2/Examples/WWDG/WWDG_Example' \
'STM32MP157C-DK2/Applications/FreeRTOS/FreeRTOS_ThreadCreation' \
'STM32MP157C-DK2/Applications/OpenAMP/OpenAMP_raw' \
'STM32MP157C-DK2/Applications/OpenAMP/OpenAMP_TTY_echo' \
'STM32MP157C-DK2/Applications/OpenAMP/OpenAMP_TTY_echo_wakeup' \
'STM32MP157C-DK2/Applications/CoproSync/CoproSync_ShutDown' \
'STM32MP157C-DK2/Demonstrations/AI_Character_Recognition' \
"
4.5.2. How to rebuild the examples with OpenEmbedded[edit | edit source]
If you need to provide a new software Linux image with a Linux file system updated with your changes, follow the instructions below:
- Make your changes in STM32MP1 Firmware source code (in <path_to_your_workspace>/sources/m4projects-stm32mp1/stm32cube_fw_mp1)
- Go to the build folder
cd <path_to_your_workspace>/build-<name_of_distro>
- Clean the m4projects build folder
bitbake m4projects-stm32mp1 -f -c cleanall
- Rebuild the recipe m4projects
bitbake m4projects-stm32mp1
- Rebuild the image
bitbake st-image-weston
4.5.3. How to download an image[edit | edit source]
- Refer to Flashing the built image to obtain all information on how to Flash a new image on the STM32MP1 board.
Arm® is a registered trademark of Arm Limited (or its subsidiaries) in the US and/or elsewhere. ![]()
Arm® is a registered trademark of Arm Limited (or its subsidiaries) in the US and/or elsewhere. ![]()