This article explains some of the basics of STM32CubeIDE support for STM32 MPU. STM32CubeIDE is an all-in-one multi-OS development tool, which is part of the STM32Cube ecosystem.
For more information about STM32CubeIDE, refer to its user guide.
1. STM32CubeIDE purpose[edit | edit source]
STM32CubeIDE is an advanced C/C++ development platform with peripheral configuration, code generation, code compilation, and debug features for STM32 microcontrollers and microprocessors. It is based on the Eclipse®/CDT framework, GCC toolchain for the development and GDB for the debugging.
It allows the integration of the hundreds of existing plugins that complete the features of the Eclipse® IDE. STM32CubeIDE integrates all STM32CubeMX functionalities to offer all-in-one tool experience, and save installation and development time.
With STM32CubeIDE, you can
- select the appropriate STM32 device corresponding to your needs
- configure the device using STM32CubeMX
- develop and debug applications on top of Arm® Cortex®-M
2. How to install STM32CubeIDE[edit | edit source]
STM32 MPU support, inside STM32CubeIDE, is available on Linux® and Windows® host PCs, but it is NOT on macOS®.
| STM32CubeIDE for Linux® host PC | STM32CubeIDE for Windows® host PC | |
|---|---|---|
| Download |
Version 1.19.0
|
Version 1.19.0
|
| Installation guide | ||
| User manual | ||
| Detailed release note |
| |
| Errata |
| |
Minor releases may be available from the update site. Check chapter 10 in (UM2609) for more information on how to update STM32CubeIDE.
3. How to get started with STM32CubeIDE[edit | edit source]
This section links to two different how to articles depending on whether you are migrating from SW4STM32 to STM32CubeIDE or starting a new project with STM32CubeIDE.
3.1. How to get started with STM32CubeIDE from scratch[edit | edit source]
How to get started with STM32CubeIDE from scratch.
3.2. How to migrate from SW4STM32 to STM32CubeIDE[edit | edit source]
How to move from SW4STM32 to STM32CubeIDE.
4. Project structure[edit | edit source]
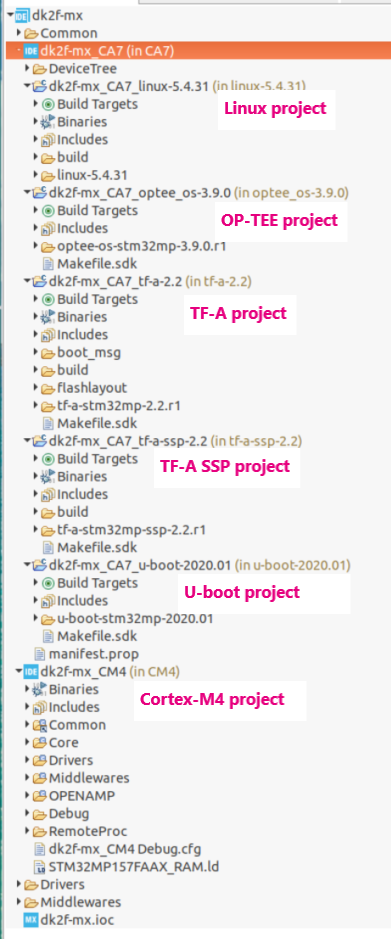
A hierarchical project structure is created together with the creation of an STM32 MPU project.
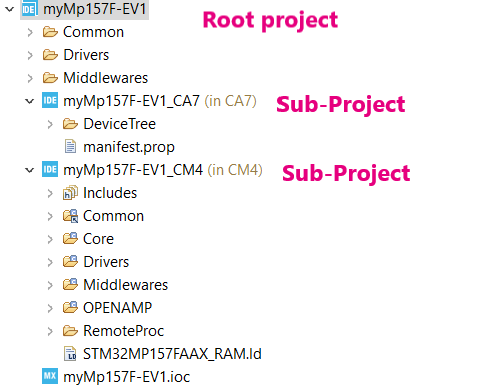
The project structure for single-core projects is flat. On the contrary, in a multi-core project, the hierarchical project structure is used. When the user creates or imports an STM32 MPU project, its structure is made of one root project together with sub-projects, referred to as STM32 MCU projects, for each core. A hierarchical structure example is shown below.
5. Arm® Cortex®-M debug on STM32 MPU device[edit | edit source]
Two modes are used to debug Arm® Cortex®-M firmware on STM32 MPU devices.
5.1. Engineering mode (STM32MP1 only)[edit | edit source]
Very powerful to debug preliminary Arm® Cortex®-M, the engineering mode implies a specific boot mode: the Engineering Boot Mode where only the Cortex®-M is started. Firmware is loaded via JTAG/SWD into its dedicated RAM.
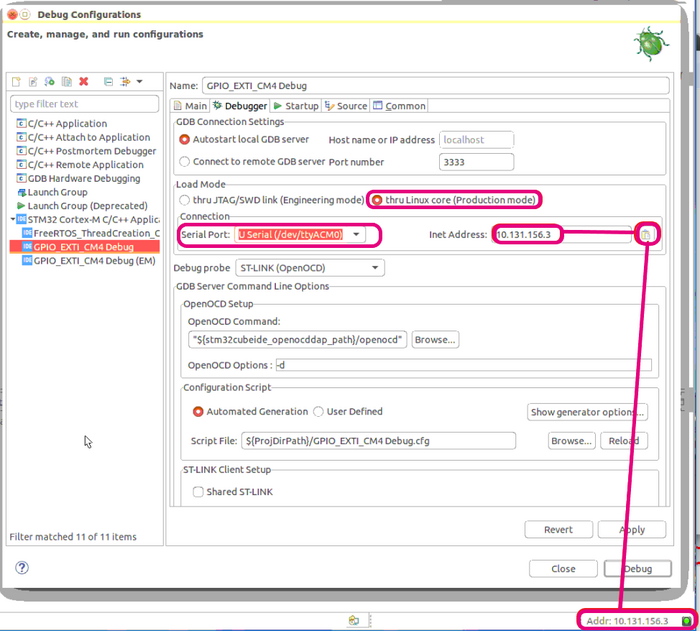
This mode is not the default one. It must be set via the "Debug Configuration" menu, in the "Debugger" tab , with "through JTGA/SWD link (Engineering mode)" option selected.
Debugging in engineering mode in an STM32 MPU device is very similar to a standard STM32 MCU debug in terms of functionality, except that in this case the Arm® Cortex®-M core has only one dedicated memory, no Flash memory type.
5.2. Production mode[edit | edit source]
Production mode targets a debug close to the final product. It means to have an STM32 MPU board up and running on the Cortex®-A (Linux®) and a Cortex®-M firmware to debug (usually an STM32CubeIDE project).
The board, also named "target", is booted in the production mode from the Flash memory (the SD card); it is connected to the Host:
- via the Ethernet network, using an Ethernet cable or dedicated USB cable
- and via a USB cable to the ST-LINK probe, giving access to the JTAG/SWD and Linux® console
ST-LINK automatically brings support for Cortex®-A Linux® console via VCP (Virtual COM port). This enables the Target Status widget, visible on the bottom-right of STM32CubeIDE, allowing target IP address discovery. For production mode setup, it is recommended to get the target IP address discovered by the Target Status widget before creating the debug configuration. This principle is depicted in the Debug Configuration screenshot below.
Network connection can be set up in two ways:
- Ethernet
- managed network: IP address attributed by DHCP server
- unmanaged network: IP address to be manually configured
- USB
- using the dedicated USB OTG connection for Ethernet point to point.
Debug is performed though the following workflow:
1. The firmware built binary is transferred to the target using the network (SSH protocol), more precisely to the Cortex®-A Linux® file system.
2. Firmware is loaded to Cortex®-M core using the “remoteproc” framework.
3. Finally the debug session is started via the JTAG/SWD connection
The production mode is the default one when you create a new debug configuration. It is automatically set via the "Debug Configuration" menu.
More information on how to use STM32CubeIDE target status are given in articleHow to use the Target Status widget in STM32CubeIDE.
At debug launch, some specific pop-up appear:
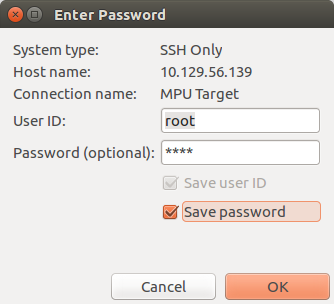
- The SSH Password must be completed: the default one is root.
- The RSA key must be approved.
Defining an Arm® Cortex®-M project in an STM32 MPU context also means to define where are downloaded in the Arm® Cortex®-A Linux® file system:
- the Cortex®-M firmware: <ProjectName>.elf
- the load/unload script fw_cortex_m4.sh used by the STM32CubeIDE if present it can be customized
- and a README, informing a user having a direct connection onto the target.
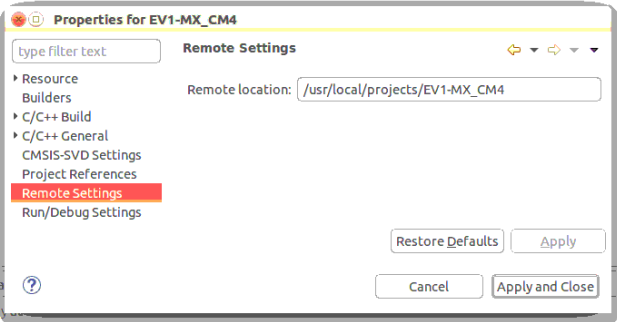
This is the purpose of "Remote Path Setting" property which is linked to the project. Its default value at creation is /usr/local/project/<ProjectName>, but can also be changed using the Remote Settings properties item.
Inside project structure,directory "<ProjectName>_CM4/Core/RemoteProc/" defines the tree downloaded when debugging in the production mode.
Note: load script mechanism described above is NOT supported with STM32MP2 (RemoteProc/ shall not be present).
5.3. Secure Project (STM32MP2 only)[edit | edit source]
On STM32MP2 Arm® Cortex®-M33 supports secure project, please refer to How to build and debug secure project on STM32MP25 co-processor in STM32CubeIDE.
5.4. ST-LINK sharing support[edit | edit source]
From STM32CubeIDE v1.2.0, it is possible to connect to an ST-LINK probe several applications, in parallel of openOCD. This support relies onto 'ST-Link Server'.
It is enabled by checking Shared ST-Link inside "Debug Configuration > Debugger > ST-Link Client Setup".
6. OpenSTLinux project support - Cortex®-A[edit | edit source]
From release 1.4.0 on Linux® host ONLY, STM32CubeIDE supports OpenSTLinux projects and its associated Yocto Project® SDK. In the release 1.17.0 of STM32CubeIDE:
- Yocto Project® SDK is referenced, pointing to an installation directory. Refer to STM32MPU_Developer_Package#Installing_the_SDK for local install.
- OpenSTLinux projects are first installed - see STM32MPU Developer Package - and imported inside STM32CubeIDE hierarchical project thanks to dedicated Eclipse® plugin to be installed.
A contextual menu is available selecting the Cortex®-A sub-project (named <project-name>_CA7 on STM32MP1, <projet-name>_CA35 on STM32MP2):
- "Setup OpenSTLinux" - in charge of Yocto Project® SDK set-up and OpenSTLinux Eclipse® plugin installation
- "Import an OpenSTLinux Project..." - allowing to import one OpenSTLinux inside selected STM32Cube project
Note that Yocto Project ® SDK set-up can also be made from "Window > Preferences" menu selecting "OpenSTLinux SDK Manager" menu from "STM32Cube" preferences.
It exists two flavors for OpenSTLinux plugins:
- STM32MP1 source support plugin requiring 32-bit Yocto Project® SDK
- STM32MP2 source support plugin requiring 64-bit Yocto Project® SDK
These Eclipse® plugins allow to easily import OpenSTLinux projects.
Note that a minimum disk space of 5 GBytes is needed under /tmp during the installation phase.
6.1. How to install Yocto Project® SDK in STM32CubeIDE[edit | edit source]
We focus in the article How to install the Yocto Project SDK in STM32CubeIDE on how to point to an already existing SDK installation.
6.2. How to manage OpenSTLinux projects[edit | edit source]
All projects from OpenSTLinux can be imported inside STM32CubeIDE are available for compilation with Yocto Project® SDK.
Regarding project structure, these OpenSTLinux projects enrich the Cortex®-A part as depicted hereafter. Note that this support is starting from OpenSTLinux v2.0.
6.3. How to debug a user space application[edit | edit source]
Release 1.6.0 provides support for creating, building and debugging projects aiming to run into the Linux® user space of STM32 MPUs. This includes executable, static and shared library.
6.4. How to debug a OP-TEE trusted application[edit | edit source]
Release 1.10.0 provides support for creating, building and debugging projects aiming to run into the Linux® user space of STM32 MPUs with support of secure service thanks to OP-TEE trusted application.
7. STM32MP2 CM33-TD Flavor support[edit | edit source]
Release 1.19.0 provides support for importing, building and debugging projects based onto MCUboot. It is recommended to first read the TF-M overview article.
STM32MP2 project with CM33-TD flavor must be created thanks to stand-alone STM32CubeMX, there is no support inside STM32CubeIDE.
As depicted hereafter, for full support this STM32CubeIDE project needs:
- to be opened in STM32CubeIDE providing:
- Cortex®-M33 non-secure STM32CubeIDE project
- device trees sources for Cortex®-M33 and Cortex®-A35
- TF-M CMake project needs to be imported providing sources for:
- MCUboot
- TF-M
- OpenSTLinux Makefile projects need to be imported providing sources for:
- TF-A
- U-Boot
- OPTEE
- Linux
The following articles address full update for dual and single storage cases
The following articles address full update for dual and single storage cases.
7.1. Dual storage[edit | edit source]
- How to address CM33-TD flavor on STM32MP257x-EV1 Evaluation Board in STM32CubeIDE for dual storage sNOR and SD-Card
7.2. Single storage[edit | edit source]
- How to address CM33-TD flavor on STM32MP215F-DK Discovery kit in STM32CubeIDE for single storage SD-Card
8. Tips & tricks[edit | edit source]
- How to use the Target Status widget in STM32CubeIDE
- How to set up proxy and P2P Ethernet connection with STM32CubeIDE
- How to setup target password in STM32CubeIDE
- How to copy and paste in the STM32CubeIDE console
- How to debug with Serial Wire Viewer tracing on STM32MP15
