1. Article purpose[edit | edit source]
This article explains, step by step, how to run the SSP process from the OEM secret generation till the chip provisioning. An SSP overview is provided here and in AN5510[1]. This example uses the STM32MPUSSP-UTIL and the tools provided by the STM32CubeProgrammer (STM32CubeProg) to execute a complete SSP procedure.
An SSP procedure requires 3 items:
- An SSP payload with OEM secrets to provision
- An HSMv2
- An SSP firmware
2. Prerequisites[edit | edit source]
Download STM32CubeProgrammer (STM32CubeProg), the minimum version required is 2.20.0
2.1. Import STM32MPUSSP-UTIL with STM32CubeProgrammer[edit | edit source]
In STM32CubeProgrammer go to the Secure Programming tab.
Connect an STM32MPU to your computer to unlock the SSP tab.
Click on the "upgrade" button to download the latest release of STM32MPUSSP-UTIL from ST.com.
3. SSP payload[edit | edit source]
The SSP payload is a binary file containing all the secrets the OEM want to provision during the SSP procedure.
The SSP payload is an accumulation of one or several binary SSP section files: OTP secret file and Backup memory file. An SSP payload must include an OTP secret file. Backup memory files are optional in an SSP payload.
The supported SSP section files in an SSP payload depends on the SSP firmware used for each STM32MPU:
The SSP firmware for STM32MP1 series can provision :
- OTPs 24 to 31 : OEM authentication keys HASH (PKH or PKHTH)
- OTP 56 : (RMA[1] password)
- OTPs 59 to 95 : others OEM secrets
The SSP firmware for STM32MP2 series can provision data in :
- Middle and upper OTPs (OEM authentication keys, RMA[1] passwords and others OEM secrets)
- Backup registers (optional)
- Backup SRAM (optional)
3.1. OTP secret file[edit | edit source]
3.1.1. Generating OEM authentication keys[edit | edit source]
The initial keys to generate for STM32 MPUs are the authentication keys. This is the root of trust of the STM32 MPU secure boot.
The HASH of the authentication keys is mandatory to execute the secure boot.
That's why the PKHTH (on STM32MP13xC/F lines ![]() and STM32MP2 series) or PKH (on STM32MP15xC/F lines
and STM32MP2 series) or PKH (on STM32MP15xC/F lines ![]() ) must be installed during the SSP process in their predefined OTP regions.
) must be installed during the SSP process in their predefined OTP regions.
On STM32MP2 series, the PKHTH is loaded in the OTP secret file.
On STM32MP1 series, the PKHTH or PKH are loaded at the last step when generating the SSP payload.
To generate the keys, you can use the KeyGen_tool:
- On STM32MP13xC/F lines
 or STM32MP25xC/F lines :
Example to generate eight ECC key pairs (Prime256v1) using AES_256_cbc encryption:
STM32_KeyGen_CLI -abs /home/user/KeyFolder/ -pwd testkey1 testkey2 testkey3 testkey4 testkey5 testkey6 testkey7 testkey8 -n 8
- On STM32MP15xC/F lines :
Example to generate one ECC key pair (Prime256v1) using AES_256_cbc encryption:
STM32_KeyGen_CLI -abs /home/user/KeyFolder/ -pwd testkey
3.1.2. OTP secret file generation[edit | edit source]
STM32 Trusted Package Creator provides an interface to generate the OTP secret file.
For more details and all the features of the GUI, check the STM32_Trusted Package Creator User Manual[2]
3.1.2.1. Secret file content for STM32MP1 series[edit | edit source]
Click on "Expand", visible on the right side of the page, to view Secret file for STM32MP1 series .
On STM32MP1 series, the secret file includes:
- The RMA password (OTP56) (Mandatory)
- OTPs from 59 to 95 (Optionnal)
On STM32MP1 series, the secret file includes all the OTPs. Not provisioned OTPs are equal to 0. Hence, the secret file size is always (1 + 95 - 59 + 1) * 4 bytes = 152 bytes.
Here is an example of the UI when selecting STM32MP13:

| On STM32MP1 series the words 57 and 58 are reserved for mac_address. |
| On the ST manufactured STM32MP1 series boards, the word 59 is already fused to store the ST board ID. When testing SSP on an STM32 MPU board, the word 59 cannot be used. |
3.1.2.2. Secret file content for STM32MP2 series[edit | edit source]
Click on "Expand", visible on the right side of the page, to view Secret file for STM32MP2 series .
On STM32MP2 series, the secret file include:
- The PKHTH (Mandatory) which is the public key hash table hash file (32 bytes) generated by KeyGen_tool.
- The RMA [3] passwords (Mandatory)
- Others middle and upper OTPs (Optional)
Here is an example of the UI when selecting STM32MP25:
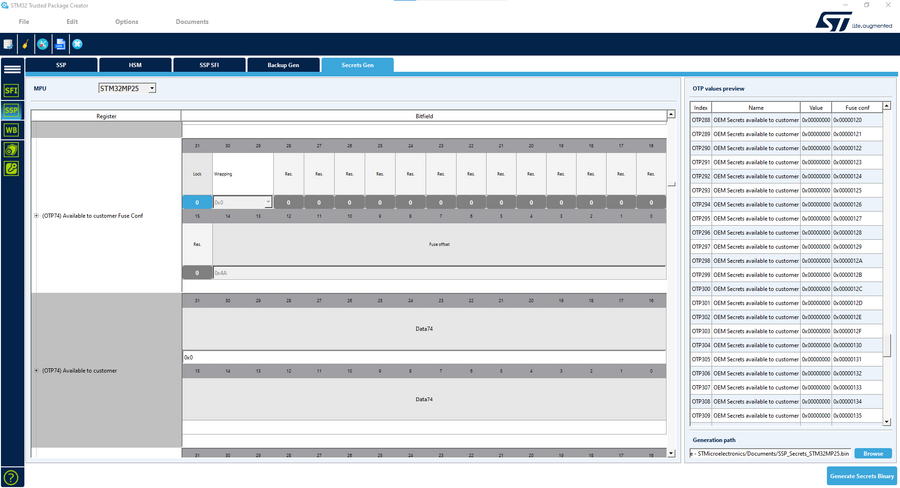
| Remove all unused secret items from TPC GUI before generating the OTP secret file. |
| On the STM32MP2 boards, the word 246 is already fused to store the ST board ID. When testing SSP on an STM32 MPU board, the word 246 cannot be used. |
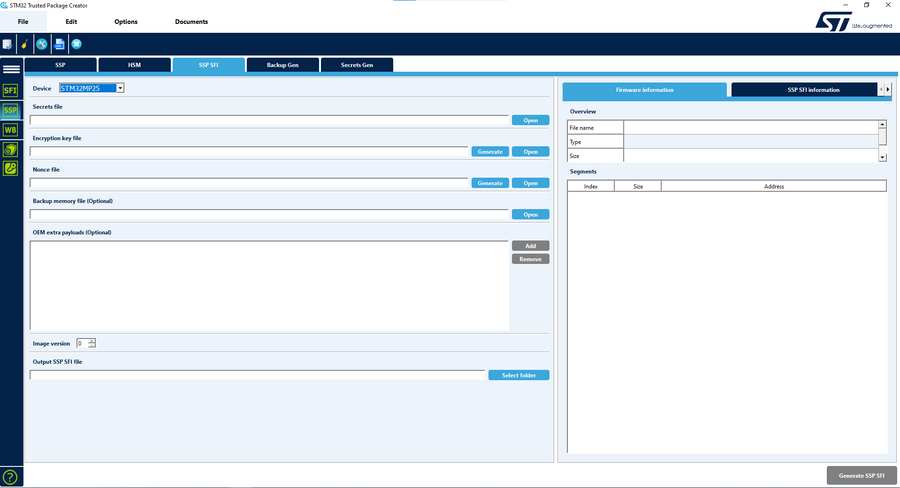
3.2. Backup memory file[edit | edit source]
On STM32MP2 series, the payload file can also include several sections to provision data in battery backed memories such as TAMP backup registers and BKPSRAM.
The provisioning of backed memory regions is only supported on STM32MP2 series.
The STM32 Trusted Package Creator integrates an interface to create the backup memory file: backup-out.bin
The data and offset must be aligned on 32bits.
The base address of the file is registered during the creation of the payload.
The backup file list can be saved to a json file to be imported later.
The following screenshot shows how to create two backup sections to provision the BHK (Backup1) and then write in BKPR12 to BKPR15 a 256bits key wrapped with the BHK (Backup2).

3.2.1. BHK provisioning[edit | edit source]
The BHK is a symmetric encryption key stored in the backup registers.
This key can be used by SAES to wrap keys or encrypt data.
SAES accesses the BHK with an internal hardware bus.
To provision the BHK with the SSP procedure, the user must add a backup memory region with offset 0 in the backup registers (base address is 0x46010100). The region must be locked to enable the hardware to access the BHK.
| In case of the BHK, locking the memory region in the UI sets the bit BHKLOCK in TAMP_SECCFGR |
To be correctly used by SAES, the BHK must be written with the correct format. The format of the BHK is described in SAES key registers in STM32 MPU reference manuals. The GUI of Trusted Package Creator does not allow to select between different format. That's why, the user has to format the input file prior to loading it in the UI.
For example to provision the key from the NIST AES ECB 256b test 0:
FE E8 38 9F ... EF 94 4B E0
The binary given as the input of STM32 Trusted Package Creator must invert the bytes of the key. The first byte of the NIST key (0xFE) must be the last byte of the file:
E0 4B 94 EF ... 9F 38 E8 FE
3.3. Generating the OEM transport key and IV[edit | edit source]
The SSP process uses a symmetric encryption to protect the OEM secrets exchanged with the chip. This encryption/decryption uses an AES encryption scheme using:
- a 128-bit transport key
- a 128-bit nonce value
Both values are provisioned in an HSM and used to generate the SSP payload. During the SSP procedure, they are securely sent to a ST verified chip using a secured transfer flow.
The two values can be directly generated with the STM32 Trusted Package Creator available in STM32CubeProgrammer , which also further manages the secret file encryption with the given key:
Another solution is to prepare both keys using the KeyGen_tool (till version 2.12.0) with the command:
STM32_KeyGen_CLI -rand 16 enc_key.bin
STM32_KeyGen_CLI -rand 16 nonce.bin
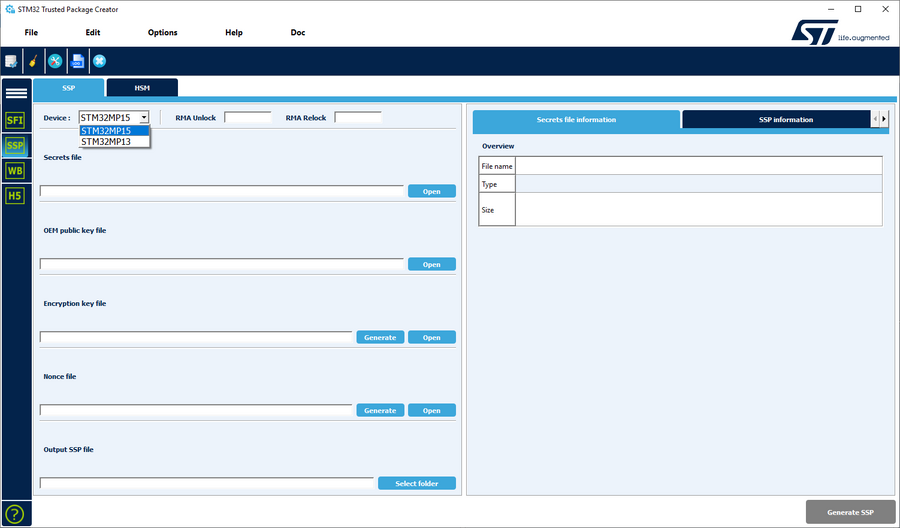
3.4. SSP Payload creation[edit | edit source]
The STM32 Trusted Package Creator is used to encrypt and prepare the payload file used for provisioning.
All the previous generated keys and files must be properly selected in the STM32 Trusted Package Creator interface to generate the final encrypted file (.ssp).
3.4.1. On STM32MP1 series[edit | edit source]
Click on "Expand", visible on the right side of the page, to view Creating SSP payload for STM32MP1 series .
On STM32MP15x lines ![]() , the OEM Public Key must be registered in the interface.
, the OEM Public Key must be registered in the interface.
On STM32MP13x lines ![]() , the OEM Root Public Key Hashes Table Hash must be registered in the interface.
, the OEM Root Public Key Hashes Table Hash must be registered in the interface.
3.4.2. On STM32MP2 series[edit | edit source]
Click on "Expand", visible on the right side of the page, to view Creating SSP payload for STM32MP2 series .
On STM32MP2 series, the OEM Root Public Key Hashes Table Hash and RMA password are already included in the secret file.
Hence, the user does not need to register them on this interface.
The user can also add backup memory files.
The supported base addresses are:
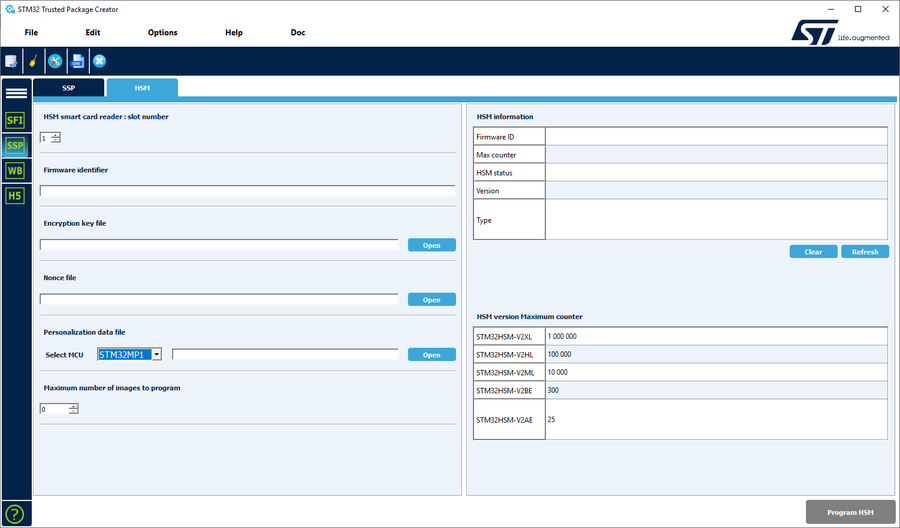
4. HSM provisioning[edit | edit source]
The HSMv2[4] must be provisioned with an encryption key and a nonce.
The STM32 Trusted Package Creator has a dedicated SSP HSM provisioning interface to select:
- the OEM transport key used to encrypt the SSP payload
- the nonce used to encrypt the SSP payload
- the personalization data file (used to identify the chip):
- STM32MP1 for STM32MP1 series
- 5010100D file for STM32MP13xC/F lines rev.Y
- 5000200A file for STM32MP15xC/F lines rev.B & rev.Z
- 5010100D file for STM32MP13xC/F lines
- STM32MP2 for STM32MP2 series
- 5050200E file for STM32MP23xC/F lines and STM32MP25xC/F lines rev.Y
- 5050200E file for STM32MP23xC/F lines
- STM32MP1 for STM32MP1 series
- the maximum number of images to program, which depends also on the HSMv2 used.
5. SSP Firmware management[edit | edit source]
On STM32MPUs, a specific firmware is used to:
- exchange SSP communication with the host,
- burn the OTP in fuses,
- provision battery backed memory (only on STM32MP2 series)
5.1. SSP Firmware for STM32MP1 series[edit | edit source]
On STM32MP1 series, the SSP Firmware is a specific TF-A BL2 that is delivered with each ecosystem version and must be updated regarding the user's board.
It only includes a limited part of the TF-A BL2 scope:
- only serial boot support
- dedicated SSP feature set
The main TF-A firmware is ready for all targets except the board device tree. It must be customized in the same way as for TF-A BL2.
5.1.1. Build TF-A BL2 SSP[edit | edit source]
Because it uses the same firmware, the way of building and configuring the firmware is described in the How_to_configure_TF-A_BL2 page.
The specific part is the following one:
- dedicated flag to enable the SSP part: STM32MP_SSP
- no TRUSTED_BOARD_BOOT enabled to limit the BL2 binary size
Example:
- Command line for the UART mode on STM32MP13xC/F lines using STM32MP135x-DK Discovery kit
 :
:
make ARM_ARCH_MAJOR=7 ARCH=aarch32 PLAT=stm32mp1 STM32MP_UART_PROGRAMMER=1 \
      STM32MP13=1 STM32MP_SSP=1 DTB_FILE_NAME=stm32mp135f-dk.dtb
- Command line for the USB mode on STM32MP15xC/F lines using STM32MP157x-EV1 Evaluation board :
make ARM_ARCH_MAJOR=7 ARCH=aarch32 PLAT=stm32mp1 STM32MP_USB_PROGRAMMER=1 \
      STM32MP15=1 STM32MP_SSP=1 DTB_FILE_NAME=stm32mp157c-ev1.dtb
5.1.2. Signing TF-A BL2 SSP[edit | edit source]
This TF-A BL2 SSP firmware MUST be signed with the OEM authentication key generated at step 1.
The authentication is made by the ROM code using the OEM public key given by the HSM during the process.
This is made in the same way as TF-A BL2 using the Signing_tool.
Example:
STM32_SigningTool_CLI -bin tfa-ssp.stm32 -pubk OEMpublicKey.pem –prvk OEMprivateKey.pem –pwd testkey
5.2. SSP Firmware for STM32MP2 series[edit | edit source]
On STM32MP2 series, STMicroelectronics provides a dedicated ST firmware that is signed and encrypted by ST. It is delivered with STM32MPUSSP-UTIL. This firmware is generic and does not need to be customized by the OEM to be compatible with the design of his board. You need to import the STM32MPUSSP-UTIL in STM32CubeProgrammer to use the SSP firmware with the graphical UI.
| The SSP firmware does not output any log. After a successful procedure the chip is reset. In case of errors, the ROM code's led blink twice fast and once slow. |
6. Production processing[edit | edit source]
At that stage, the following parts are available:
- SSP encrypted secret file
- provisioned HSMv2
- SSP firmware
All that material must be given to the untrusted production to start the SSP process.
6.1. Test case using STM32CubeProgrammer_Cli[edit | edit source]
For an evaluation purpose, STM32CubeProgrammer can be used to test the SSP processing chain.
On the host, the STM32CubeProgrammer must be installed. HSM is plugged into the host smartcard reader. The board is connected, its chip is virgin. The serial boot mode is selected and the power is ON.
The following command can be used for a USB SSP provisioning:
STM32_Programmer_CLI -c port=USB1 -ssp <ssp_file_path> <ssp-fw-path> hsm=1 slot=1
7. SSP: Final state[edit | edit source]
At that stage, the device is provisioned with all the OEM secrets:
- OEM PKH or PKHTH
- OTP secrets
- battery backed memory
The chip is now in the secure close state, the secure boot is mandatory.
Enabling secure boot is the final step to use the chip.
The SSP process cannot be restarted anymore.
8. References[edit | edit source]
Arm® is a registered trademark of Arm Limited (or its subsidiaries) in the US and/or elsewhere. ![]()