This article gives information about how to easily develop a LVGL application on STM32MP1 series using STM32CubeIDE with OpenSTLinux distribution, in Linux context. LVGL library release used for this article is the release 8.1.
You can develop and design your application with squareline tool (see reference "LVGL learning course") and then adapt the project to your board.
1. Architecture overview[edit | edit source]
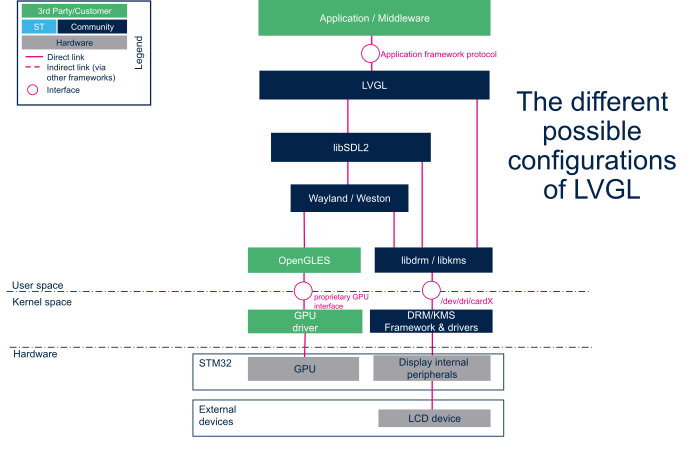
The following diagram summarizes all the configurations of the LVGL library. This article details each of the possible configurations and proposes demonstration usage examples with STM32CubeIDE.
1.1. Components presentation[edit | edit source]
1.1.1. LVGL[edit | edit source]
LVGL (Light and Versatile Graphics Library) is an open-source embedded GUI library that is written in C (with C++ compatibility) and is released under the MIT license. It is optimized for deployment on microcontrollers/microprocessors and bare-metal (no OS) devices. This article explains how to develop LVGL applications for the STM32MP1 microprocessors running with OpenSTLinux Linux® distribution. LVGL release 8.1 is the version used for this article.
1.1.2. SDL2[edit | edit source]
SDL or Simple Direct Media Layer is a cross-platform development library designed to provide low-level access to audio, keyboard, mouse, joystick, and graphics hardware. It allows, for example, the display of windows and images, the playback of sounds, and the management of keyboards.
SDL is written in C, works natively with C++, and there are bindings available for several other languages, including C# and Python™.
SDL 2.0 is distributed under the zlib license. This license allows the use of SDL freely in any software.
1.1.3. Wayland / Weston[edit | edit source]

Wayland is a protocol that allows a composer to communicate with multiple windows. It works only with systems using KMS (Kernel-based mode-setting), a kernel feature dependent on the graphics card driver used. For this reason, a composer must be used.
A composer implementing the Wayland protocol (such as Mutter, Kwin, Enlightenment, Weston, or others) is necessary. Otherwise, Wayland alone performs no operation, and it is always an X server that would be used.
The composer is a window manager, which uses a buffer in memory to manage each window and apply visual effects to it.
Weston is the reference implementation of a graphical composer window manager for the Wayland display protocol. Its existence is justified by the need to develop Wayland without depending on the ups and downs of the development of libraries and environments. It is also justified by the need to be able to rigorously test Wayland without experiencing bugs independent of Wayland.
1.1.4. DRM-KMS[edit | edit source]
For more information about DRM-KMS, refer to the following article: DRM_KMS_overview
1.2. Different configurations[edit | edit source]
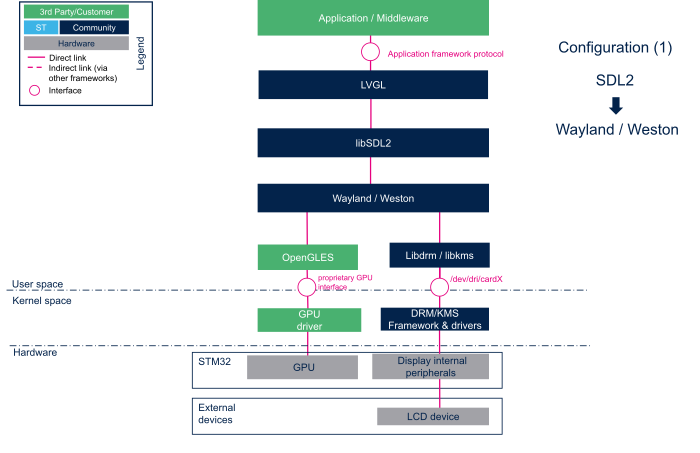
1.2.1. Weston Wayland SDL2 configuration with GPU[edit | edit source]
1.2.2. DRM-KMS / SDL2 configuration with GPU[edit | edit source]

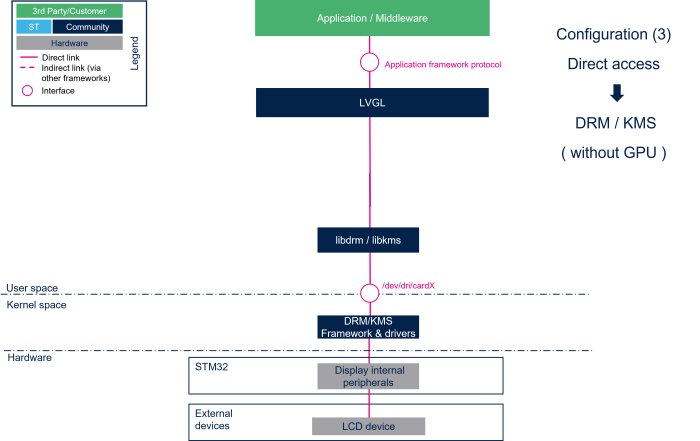
1.2.3. Direct DRM-KMS configuration without GPU[edit | edit source]
2. How to build LVGL project with STM32CubeIDE[edit | edit source]
2.1. Get SDK[edit | edit source]
The SDK provided with the OpenSTLinux Ecosystem release can be used.
To install SDK you can refer to STM32MPU Developer Package#Installing_the_SDK
2.2. Configure STM32CubeIDE with SDK[edit | edit source]
- To be able to use the SDK:
- In STM32CubeIDE, navigate to Window ==>Preferences ==>STM32Cube ==>OpenSTLinux SDK Manager
- Browse and select the directory containing the OpenSTLinux toolchains
- Click on "Apply an close "

Note that this manages the SDKPATH variable.
2.3. Get LVGL project for STM32MP1[edit | edit source]
Open a PC Linux terminal in a new folder.
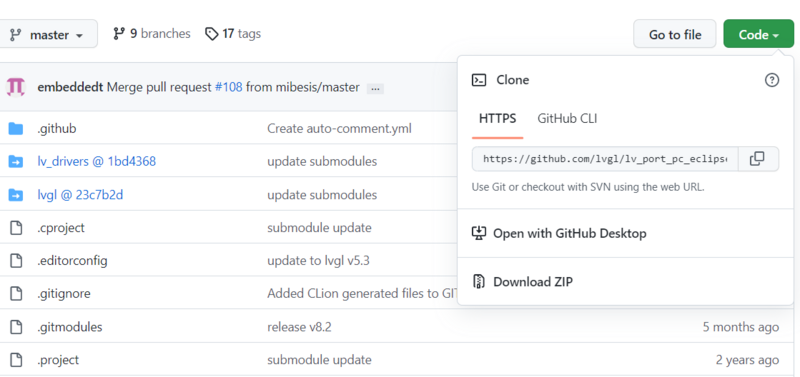
- Download the LVGL project with the following command
- Apply modification for LVGL project for STM32MP1
lvgl_stm32mp_patch.zip [1]
- Rename lv_port_pc_eclipse directory (for instance lv_stm32mp_lvgl)
Section 5 explains how the modifications on the LVGL project for STM32MP1 have been applied for release 8.1.
git clone --recursive https://github.com/lvgl/lv_port_pc_eclipse.git
cd lv_port_pc_eclipse/
git checkout -b WORKING origin/release/v8.1
git submodule init
git submodule update

cd ..
cp -a ./lvgl_stm32mp_patch/* ./lv_port_pc_eclipse/
mv lv_port_pc_eclipse  lv_stm32mp_lvgl
LVGL github project LVGL's GitHub
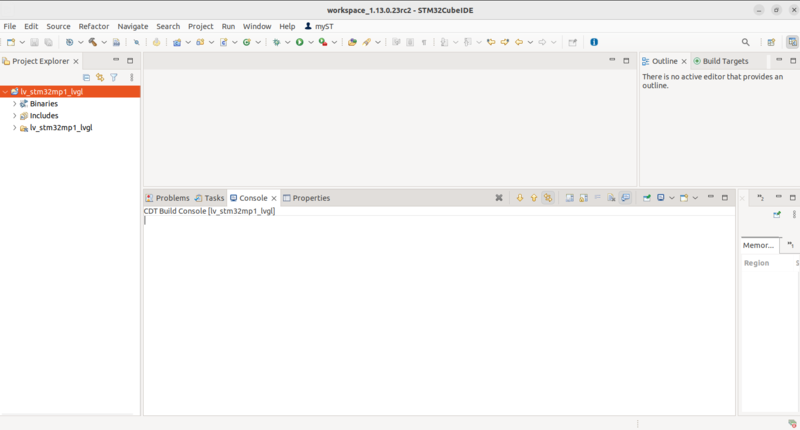
2.4. Import then Configure and Build CMake LVGL project for STM32MP1[edit | edit source]
- Launch STM32CubeIDE
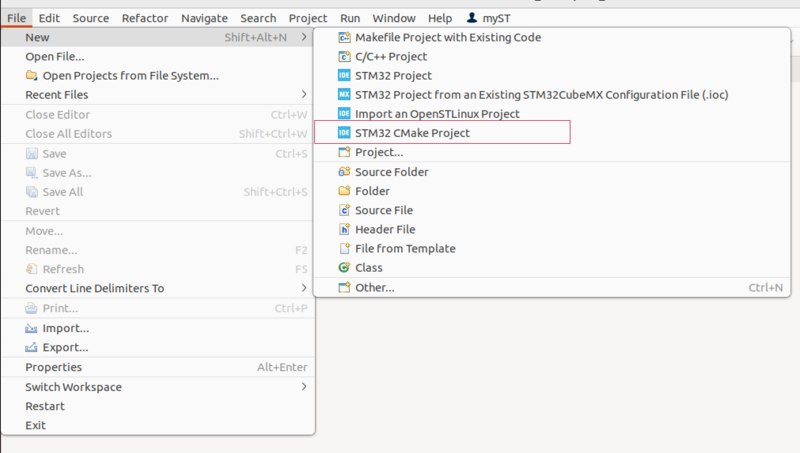
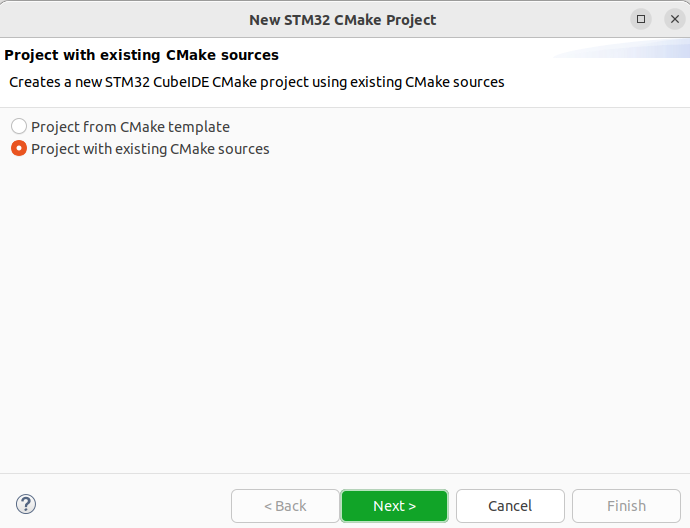
- Import your CMake project:
Click on file ==> New ==> STM32 CMake project upload your LVGL project.
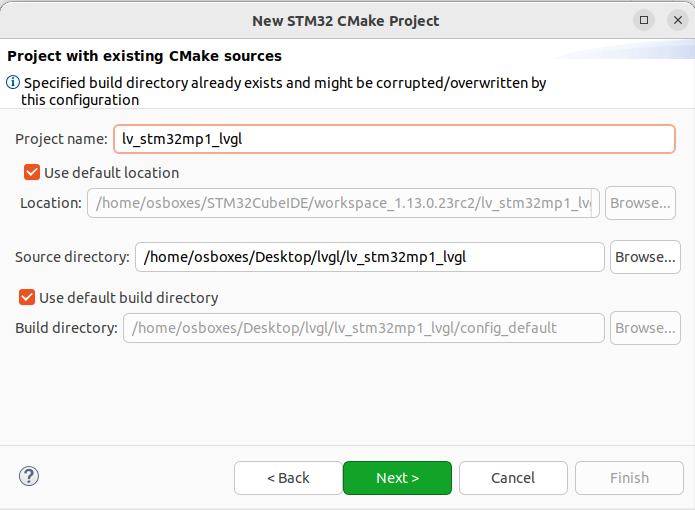
- Select source directory:
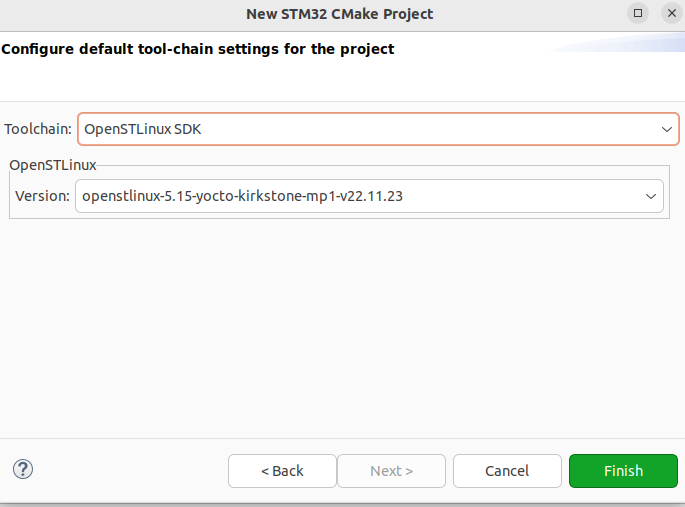
- Select the toolchain for OpenSTLinuxSDK
- Activate your LVGL STM32MP1 configuration for your board
modify CMakeLists.txt for your configuration
configuration 1
option(STM32MP_LVGL_WAYLAND_SDL2_GPU BOOLEAN ON)
option(STM32MP_LVGL_DRM_KMS_SDL2_GPU BOOLEAN OFF)
option(STM32MP_LVGL_DIRECT_DRM_KMS_NOGPU BOOLEAN OFF)
configuration 2
option(STM32MP_LVGL_WAYLAND_SDL2_GPU BOOLEAN OFF)
option(STM32MP_LVGL_DRM_KMS_SDL2_GPU BOOLEAN ON)
option(STM32MP_LVGL_DIRECT_DRM_KMS_NOGPU BOOLEAN OFF)
configuration 3
option(STM32MP_LVGL_WAYLAND_SDL2_GPU BOOLEAN OFF)
option(STM32MP_LVGL_DRM_KMS_SDL2_GPU BOOLEAN OFF)
option(STM32MP_LVGL_DIRECT_DRM_KMS_NOGPU BOOLEAN ON)
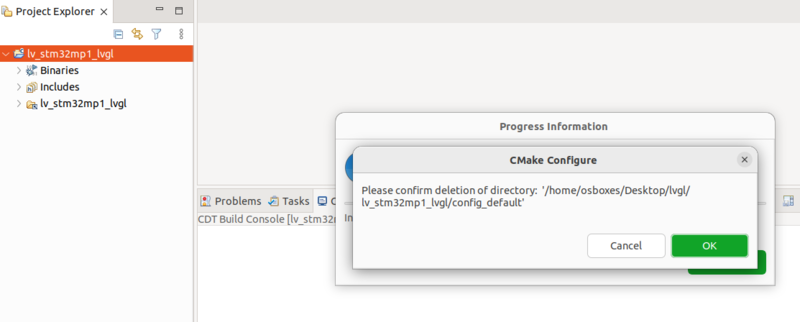
- CMake Configure
Select project ==> right click ==> CMake Configure
Delete and Reconfigure

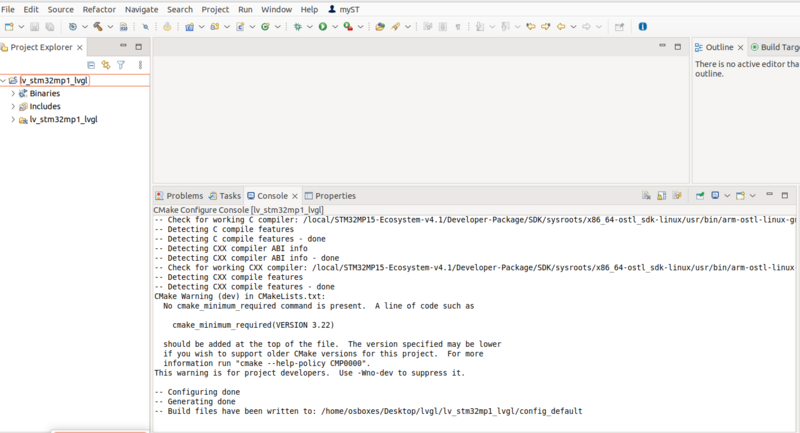
- Build the project with the generated Makefile
3. Run the demonstration[edit | edit source]
You must build the binary for your configuration.
- Build the project:
Right-click on your project ==> Build project
- You can then run the binary with STM32CubeIDE using "C/C++ Remote Application" run configuration.
it is also possible to run it manually as follows:
- Find the binary file in your project (folder "config_default" binary name "main") .
- Setup a terminal on the board.
minicom -D /dev/ttyACM0
- To get the IP address of your target, type the following commands:
ifconfig
...
eth1      Link encap:Ethernet  HWaddr 10:E7:7A:E3:47:C8
         inet addr:10.48.1.145  Bcast:10.48.3.255  Mask:255.255.252.0
         inet6 addr: fe80::12e7:7aff:fee3:47c8/64 Scope:Link
inet is the ip address of your target
or
ip addr
 ...
3: eth1: <BROADCAST,MULTICAST,UP,LOWER_UP> mtu 1500 qdisc mq state UP group default qlen 1000
   link/ether 10:e7:7a:e3:47:c8 brd ff:ff:ff:ff:ff:ff
   inet 10.48.1.145/22 metric 10 brd 10.48.3.255 scope global dynamic eth1
- Copy the binary to the board using the following command:
scp <name_of_your_binary> root@<IP_address>:/usr/local/
To force binary writing onto the SD™ card:
sync
3.1. Run your binary with SDL2 configuration (configuration 1 and 2)[edit | edit source]
For using SDL, you must indicate to SDL2 library which backend to use: here wayland or kmsdrm.
- In configuration 1: Weston Wayland SDL2 configuration with GPU
The environment variable for SDK2 videodriver must be set to Wayland. The binary must be executed with Weston permission:
su -l weston -c "SDL_VIDEODRIVER=wayland /usr/local/<name_of_your_binary >"
To kill the binary execution:
CTRL + c
- In configuration 2: DRM-KMS / SDL2 configuration with GPU
For this configuration, you MUST stop the Weston service before running your binary (refer to How to stop and start Weston):
systemctl stop weston-graphical-session.service
export SDL_VIDEODRIVER=kmsdrm
To run the binary:
/usr/local/<name_of_your_binary >
To kill the current project:
CTRL + c
3.2. Run your binary in direct DRM-KMS configuration (configuration 3)[edit | edit source]
To run the binary you MUST stop the Weston service before running your binary (refer to How to stop and start Weston)):
systemctl stop weston-graphical-session.service
/usr/local/<name_of_your_binary >
To kill the current project:
CTRL + c
3.3. Summary[edit | edit source]
As a summary, to run the different configurations:
- In configuration 1: Weston Wayland SDL2 configuration with GPU
su -l weston
export SDL_VIDEODRIVER=wayland
<path to binary>/<name_of_your_binary >
- In configuration 2: DRM-KMS / SDL2 configuration with GPU
systemctl stop weston-graphical-session.service
export SDL_VIDEODRIVER=kmsdrm
<path to binary>/<name_of_your_binary>
- In configuration 3: direct DRM-KMS
systemctl stop weston-graphical-session.service
<path to binary>/<name_of_your_binary >
4. Debugging the demonstration[edit | edit source]
This section shows how to debug with STM32CubeIDE.
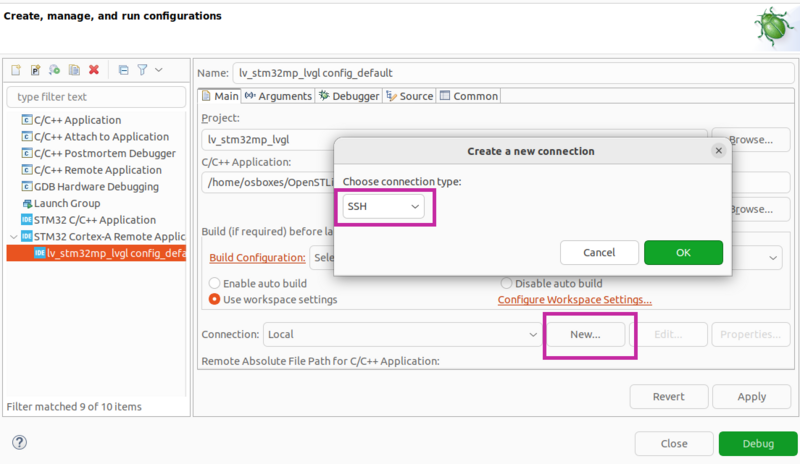
Create a debug configuration
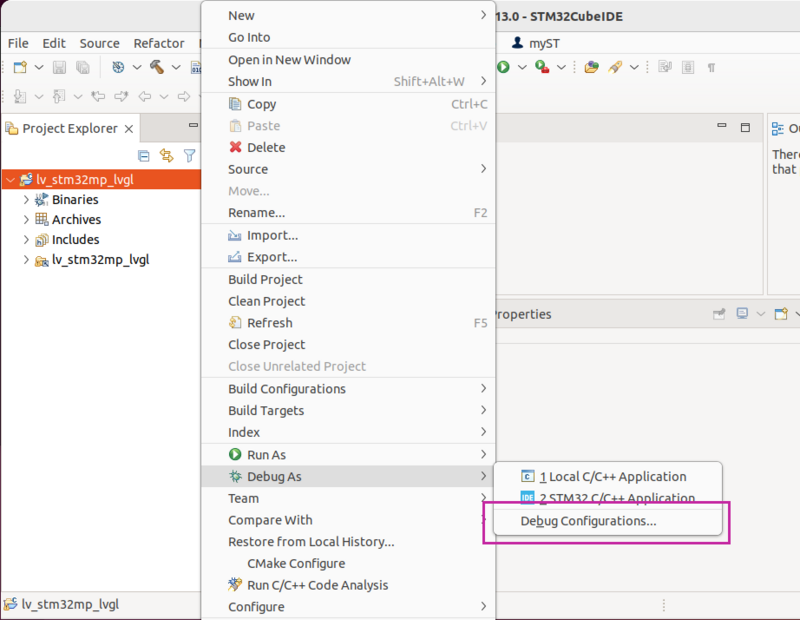
Select STM32 Cortex-A Remote Application for debug configuration.

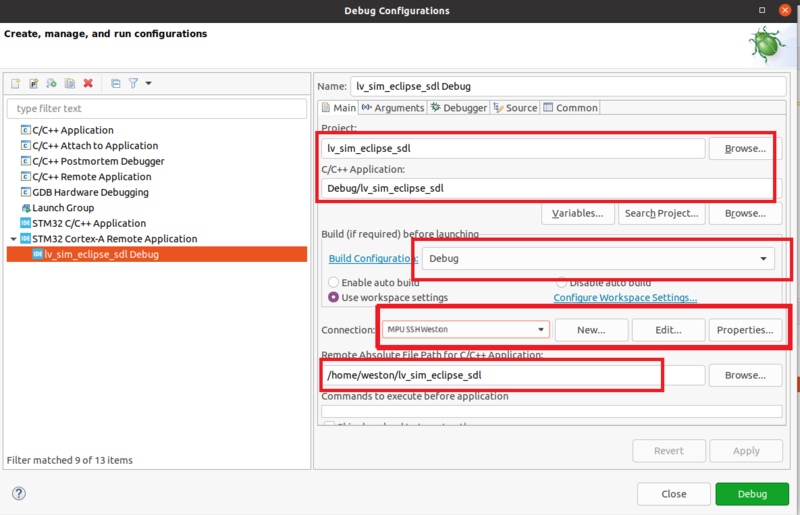
In main tab
- Set the project name and path
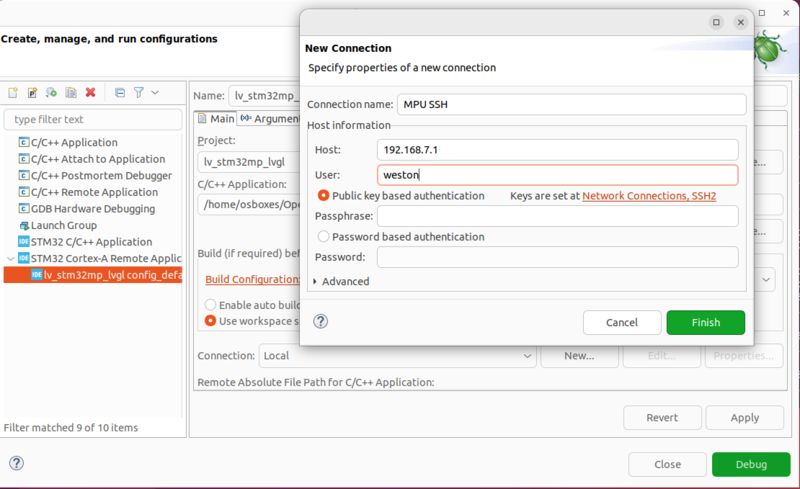
- Configure the MPU SSH Weston connection
- Configure Remote Absolute Path
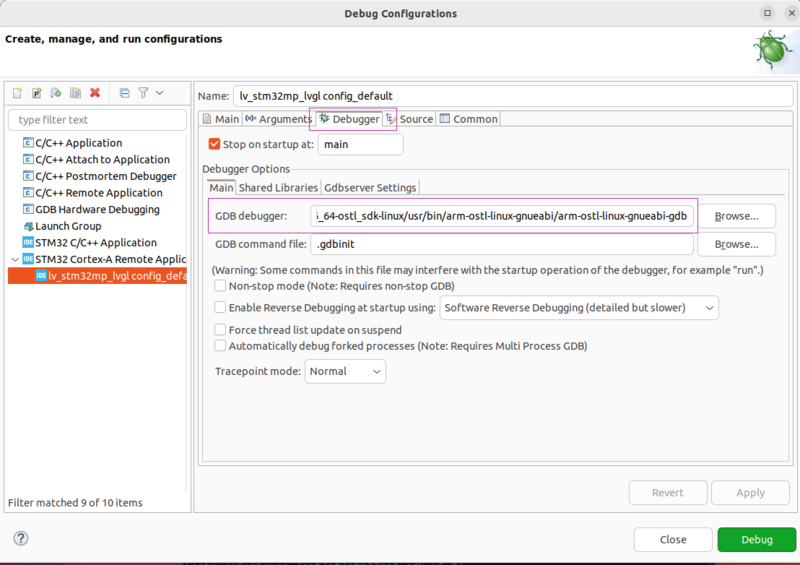
In debug tab
Set GDBdebugger from SDK path to
<...>/sysroots/x86_64-ostl_sdk-linux/usr/bin/arm-ostl-linux-gnueabi/arm-ostl-linux-gnueabi-gdb
Follow these wiki articles:
- How_to_debug_a_user_space_application_with_STM32CubeIDE/User_space_project#Prepare Debug Configuration
- How_to_debug_a_user_space_application_with_STM32CubeIDE/User_space_project#Set Debug Configuration
- How_to_debug_a_user_space_application_with_STM32CubeIDE/User_space_project#Debug
5. Summary of modifications on LVGL project for STM32MP1[edit | edit source]
Find below how the modifications are applied to the LVGL project. The changes are already applied when copying lvgl_stm32mp_patch to lvgl project (release 8.1) in 2.3 Get LVGL project for STM32MP1.
5.1. Modifications on LVGL project (common for all configurations)[edit | edit source]
To adapt LVGL to the STM32MP1 board, some modification are needed.
The following modifications are common to all the configurations described on this page (SDL2 configurations or direct DRM-KMS configuration).
5.1.1. Adaptation of example source code (main.c)[edit | edit source]
- Replace the content of the main file of your project by the following script:
/**
 * @file main.c
 *
 */
/*********************
 *      INCLUDES
 *********************/
#define _DEFAULT_SOURCE /* needed for usleep() */
#include <stdlib.h>
#include <unistd.h>
#include <time.h>
#include <sys/time.h>

// For SDL2 usage
#define SDL_MAIN_HANDLED /*To fix SDL's "undefined reference to WinMain" issue*/
#include <SDL2/SDL.h>
#include "lvgl/lvgl.h"
#include "lvgl/examples/lv_examples.h"
#include "lv_demos/lv_demo.h"
#include "lv_drivers/sdl/sdl.h"

// For USE DRM usage
#include "lv_drivers/display/drm.h"
#include "lv_drivers/indev/evdev.h"

/**********************
 *  STATIC PROTOTYPES
 **********************/
static void hal_init(void);
static int tick_thread(void *data);


/*********************
 *      DEFINES
 *********************/
/* select which demo you would like to execute */
#define COMPILE_WIDGET 1
//#define COMPILE_MUSIC 1
//#define COMPILE_KEYPAD 1


/**********************
 *   GLOBAL FUNCTIONS
 **********************/
int main(int argc, char **argv)
{
    (void)argc; /*Unused*/
    (void)argv; /*Unused*/

    /*Initialize LVGL*/
    lv_init();

    /*Initialize the HAL (display, input devices, tick) for LVGL*/
    hal_init();

#ifdef COMPILE_WIDGET
    lv_demo_widgets();
#endif
#ifdef COMPILE_MUSIC
    lv_demo_music();
#endif
#ifdef COMPILE_KEYPAD
    lv_demo_keypad_encoder();
 #endif

    while(1) {
        /* Periodically call the lv_task handler.
         * It could be done in a timer interrupt or an OS task too.*/
        lv_timer_handler();
        usleep(5 * 1000);
    }

    return 0;
}

/**********************
 *   STATIC FUNCTIONS
 **********************/
/**
 * Initialize the Hardware Abstraction Layer (HAL) for the LVGL graphics
 * library
 */
static void hal_init(void)
{
#if USE_DRM
    drm_init();
#endif
#if USE_SDL
    sdl_init();
#endif

    /* Tick init.
     * You have to call 'lv_tick_inc()' in periodically to inform LittelvGL about
     * how much time were elapsed Create an SDL thread to do this*/
 #if USE_SDL
    SDL_CreateThread(tick_thread, "tick", NULL);
#endif

    /* Create a display buffer */
    static lv_disp_draw_buf_t disp_buf1;

#if USE_DRM
    static lv_color_t buf1_1[128 * 1024];
    lv_disp_draw_buf_init(&disp_buf1, buf1_1, NULL, 128 * 1024);
#endif
#if USE_SDL
    static lv_color_t buf1_1[SDL_HOR_RES * 100];
    lv_disp_draw_buf_init(&disp_buf1, buf1_1, NULL, SDL_HOR_RES * 100);
#endif

    /*Create a display*/
    static lv_disp_drv_t disp_drv;
    lv_disp_drv_init(&disp_drv); /*Basic initialization*/
    disp_drv.draw_buf = &disp_buf1;
#if USE_DRM
    disp_drv.flush_cb   = drm_flush;
    lv_coord_t drm_width, drm_height;
    /* get size from DRM-KMS backend */
    uint32_t drm_dpi;
    drm_get_sizes(&drm_width, &drm_height, &drm_dpi);
    disp_drv.hor_res    = drm_width;
    disp_drv.ver_res    = drm_height;
#endif
#if USE_SDL
    disp_drv.flush_cb = sdl_display_flush;
    disp_drv.hor_res = SDL_HOR_RES;
    disp_drv.ver_res = SDL_VER_RES;
#endif
    fprintf(stderr, "SCREEN SIZE ----> %d x %d\n", disp_drv.hor_res, disp_drv.ver_res);
    lv_disp_t * disp = lv_disp_drv_register(&disp_drv);

    lv_theme_t * th = lv_theme_default_init(disp,
                                            lv_palette_main(LV_PALETTE_BLUE),
                                            lv_palette_main(LV_PALETTE_RED),
                                            LV_THEME_DEFAULT_DARK, LV_FONT_DEFAULT);
    lv_disp_set_theme(disp, th);

#if USE_EVDEV
    /* warning: EVDEV_NAME on lv_drv_conf.h MUST be adapted to the correct input devince on board */
    evdev_init();
    static lv_indev_drv_t indev_drv;
    lv_indev_drv_init(&indev_drv);
    indev_drv.type = LV_INDEV_TYPE_POINTER;
    indev_drv.read_cb = evdev_read;
    lv_indev_drv_register(&indev_drv);
#endif

#if USE_SDL
    lv_group_t * g = lv_group_create();
    lv_group_set_default(g);

    /* Add the mouse as input device
     * Use the 'mouse' driver which reads the PC's mouse*/
    static lv_indev_drv_t indev_drv_1;
    lv_indev_drv_init(&indev_drv_1); /*Basic initialization*/
    indev_drv_1.type = LV_INDEV_TYPE_POINTER;

    /* This function will be called periodically (by the library) to get the mouse position and state */
    indev_drv_1.read_cb = sdl_mouse_read;
    lv_indev_t *mouse_indev = lv_indev_drv_register(&indev_drv_1);

    static lv_indev_drv_t indev_drv_2;
    lv_indev_drv_init(&indev_drv_2); /*Basic initialization*/
    indev_drv_2.type = LV_INDEV_TYPE_KEYPAD;
    indev_drv_2.read_cb = sdl_keyboard_read;
    lv_indev_t *kb_indev = lv_indev_drv_register(&indev_drv_2);
    lv_indev_set_group(kb_indev, g);

    static lv_indev_drv_t indev_drv_3;
    lv_indev_drv_init(&indev_drv_3); /*Basic initialization*/
    indev_drv_3.type = LV_INDEV_TYPE_ENCODER;
    indev_drv_3.read_cb = sdl_mousewheel_read;
    lv_indev_t * enc_indev = lv_indev_drv_register(&indev_drv_3);
    lv_indev_set_group(enc_indev, g);

    /* Set a cursor for the mouse*/
    LV_IMG_DECLARE(mouse_cursor_icon); /*Declare the image file.*/
    lv_obj_t * cursor_obj = lv_img_create(lv_scr_act()); /*Create an image object for the cursor */
    lv_img_set_src(cursor_obj, &mouse_cursor_icon);           /*Set the image source*/
    lv_indev_set_cursor(mouse_indev, cursor_obj);             /*Connect the image  object to the driver*/
#endif
}

/**
 * A task to measure the elapsed time for LVGL
 * @param data unused
 * @return never return
 */
static int tick_thread(void *data) {
    (void)data;

    while(1) {
 #if USE_SDL
        SDL_Delay(5);
 #endif
       lv_tick_inc(5); /*Tell LittelvGL that 5 milliseconds were elapsed*/
    }
    return 0;
}

/**
 * Use a custom tick source that tells the elapsed time in milliseconds.
 * It removes the need to manually update the tick with `lv_tick_inc()`
*/
uint32_t custom_tick_get(void)
{
    static uint64_t start_ms = 0;
    if(start_ms == 0) {
        struct timeval tv_start;
        gettimeofday(&tv_start, NULL);
        start_ms = (tv_start.tv_sec * 1000000 + tv_start.tv_usec) / 1000;
    }

    struct timeval tv_now;
    gettimeofday(&tv_now, NULL);
    uint64_t now_ms;
    now_ms = (tv_now.tv_sec * 1000000 + tv_now.tv_usec) / 1000;

    uint32_t time_ms = now_ms - start_ms;
    return time_ms;
}
5.1.2. Configuration of the demonstration for LVGL (lv_demo_conf.h)[edit | edit source]
- The file lv_demo_conf.h must be aligned with the template present in lv_demos/lv_demo_conf_template.h:
cp lv_demos/lv_demo_conf_template.h lv_demo_conf.h
- Adapt the configuration:
Enable the demonstration configuration and enable following demonstrations : benchmark with widgets, keypad and music with lanscape .
Replace at the beginning of the file
#if 0 /*Set it to "1" to enable the content*/
with
#if 1 /*Set it to "1" to enable the content*/
Configure the following defines to select the demonstrations you want to build:
#define LV_USE_DEMO_WIDGETS        '''1'''
#define LV_USE_DEMO_KEYPAD_AND_ENCODER    '''1'''
#define LV_USE_DEMO_MUSIC      '''1'''
#define LV_DEMO_MUSIC_LANDSCAPE    '''1'''
5.1.3. Configuration of LVGL (lv_conf)[edit | edit source]
- The file lv_conf.h must be aligned with the template present in lvgl/lv_conf_template.h:
cp lvgl/lv_conf_template.h lv_conf.h
- Adapt the configuration
Enable the LVGL configuration, force the color depth to 32, and enable the font for the demonstration.
Replace at the beginning of the file
#if 0 /*Set it to "1" to enable the content*/
with
#if 1 /*Set it to "1" to enable content*/
Configure the following defines:
Force the color depth:
#define LV_COLOR_DEPTH 32
Modify the memory size to 128:
#define LV_MEM_CUSTOM      1
#define  LV_MEM_SIZE    (128U * 1024U)          /*[bytes]*/
Enable the font (adapt according to the fonts requested by the elements used in the demonstration):
#define LV_FONT_MONTSERRAT_8     '''1'''
#define LV_FONT_MONTSERRAT_10    '''1'''
#define LV_FONT_MONTSERRAT_12    '''1'''
#define LV_FONT_MONTSERRAT_14    '''1'''
#define LV_FONT_MONTSERRAT_16    '''1'''
#define LV_FONT_MONTSERRAT_18    '''1'''
#define LV_FONT_MONTSERRAT_20    '''1'''
#define LV_FONT_MONTSERRAT_22    '''1'''
#define LV_FONT_MONTSERRAT_24    '''1'''
#define LV_FONT_MONTSERRAT_26    '''1'''
#define LV_FONT_MONTSERRAT_28    '''1'''
#define LV_FONT_MONTSERRAT_30    '''1'''
#define LV_FONT_MONTSERRAT_32    '''1'''
#define LV_FONT_MONTSERRAT_34    '''1'''
#define LV_FONT_MONTSERRAT_36    '''1'''
#define LV_FONT_MONTSERRAT_38    '''1'''
#define LV_FONT_MONTSERRAT_40    '''1'''
#define LV_FONT_MONTSERRAT_42    '''1'''
#define LV_FONT_MONTSERRAT_44    '''1'''
#define LV_FONT_MONTSERRAT_46    '''1'''
#define LV_FONT_MONTSERRAT_48    '''1'''
#define LV_FONT_MONTSERRAT_12_SUBPX      '''1'''
#define LV_FONT_MONTSERRAT_28_COMPRESSED '''1'''  /*bpp = 3*/
#define LV_FONT_DEJAVU_16_PERSIAN_HEBREW '''1'''  /*Hebrew, Arabic, Perisan letters and all their forms*/
#define LV_FONT_SIMSUN_16_CJK            '''1'''  /*1000 most common CJK radicals*/
#define LV_FONT_UNSCII_8        '''1'''
#define LV_FONT_UNSCII_16       '''1'''
#define LV_FONT_FMT_TXT_LARGE   '''1'''
#define LV_USE_FONT_COMPRESSED  '''1'''
#define LV_USE_FONT_SUBPX       '''1'''
#define LV_USE_BIDI         '''1'''
To see the performance monitor, activate:
#define LV_USE_MEM_MONITOR 1
5.2. Proposed modifications on LVGL project for configuration 1 and 2 (SDL2 with GPU)[edit | edit source]
To adapt LVGL to the STM32MP1 board, some modifications are needed.
The following modifications are valid only for the SDL2 configuration.
5.2.1. Configuration for LVGL driver (lv_drv_conf.h)[edit | edit source]
- The file for LVGL driver lv_drv_conf.h must be aligned with the template present in lv_drivers/lv_drv_conf_template.h
cp lv_drivers/lv_drv_conf_template.h lv_drv_conf.h
- Adapt the configuration:
Enable the driver configuration, SDL configuration, and display size configuration:
Replace at begin of file
#if 0 /*Set it to "1" to enable the content*/
with
#if 1 /*Set it to "1" to enable content*/
Configure the following defines:
# define USE_SDL 1
#  define SDL_HOR_RES     800
#  define SDL_VER_RES     480
The size of screen must be adapted to the size and the orientation of screen present on board:STM32MP157F-DK2: 800x400 (configuration 1 Wayland) STM32MP157F-DK2: 400x800 (configuration 2 DRM KMS) STM32MP157F-EV1: 1280x720 STM32MP135F-DK: 480x272 STM32MP257F-EV1:1024x600 STM32MP257F-EV1_HDMI:1920x1080 STM32MP257F-DK:1024x600 STM32MP257F-DK_HDMI:1920x1080 |
5.3. Proposed modifications on LVGL project for configuration 3 (direct DRM-KMS no GPU)[edit | edit source]
To adapt LVGL to the STM32MP1 board, some modifications are needed.
The following modifications are valid only for the direct DRM-KMS configuration.
5.3.1. Configuration for LVGL (lv_conf.h)[edit | edit source]
- In the file lv_conf.h, for configuration without SDL, the modification of LV_TICK_CUSTOM is mandatory to provide a custom tick source:
#define LV_TICK_CUSTOM     1
#define LV_TICK_CUSTOM_INCLUDE  "stdint.h"
#define LV_TICK_CUSTOM_SYS_TIME_EXPR (custom_tick_get())
| You must implement the custom_tick_get function in your main code. An example of implementation is provided in the main.c example present on this wiki page. |
5.3.2. Configuration for LVGL driver (lv_drv_conf.h)[edit | edit source]
- The file for LVGL driver lv_drv_conf.h must be aligned with the template present in lv_drivers/lv_drv_conf_template.h:
cp lv_drivers/lv_drv_conf_template.h lv_drv_conf.h
- Adapt the configuration:
Enable the driver configuration, drm configuration, and EVDEV configuration:
Replace at the beginning of the file
#if 0 /*Set it to "1" to enable the content*/
with
#if 1 /*Set it to "1" to enable content*/
Configure the following defines:
#  define USE_DRM           1
#  define USE_EVDEV       1
For EVDEV configuration, EVDEV_NAME MUST be adapted to the input device available on board:# define EVDEV_NAME "/dev/input/event1" /* touch screen on STM32MP157F-DK2 */ # define EVDEV_NAME "/dev/input/event0" /* touch screen on STM32MP135F-DK */ # define EVDEV_NAME "/dev/input/event0" /* touch screen on STM32MP257F-EV1 */ # define EVDEV_NAME "/dev/input/event0" /* touch screen on STM32MP257F-DK */ |
5.4. Adaptation of Makefile (Makefile)[edit | edit source]
In Makefile, the CFLAGS and LDFLAGS must be adapted to the usage of librdm instead of the SDL2 library:
CFLAGS ?= -O3 -I$(LVGL_DIR)/ $(WARNINGS)
LDFLAGS ?= -lm -ldrm
5.5. Adaptation of CMakeLists.txt (CMakeLists.txt)[edit | edit source]
The following configurations are possible in CMakeLists.txt:
- Define options for each configuration:
option(STM32MP_LVGL_WAYLAND_SDL2_GPU BOOLEAN OFF)

option(STM32MP_LVGL_DRM_KMS_SDL2_GPU BOOLEAN OFF)

option(STM32MP_LVGL_DIRECT_DRM_KMS_NOGPU BOOLEAN ON)
- Define the board to test
#set(STM32MP_BOARD "STM32MP157F_DK2")
#set(STM32MP_BOARD "STM32MP135F_DK")
set(STM32MP_BOARD "STM32MP257F_EV1")
#set(STM32MP_BOARD "STM32MP257F_EV1_HDMI")
#set(STM32MP_BOARD "STM32MP257F_DK")
#set(STM32MP_BOARD "STM32MP257F_DK_HDMI")
- Define target_compile_definitions for each configuration and board:
- Build submodules with CMake:
add_subdirectory(lvgl)

add_subdirectory(lv_drivers)

add_subdirectory(lv_demos)
- Add libraries:
target_link_libraries(main libdrm.so)

target_link_libraries(main libSDL2-2.0.so)
6. References[edit | edit source]
"LVGL official web site"[1]
"LVGL Get Started"[2]
"LVGL demos"[3]
"LVGL demos github" [4]
"LVGL project examples"[5]
"LVGL learning course"[6]
"LVGL forum"[7]
"SDL official web site"[8]
"Wayland official web site"[9]
- ↑ https://lvgl.io/ LVGL official web site
- ↑ https://docs.lvgl.io/master/get-started/quick-overview.html#get-started-in-a-simulator
- ↑ https://lvgl.io/demos
- ↑ https://github.com/lvgl/lv_demos"
- ↑ https://docs.lvgl.io/master/get-started/quick-overview.html#examples/ LVGL project examples
- ↑ https://lvgl.academy/lvgl/Introduction/lvgl-intro
- ↑ https://forum.lvgl.io/ LVGL forum
- ↑ https://www.libsdl.org/download-2.0.php/ SDL official web site
- ↑ https://wayland.freedesktop.org/ Wayland official web site