This article gives information about the Demo Launcher application. The Demo Launcher starts by default in the Starter Package. This application is written in python3[1] and uses GTK[2] to display the user interface. A touchscreen is required to control the application.
[edit source]
The main menu is composed of six demonstrations:
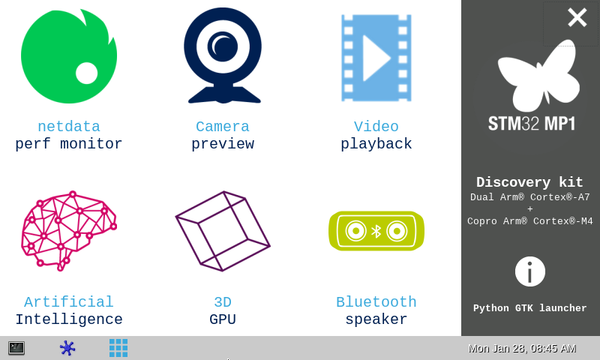
| Netdata perf monitor | Gives information in how to connect to the board through ethernet or wifi (if available) in order to connect to netdata |
| Camera preview | Displays the preview camera |
| Video playback | Displays the video playback |
| Artificial intelligence | Handwriting character recognition (use M4 firmware) |
| 3D GPU | Displays a rotating 3D cube |
| Bluetooth speaker | Allows the connection to a bluetooth headset |
To exit from this window, tap on the top-right corner cross. To launch it again, tap or click on the icon of Weston launcher with nine blue squares.
2. Netdata perf monitor[edit source]
netdata is a tool started on boot which provides all monitoring information on a web page accessible at the IP address of the board. This window helps to connect to the network of the board to get netdata information.
If Ethernet network is available, the URL to connect to netdata is displayed.
If wireless network is available, a cursor button is displayed to enable hotspot wifi.
If wifi hotspot is enabled with default configuration, two QR-code are displayed on screen:
- The first one gives parameters to connect to wifi hotspot
- The second one provides the URL to connect to netdata
To exit from this window, double tap anywhere on the screen.
3. Camera preview[edit source]
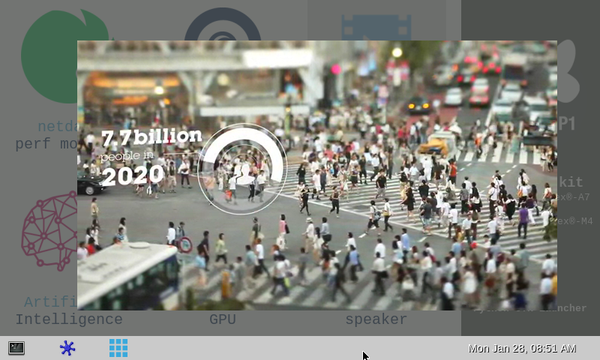
Display the preview from /dev/video0.
- On STM32MP157C-DKX boards, a USB webcam can be used
- On STM32MP157C-EVX boards, either a MB1379 camera daughter board or a USB webcam can be used.
Ensure that the webcam is compatible with Linux®.
The available actions to control the camera preview are:
- first tap: as preview is composed by Wayland, the first tap has to be done outside the camera preview window to recover the GTK focus
- simple tap: pause-resume the camera preview
- double tap: exit from this window, double tap anywhere on the screen.
More information about V4L2 in V4L2 camera overview and how is managed the display in Wayland_Weston_overview.
4. Video playback[edit source]
Here are the available actions to control the video playback:
- first tap: as video is composed by Wayland, the first tap has to be done outside the video playback window to recover the GTK focus
- double tap: exit from this window, double tap anywhere on the screen.
More information about Gstreamer in GStreamer_overview and how is managed the display in Wayland_Weston_overview.
5. Artificial Intelligence[edit source]
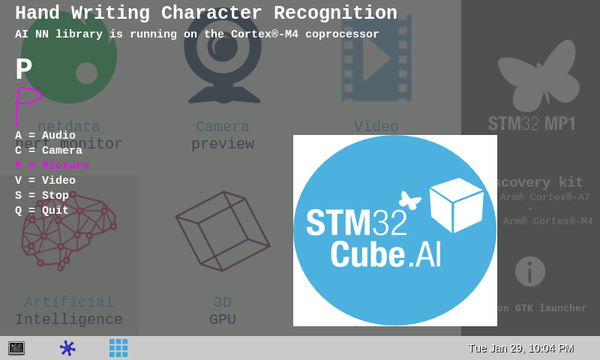
This is a handwriting character recognition application:
1) Draw a character on the screen which will be analysed by the firmware running on M4 side
2) If the character is recognized, it is displayed on the left (else a question mark is displayed)
3) If the recognized character is associated with an application, the application is launched:
- A: launch audio playback
- C: launch camera preview
- P: display a picture
- V: launch a video playback
- S: stop launched application
- Q: exit from the Artificial Intelligence demo
6. 3D GPU[edit source]

A cube rotates on the screen.
The available actions to control the video playback are:
- continuous tap : a continuous press on screen will drag the cube.
- double tap: exit from this window, double tap anywhere on the screen.
More information about the GPU in Vivante_GCNANO_GPU_overview and how is managed the display in Wayland_Weston_overview.
7. Bluetooth speaker[edit source]

This application is able to discover bluetooth devices, and pair/connect to them. If an audio capable device is connected, the message The audio BT device <your device> is connected is displayed.
First use:
1) Tap on start scan button: a scan of discoverable devices is done during 15 seconds: the scroll bar progression is displayed
2) Select the device in the list, and tap on connect
If the device is already connected, the connect button is renamed to disconnect.
To exit from this window, double tap anywhere on the screen.
More information about bluetooth in Bluetooth_overview.
[edit source]
This menu (which appears after clicking on i icon on the right) explains how to use the demos by providing the basic information needed to use them. To exit from this window, double tap anywhere on the screen.
9. How to add a new demo application[edit source]
Available: ecosystem release ≥ v1.2.0
The GTK Demo launcher is scalable, you can add some new application on it. The GTK Demo launcher use some yaml files to automatically detect applications to display.
Application on GTK Demo launcher:
- is described by one yaml file which describe the application: information to display, how to launch it, ...
- is indexed to be displayed in specific order.
- can be enabled for a specific SOC
- can be launched with presence of specific devices.
For scalability, an application come with:
- an indexed yaml file
- a sub tree which contains pictures and script mandatory to run application.
Example for video application:
 /usr/local/demo/application/
 ├── 02-video.yaml
 └── video
     ├── bin
     │   └── launch_video.sh
     └── pictures
         └── Video_playback_logo.png
9.1. YAML: application format[edit source]
 Application:
    Name: <name of application>
    Description: <description of application>
    Icon: <icon of application>
    Type: <script|python>
    Board:
        <List|NotList>: <all|list of chip>
    Script:
        Exist:
            <File|Command>: <file or command to verify>
            Msg_false: <Message to display if <File|Command> are not true
        Start: <script or application to launch application>
        Stop: <script or application to stop application>
    Python:
        Exist:
            <File|Command>: <file or command to verify>
            Msg_false: <Message to display if <File|Command> are not true
        Module: <Python module name to load>
    Action:
        button_release_event: <python_start|script_management>
        button_press_event: highlight_eventBox
Explanation:
- Name
- name of application displayed on GTK Demo launcher
- Description
- description of application displayed on GTK Demo launcher
- Icon
- icon of application displayed on GTK Demo launcher
- Board
- List: list of SOC with which the application is compatible
- NotList: List of SOC with which the application is NOT compatible
- Type
- Type of script which are used to launch the application
- Type available:
- - script : shell script or application (without parameters) for launching application
- - python: python script to load for launching application
- This two types have a specific declaration available: Script, Python
- Script
- This section describe the script (shell or application) to launch application.
- This section have several subsection:
- - Exist: verify some requirement before to launch start command
- - Start: command to start the application
- - Stop: command to stop the application
- Exist section:
- - File: verify presence of specific file, if file are present then application can be launched with Start
- - Command: command to execute, if return is Ok then application can be launched with Start
- ex.:
        Exist:
            File: /dev/video0
            Msg_false: Webcam is not connected,
                    /dev/video0 doesn't exist
- Python
- This section describe the python script to load for accessing to application functionality.
- The python script must have the function create_subdialogwindow(<parent window>).
- This section have several sub section:
- Exist: verify some requirement before to launch start command
- Module: Python module name to load, it's corresponding to path and script name.
- ex.:
     for a path application/netdata/netdata.py
     module name must be application.netdata.netdata
     Module: application.netdata.netdata
- Tips: you need to add an empty file name "__init__.py" on each sub directory to permit to launch the python module
- Exist section:
- - File: verify presence of specific file, if file are present then application can be launched with Start
- - Command: command to execute, if return is Ok then application can be launched with Start
- ex.:
        Exist:
            Command: hciconfig hci0 up
            Msg_false: Please connect a bluetooth controller on the board
9.2. File Tree[edit source]
/usr/local/demo/application/
 ├── 000-netdata.yaml
 ├── 010-camera.yaml
 ├── 020-video.yaml
 ├── 030-3d_cube.yaml
 ├── 040-m4_ai.yaml
 ├── 060-bluetooth_audio_output.yaml
 ├── 3d_cube
 │   ├── bin
 │   │   └── launch_cube_3D.sh
 │   └── pictures
 │       └── ST153_cube_purple.png
 ├── bluetooth
 │   ├── bluetooth_audio.py
 │   ├── __init__.py
 │   ├── pictures
 │   │   └── ST11012_bluetooth_speaker_light_green.png
 │   └── wrap_blctl.py
 ├── camera
 │   ├── bin
 │   │   ├── launch_camera_preview.sh
 │   │   └── stop_camera.sh
 │   ├── pictures
 │   │   └── ST1077_webcam_dark_blue.png
 │   └── shaders
 │       └── edge_InvertLuma.fs
 ├── __init__.py
 ├── m4_ai
 │   ├── bin
 │   │   └── launch_AI.sh
 │   └── pictures
 │       └── ST7079_AI_neural_pink.png
 ├── netdata
 │   ├── bin
 │   │   └── build_qrcode.sh
 │   ├── __init__.py
 │   ├── netdata.py
 │   └── pictures
 │       └── netdata-icon-192x192.png
 └── video
     ├── bin
     │   └── launch_video.sh
     └── pictures
         └── Video_playback_logo.png
9.3. Examples of yaml application file[edit source]
9.3.1. with Script, verification of presence of device and board support[edit source]
Application:
    Name: 3D Pict
    Description: GPU with picture
    Icon: application/3d_cube/pictures/ST153_cube_purple.png
    Board:
        NotList: stm32mp151
    Type: script
    Script:
        Exist:
            File: /dev/galcore
            Msg_false: No GPU capabilities to run 3D GPU demo
        Start: application/3d_cube/bin/launch_cube_3D.sh
    Action:
        button_release_event: script_management
        button_press_event: highlight_eventBox
9.3.2. with Script and verification of presence of device[edit source]
Application:
    Name: Camera
    Description: shader
    Icon: application/camera/pictures/ST1077_webcam_dark_blue.png
    Board:
        List: all
    Type: script
    Script:
        Exist:
            File: /dev/video0
            Msg_false: Webcam is not connected,
                    /dev/video0 doesn't exist
        Start: application/camera/bin/launch_camera_shader.sh
        Stop: application/camera/bin/stop_camera.sh
    Action:
        button_release_event: script_management
        button_press_event: highlight_eventBox
9.3.3. with Python and verification via command[edit source]
Application:
    Name: Bluetooth
    Description: speaker
    Icon: application/bluetooth/pictures/ST11012_bluetooth_speaker_light_green.png
    Type: python
    Board:
        List: stm32mp157 stm32mp153
    Python:
        Exist:
            Command: hciconfig hci0 up
            Msg_false: Please connect a bluetooth controller on the board
        Module: application.bluetooth.bluetooth_audio
    Action:
        button_release_event: python_start
        button_press_event: highlight_eventBox
9.4. Example of recipe to add an application[edit source]
One example are located on meta-st-openstlinux
meta-st-openstlinux/recipes-samples/demo-application/demo-application-3d-cube.bb
Point of attention:
- put a correct index for yaml file
- install all the sub tree of application on /usr/local/demo/application
- put the correct execution permission for script file
Example for this example:
/usr/local/demo/application
├── 100-3d-cube.yaml
├── 101-3d-cube-shader.yaml
├── 105-3d-cube-picture-shader.yaml
├── 110-3d-cube-video.yaml
├── 111-3d-cube-video-shader.yaml
├── 115-3d_cube_camera.yaml
├── 116-3d_cube_camera_shader.yaml
├── 120-3d-cube-pictures-shader.yaml
└── 3d-cube-extra
    ├── bin
    │   ├── launch_cube_3D_1_picture_shader.sh
    │   ├── launch_cube_3D_3_pictures_shader.sh
    │   ├── launch_cube_3D_camera.sh
    │   ├── launch_cube_3D_camera_shader.sh
    │   ├── launch_cube_3D_color.sh
    │   ├── launch_cube_3D_color_shader.sh
    │   ├── launch_cube_3D_video.sh
    │   └── launch_cube_3D_video_shader.sh
    └── pictures
        └── ST153_cube_purple.png
Recipe associated:
DESCRIPTION = "Add support of 3d Cube application on Demo Launcher"
HOMEPAGE = "wiki.st.com"
LICENSE = "BSD-3-Clause"
LIC_FILES_CHKSUM = "file://${COREBASE}/meta/files/common-licenses/BSD-3-Clause;md5=550794465ba0ec5312d6919e203a55f9"

DEPENDS = "weston-cube demo-launcher"

SRC_URI = " \
    file://100-3d-cube.yaml \
    file://101-3d-cube-shader.yaml \
    file://105-3d-cube-picture-shader.yaml \
    file://110-3d-cube-video.yaml \
    file://111-3d-cube-video-shader.yaml \
    file://115-3d_cube_camera.yaml \
    file://116-3d_cube_camera_shader.yaml \
    file://120-3d-cube-pictures-shader.yaml \
    file://launch_cube_3D_1_picture_shader.sh \
    file://launch_cube_3D_3_pictures_shader.sh \
    file://launch_cube_3D_camera.sh \
    file://launch_cube_3D_camera_shader.sh \
    file://launch_cube_3D_color.sh \
    file://launch_cube_3D_color_shader.sh \
    file://launch_cube_3D_video.sh \
    file://launch_cube_3D_video_shader.sh \
    file://ST153_cube_purple.png \
    "

do_configure[noexec] = "1"
do_compile[noexec] = "1"

do_install() {
    install -d ${D}${prefix}/local/demo/application/3d-cube-extra/bin
    install -d ${D}${prefix}/local/demo/application/3d-cube-extra/pictures

    # install yaml file
    install -m 0644 ${WORKDIR}/*.yaml ${D}${prefix}/local/demo/application/
    # install bin
    install -m 0755 ${WORKDIR}/*.sh ${D}${prefix}/local/demo/application/3d-cube-extra/bin
    # install pictures
    install -m 0644 ${WORKDIR}/*.png ${D}${prefix}/local/demo/application/3d-cube-extra/pictures
}

FILES_${PN} += "${prefix}/local/demo/application/"
9.5. How to install demo application via packages[edit source]
If the demo application are not installed
 dpkg -l | grep demo-launcher
 ii  demo-launcher          1.0-r0    armhf        Python script which ls-
You can install it with the following command:
apt-get update
apt-get install packagegroup-st-demo
to add 3d application:
apt-get install demo-application-3d-cube
10. References[edit source]