This article guides STM32H573 users on their first steps with Secure Manager. Refer to the article Introduction to Secure Manager for further details on what Secure Manager is and what are the benefits of using it.
1. Introduction
See the following reference articles to understand the Secure Manager concept:
- Start by reading the Secure Manager STM32H5 How to Intro article.
- For technical background, refer to the Secure Manager for STM32H5 article.
This article describes how to get started with the Secure Manager Access Kit (SMAK). It details the package and provides a step-by-step guide on the Secure Manager installation, customization, and usage.
There are two ways to install the Secure Manager:
- Running a command that installs the Secure Manager with ST default parameters. Refer to this wiki page for more information.
- Running a command that guides the user through all the user-configurable parameters of the Secure Manager.
The following part focuses on the customization during the Secure Manager installation.
2. Prerequisites
2.1. Hardware
- STM32H573 discovery board: the STM32H573 devices have all the available security features, including the hardware crypto accelerator. Note: the Secure Manager is not supported for STM32H56x devices, the hardware crypto is not available.
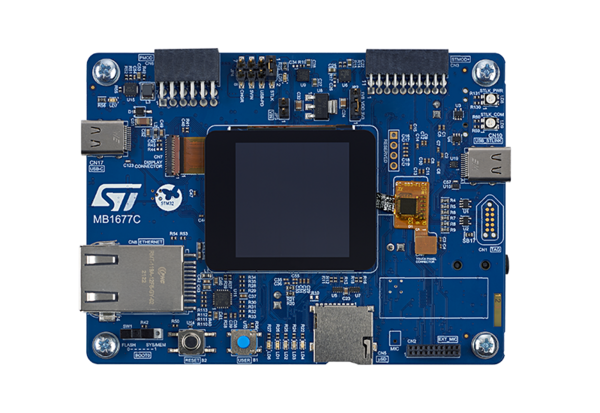
- Discovery MB1677- STM32H573 (USB Type-C® cable not included)
- In case your board has already been used for other hands-on:
- Perform a regression in case the board is in another state than OPEN by using the script provided for the last hands-on done.
- If the board is in OPEN state, verify that the SECBOOT_LOCK option byte is not set. Use the STM32CubeProgrammer.
2.2. Required tools
- X-CUBE-SEC-M-H5_V2.0.0 available at the STM32TRUSTEE-SM. It contains the Secure Manager binary.
- STM32CubeProgrammer : V2.19.0 (with STM32TrustedPackageCreator (TPC) selected at installation) or later.
- One of the supported IDE:
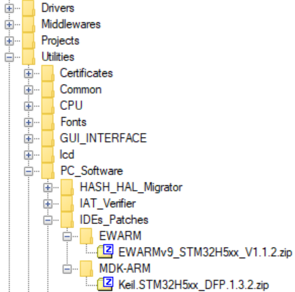
- EWARM (IAR) : V9.20.1 and the patch EWARMv9_STM32H5xx_V1.1.2 or later to support the STM32H5 series
- STM32CubeIDE : V1.18.0
- MDK_ARM : V5.38.0.0 and the patch Keil_STM32H5_DFP.1.3.2 or later to support the STM32H5 series
- Tera Term / Putty or equivalent UART terminal emulator.
The IDE patches can be found in the X-CUBE-SEC-M-H5:
2.3. X-CUBE-SEC-M-H5
- Download the X-CUBE-SEC-M-H5_V2.0.0 package.
- A directory STM32H573I-DK is included in the Projects directory.
- If the STM32CubeProgrammer has not been installed in the default folder:
- C:\Program Files\STMicroelectronics\STM32Cube\STM32CubeProgrammer.
- The customized installation path needs to be updated for the OS used in the variable: tools.ini (see the example in the figure below).
2.4. Python
Note: If issues arise during this step or when using Python in the following, check Python setup & usage troubleshoot
- Download and install Python v3.10 (or later) available on https://www.python.org/. The Python version can be verified with the following command:
$ python --version
Python 3.10.0
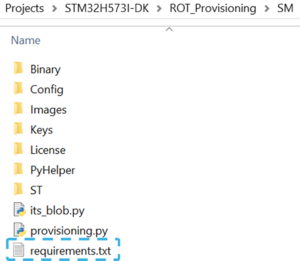
- Open a terminal in the folder Projects/STM32H573I-DK/ROT_Provisioning/SM/ and install required packages available in requirements.txt (see figure below) with the command:
$ python -m pip install -r requirements.txt
- The packages installed can be verified with the command
$ python -m pip list
Package       Version
------------- -------
click         8.1.3
colorlog      6.8.2
3. Package contents
In the X-CUBE-SEC-M-H5 Expansion Package, the folder ROT_Provisioning contains all the necessary files to install the Secure Manager.
Below, the detail of relevant directories to install and use the Secure Manager:
| Item | Directory/Script name | Description |
|---|---|---|
| 1 | Drivers | SMAK is using drivers |
| 2 | secure_manager_api | Secure Manager API used by SMAK project to call secure services (PSA) |
| 3 | SMAK Appli | Example of nonsecure application project compatible with Secure Manager |
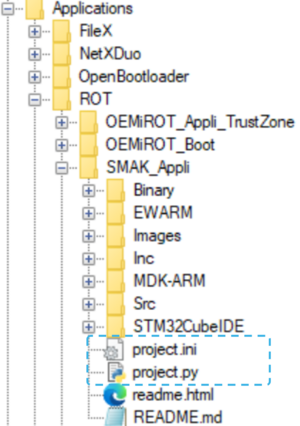
| 4 | project.ini | Configuration file of the nonsecure application project |
| 5 | project.py | Script to download via STM32CubeProgrammer the nonsecure image in the download slot. It also allows to do the prebuild and postbuild command for the building of nonsecure images via STM32TrustedPackageCreator |
| 6 | DA | Debug Authentication, including script to perform full regression |
| 7 | Binary | RSSe (delivered in X-CUBE-SEC-M-H5_V2.0.0) and Secure Manager binaries used for installation |
| 8 | Config | *.xml file and *.ini to configure Secure Manager for installation |
| 9 | Images | Generic *.xml file used to generate nonsecure application |
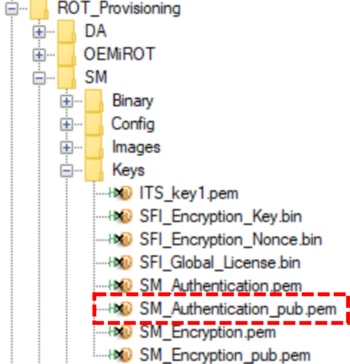
| 10 | Keys | OEM Keys used during Secure Manager installation |
| 11 | License | Module with global license example used during Secure Manager installation |
| 12 | PyHelper | Internal scripts used during Secure Manager installation, nonsecure application build |
| 13 | its_blob.py | Script to create a blob for ITS factory feature |
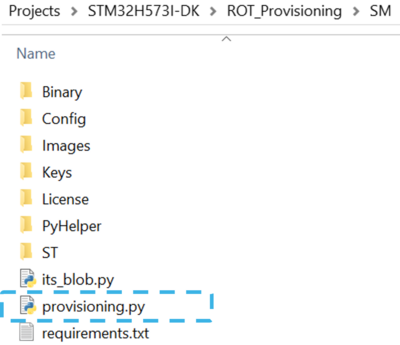
| 14 | provisioning.py | Script to configure and install Secure Manager |
| 15 | SMAK_Appli | Nonsecure application project template compatible with Secure Manager |
| 16 | Certificates | Utilities used to get a certificate X509 |
| 17 | IAT_Verifier | Utilities used to visualize the initial attestation token (Secure Manager service) |
| 18 | ITSbuilder | Utilities used to provision initial secure key and data in secure storage during the Secure Manager installation |
| 19 | ROT_AppliConfig | Utilities used to update projects and configuration files |
4. Secure Manager installation: Python environment
4.1. Configuration file sm.ini
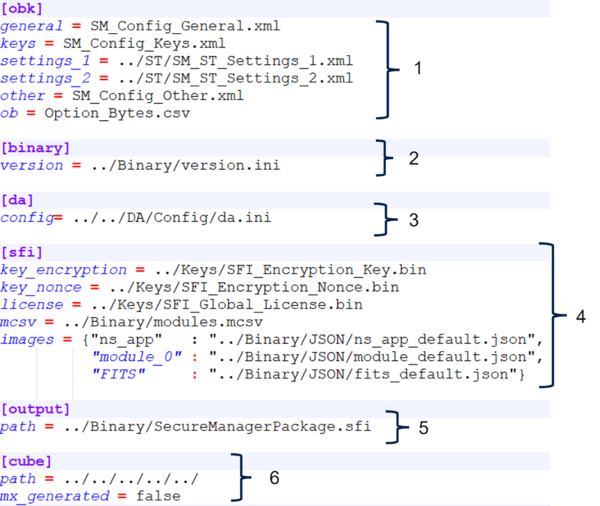
The script provisioning.py allows to configure and install the Secure Manager. It is based on the configuration file sm.ini in ROT_Provisioning/SM/Config. This file describes all the input files used by the script.
| Item | Field name | Description/Content |
|---|---|---|
| 1 | OBK | Contains the xmls to use during the configuration of the Secure Manager: general, other, keys, and option bytes |
| 2 | Binary | Contains the configuration file for the SSFI version and the RSSe to use during the installation |
| 3 | DA | Contains the DA configuration to use during the installation |
| 4 | SFI generation | Contains the input to create the SFI |
| 5 | SFI license | Contains the SFI license configuration to use during the installation |
| 6 | Output | Contains the name of the generated SFI |
| 7 | Cube | Contains the X-CUBE-SEC-M-H5 relative path to this file |
4.2. Script provisioning.py
The provisioning.py script ensures the following functionalities:
- (--sfi-gen) Generate the SFI: binary with the Secure Manager, the user configuration and other firmware
- (--sfi-flash) Flash and install the SFI in the board
- (--regression) Perform a full regression of the board: return to the virgin state of the board
- (-t/-x) Use another configuration file for the tools and/or the Secure Manager configuration (replace the default tools.ini and sm.ini). It will be saved in the config_path.ini and used for the next provisioning script call
- (-c) Clear the previous -t/-x configuration saved if any and return to the default one in config_path.ini
- (-a) Run the command in automatic mode (without user input during the command execution)
- (-v) Display the script log with more debug information (logs with this level of debug are also saved in provisioning.log file by default)
The option --sfi-gen, --sfi-flash and --regression can be call together or separately.
4.3. Script da.py
The da.py script, found in ROT_Provisioning/DA/, ensures the following functionalities:
- (--regression) Perform a full regression of the board: return to the virgin state of the board
- (--dbg-auth) Perform a Debug Authentication that gives the choice to the user between several forms of regression or debug
- (--discovery) Perform a discovery and displays the relevant information about the microcontroller such as the target and SoC ID and the PSA lifecycle state
- (-d) Use another DA configuration file (replace the default da.ini). It will be saved in config_path.ini in DA folder and be used for the next da.py calls
- (-c) Clear the previous -d configuration saved if any and return to the default one in config_path.ini.
- (-v) Display the script log with more debug information (logs with this level of debug are also saved in da.log file by default)
5. Script provisioning.py step 1: Configuration
This section details the customization of the Secure Manager installation.
For more information on each configuration item, refer to Secure Manager configuration section in UM3254.
The configuration steps described below are based on the provisioning.py script execution for the STM32H573I-DK Discovery kit in the X-CUBE-SEC-M-H5 Expansion Package.
In the following, all commands are run from within the Projects\STM32H573I-DK\ROT_Provisioning\SM folder in a terminal.
First:
- Connect the STM32H573-DK using the USB Type-C® cable.
- Execute the following command:
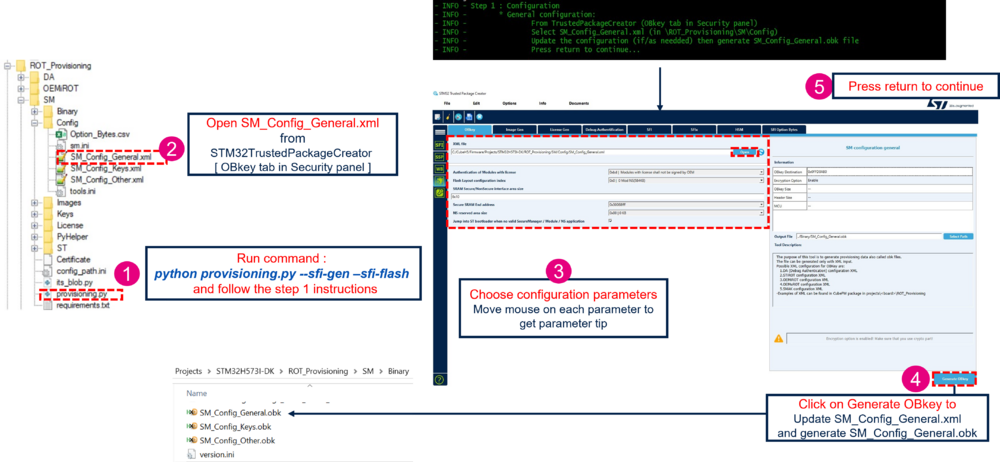
$ python provisioning.py --sfi-gen --sfi-flash
5.1. General configuration
This step allows the user to configure various general configuration items of the system. If this part has no need to be updated (STMicroelectronics default configuration or previous input user), the user can press return on the terminal to skip this part and go to the next step
SM Keys configuration.
The following table lists the general configuration parameters that can be changed:
| Parameter | Description | Default value | Possible value |
|---|---|---|---|
| Authentication of Modules with license | Type of authentication for module with license (third-party module with or without counting installation). Other modules are not concerned by this setting. | 0xBD | 0xBD: Modules with license shall not be signed by the OEM. 0xCE: Modules with license shall be signed by OEM. |
| Flash Layout configuration index | Predefined flash layout configuration | 0x0 | 0x0: no module. 0x1: one module. Note: configuration details are described below. |
| SRAM Secure/NonSecure interface area size | Size of the shared SRAM area between the nonsecure and the secure. This area is located at the end of the SRAM1 and is used to communicate data. | 0x10 (16 KB) | Minimum 4 KB Maximum 248 KB with a granularity of 1 KB. |
| Secure SRAM End address | End address of the SRAM3 allocated to Secure Manager and module. The remaining area of the SRAM3 is allocated to nonsecure applications. | 0x30068fff: 24 KB allocated to module (if any) | 0x30062fff: Minimum value, for Secure Manager only (no SRAM allocated to the module) 0x30069fff: Maximum value (End address of the SRAM3); with a granularity of 4 KB. |
| NS reserved area size | Area reserved to the nonsecure application (for example: NV data, file system). This area reduces by half of the value the available size for a nonsecure application. | 0 KB: No NS reserved area | Minimum 0 KB Maximum 464 KB with a granularity of 16 KB. |
| Jump into ST bootloader when no valid Secure Manager / Module / NS application | Authorized the SMuRoT (second boot stage) to jump into the ST bootloader when the authenticity and the integrity are not verified of at least one image | Enabled | Enabled Disabled |
Below, the detail of the predefined Flash Layout configuration:
To proceed with the configuration, open the STM32TrustedPackageCreator tool:
5.2. OEM keys configuration
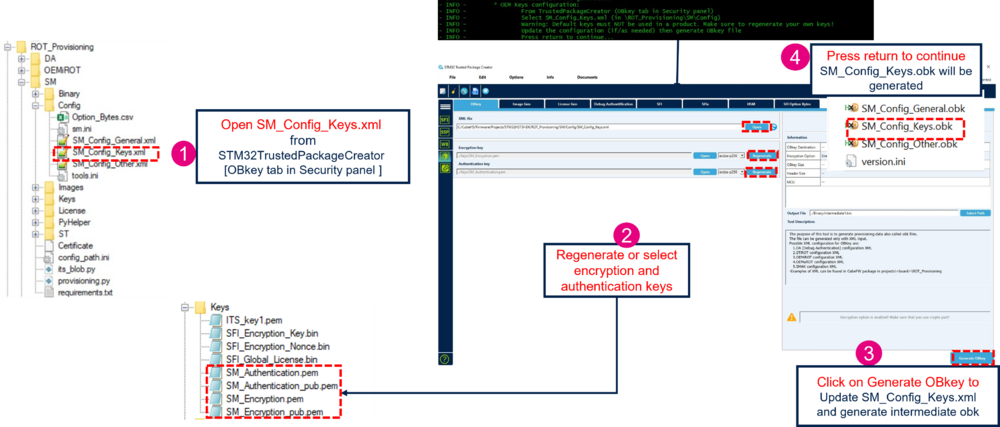
This step allows to customize the SM authentication and encryption keys. These keys are used for the nonsecure application image and for OEM module image (if any). These keys are located in the folder Projects\STM32H573I-DK\ROT_Provisioning\SM\Keys. The user can press return on the terminal to skip this part and go to the next step Other configuration.
In the STM32TrustedPackageCreator tool:
5.3. Other configuration
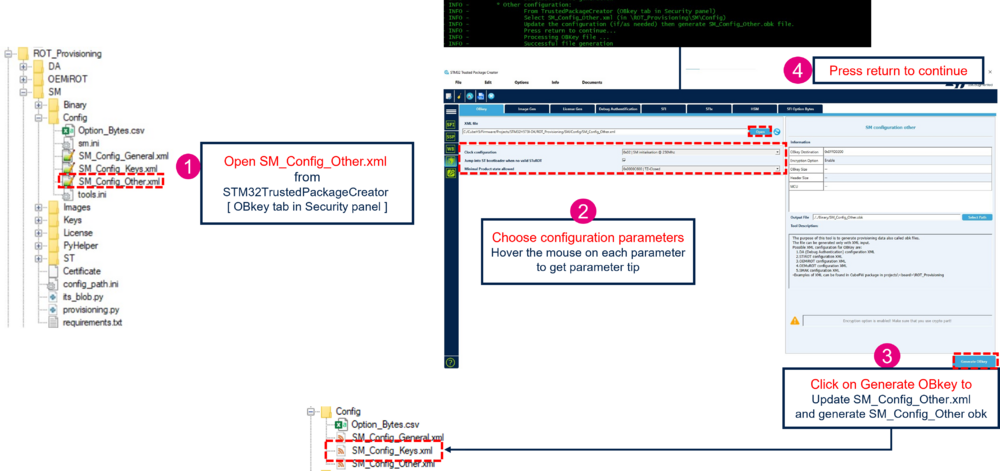
This step allows the user to configure specific configuration items of the system. The user can press return on the terminal to skip this part and go to the next step Debug Authentication (DA) configuration. This step allows to customize the following parameters:
| Parameters | Description | Default value | Possible value |
|---|---|---|---|
| Clock configuration | Configuration of the clock during the Secure Manager initialization (including the boot stage) | 0x2 | 0x0: 64 MHz 0x1: 200 MHz 0x2: 250 MHz |
| Jump into ST bootloader when no valid SMuRoT | Enable the SMiRoT (first boot stage) to jump into the ST bootloader when the authenticity and the integrity of the SMuRoT image (second boot stage) is not verified | Enabled | Enabled Disabled |
| Minimal Product state allowed | The boot stage executes the application only if the product state programmed is equal or greater to this value | 0x0000c600: TZ-Closed | 0x0000c600: TZ-Closed 0x00007200: Closed 0x00005C00: Locked |
To proceed with the configuration, open the STM32TrustedPackageCreator tool:
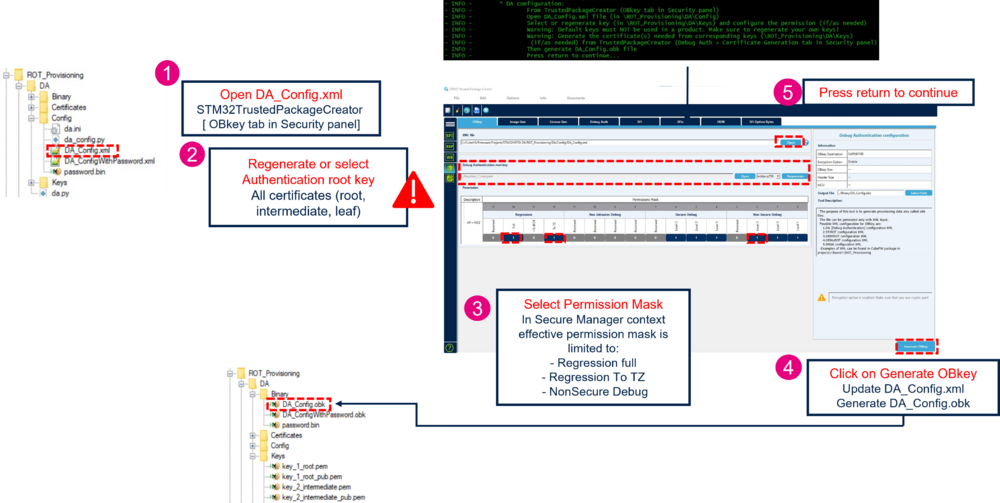
5.4. Debug Authentication (DA) configuration
This step allows to customize the Debug Authentication (DA) key and permission, located in Projects\STM32H573I-DK\ROT_Provisioning\DA\Keys. If the key or the permission is changed, the user must follow the article introduction to Debug Authentication to generate the certificate accordingly to these modifications. The user can press return on the terminal to skip this part and go to the next step. In Production usecase, this customization is mandatory.
In the STM32TrustedPackageCreator tool:
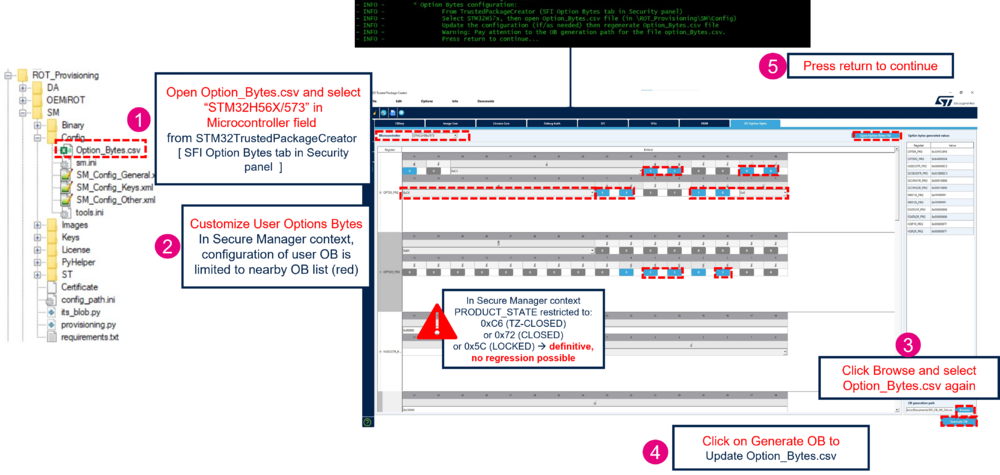
5.5. Option Bytes (OB) configuration
This part allows to customize the option bytes configuration. It regenerates the Option_Bytes.csv file located in Projects\STM32H573I-DK\ROT_Provisioning\SM\Config with the user configuration selected. This option bytes configuration is applied when the Secure Manager is installed. The user can press return on the terminal to skip this part and go to the next step.
Note:
- If the Minimal Product state has been changed in the part Other configuration, the user can change the product state to the according value in this step
- In the STM32TrustedPackageCreator tool, the user can modify all the option bytes of the STM32H573 but only the following option bytes are effectively configurable by the user, the other option bytes configuration is ignored (not configurable in the Secure Manager context).
| register | BitField | Description |
|---|---|---|
| OPTSR_PRG |
IWDG_STDBY |
independent watchdog counter active in Standby mode |
| OPTSR2_PRG |
SRAM3_ECC |
SRAM3 error code correction |
In the STM32TrustedPackageCreator tool:
5.6. SFI license configuration
This step allows to choose between a global license or a chip-specific license for the SFI. By default, the SFI license type is global :
The user can press 2 to customize the SFI license. This step is highly recommended for a Production usecase. To configure a global license, go to the next step SFI global license configuration. To configure a chip-specific license, go to the step SFI chip-specific license configuration.
5.6.1. SFI global license configuration
This step allows to regenerate a SFI Global License with a new key and nonce, located in Projects\STM32H573I-DK\ROT_Provisioning\SM\Keys. To choose a SFI global license type, it is possible to use the configuration by default (global license type), or do this :
The user can press return on the terminal to skip this part and go to the next step.
In the STM32TrustedPackageCreator tool:
5.6.2. SFI chip-specific license configuration
This step allows to use a chip-specific license thanks to a STM32HSM-V2^* or to configure a new one. Download X-CUBE-RSSe package (V1.1.0 or higher). and follow the next steps.
- Import the X-CUBE-RSSe package in STM32TrustedPackageCreator:
- Select the chip-specific license during provisioning:
- Insert your STM32HSM-V2^* in the HSM reader and open STM32TrustedPackageCreator to read the HSM information. If needed, you can configure the HSM slot number as follows:
- To use an already configured HSM, the key and nonce must be located in Projects\STM32H573I-DK\ROT_Provisioning\SM\Keys under the names SFI_Encryption_Key.bin and SFI_Encryption_Nonce.bin. To configure a new HSM, follow these steps:
| Item | Action |
|---|---|
| 1 | [Firmware identifier]: choose a firmware identifier |
| 2 | [Encryption key file]: click on the [Open] button and select ROT_Provisioning\SM\Keys\SFI_Encryption_Key.bin |
| 3 | [Nonce file]: click on the [Open] button and select ROT_Provisioning\SM\Keys\SFI_Encryption_Nonce.bin |
| 4 | 4. [Select MCU]: select H56x_H573 from the dropdown menu and Perso_Data_H56x_H573_48402011_SFI._v3.0.0.bin |
| 5 | [Maximum number of images to program]: set the maximum number for the HSM counter (this example uses STM32HSM-V2ML) |
| 6 | Press the [Program HSM] button |
After inserting the HSM and configuring it if necessary, press return.
5.7. Factory ITS blob preparation
The Internal Trusted Storage of the Secure Manager can be initialized securely with preloaded keys and data during Secure Manager installation. This feature allows to start the nonsecure application execution with keys/ and/or data already provisioned in the device and ready to be used.
This step allows to customize this initial trusted storage provisioning located in Projects\STM32H573I-DK\ROT_Provisioning\SM\Binary\ITS_Factory.bin. The user can press return on the terminal to skip this part and go to the next step.
The utility ITSbuilder located in Utilities\PC_Software\ITSbuilder is used to regenerate the blob file with data and/or keys as input. This blob file is formatted to be recognized and implemented by the Secure Manager. This utility is called in its_blob.py script located in Projects\STM32H573I-DK\ROT_Provisioning\SM\its_blob.py. Below, the principal of this script with the default value located in Projects\STM32H573I-DK\ROT_Provisioning\SM\Binary and Projects\STM32H573I-DK\ROT_Provisioning\SM\Keys
To customize the initial trusted storage provisioning:
Note: You can verify in the generated file its_blob.log (located in Projects\STM32H573I-DK\ROT_Provisioning\SM\its_blob.log) the blob composition and the possible errors.
5.8. Module & license
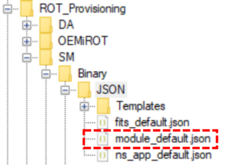
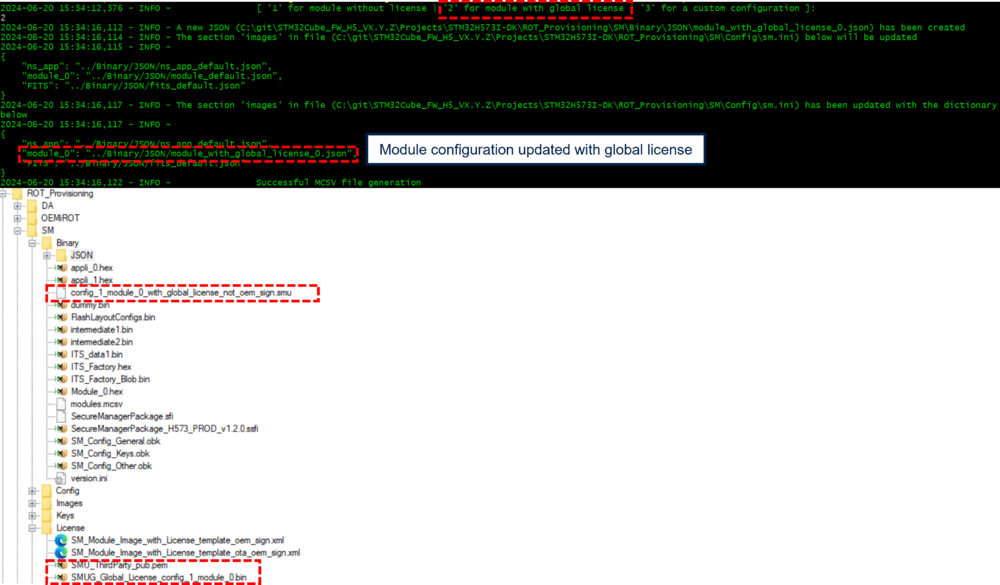
A module can be installed with or without license (see the possibilities below). The module information is described on JSON files located in ROT_Provisioning/SM/Binary/JSON. It gives information about the license and the binary to use during the Secure Manager installation. During the provisioning, the content of the JSON file used is displayed in the terminal as it is shown in Figure 28.
The user can customize the module configuration with the JSON files located in ROT_Provisioning/Binary/JSON/Templates. See the security guidance UM3238 for more details.
If an installation of a third-party module (with license) is chosen, the Authentication of Modules with license parameter in general configuration will be applied.
- 0xBD: Modules with license are not signed by OEM.
- OEM has to integrate the third-party module directly.
- OEM has to integrate the third-party module directly.
- 0xCE: Modules with license are signed by OEM.
- The third-party module will be automatically signed with OEM keys.
- The third-party module will be automatically signed with OEM keys.
When the general configuration contains at least one module, the provisioning.py displays the prompt below:
It displays the module configuration selected. By default, it is a dummy module without license that is used. If the configuration is not the one desired, the user must select 2.
The user can select the type of module to be installed:
- Module without license (developed by OEM): OEM module
- Module with global license (without installation counting, developed by third-party entity): third-party module with global license
- Module with custom configuration: User configuration
5.8.1. Module without license
To install a module without license, just press ‘1’ on the prompt:
With this choice, a dummy module is created (dummy.bin above), then signed and encrypted with OEM keys. The resulting firmware image is Module_0.hex.
5.8.2. Module with global license
To install a module with global license (without installation counting), just press ‘2’ on the prompt:
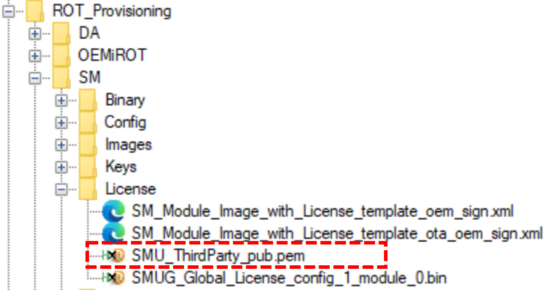
A dummy module with global license, the associated license and the third-party key are available in the package above.
5.8.3. Module with custom configuration
To install a module with a custom configuration (user module):
- Press ‘3’ on the prompt.
- Open the configuration file ROT_Provisioning/SM/Config/sm.ini.
- Update the field module_0 with the JSON file wanted. Template files are available in ROT_Provisioning/SM/Binary/JSON/Templates. See the security guidance UM3238 for more details about JSON file customization.
5.8.4. Module and Initial attestation
When the Initial attestation feature is used, the result of the token (SIGNER_ID field) depends on the origin of the module:
- Module developed by OEM: Module without license
- This is the hash of the public OEM key below.
- Module developed by third-party entity: Module with license
- This is the hash of the public third-party key below.
For further information on this feature, refer to Initial attestation.
5.9. SFI file generation
This step generates the SFI file that contains all the required files for the device configuration, the Secure Manager binary and a nonsecure default application. The SFI file is located in Projects\STM32H573I-DK\ROT_Provisioning\SM\Binary\SecureManagerPackage.sfi
6. Script provisioning.py step 2: Installation
After completion of step 1, follow the indications of the script as shown in the figure below.
The step 2 of the script installs the Secure Manager and a nonsecure default application. If the configuration with one module has been selected, a dummy module is installed by default.
Once the installation is complete:
- A message displays indicating that the board is correctly confirmed.
- On the STM32H573I-DK board, LED1, LED2, LED3, and LED4 should blink. This is part of the default-installed code by the script.
In case of issue:
- Check the provisioning.log file (created where the command is called, in this case, in the directory: .\Projects\STM32H573I-DK\ROT_Provisioning\SM).
- Perform a regression (Refer to the chapter below) and restart at the beginning of this article.
6.1. Default installed code execution
As mentioned above, after the script execution is complete, the four LEDs should blink. This corresponds to the default-installed code.
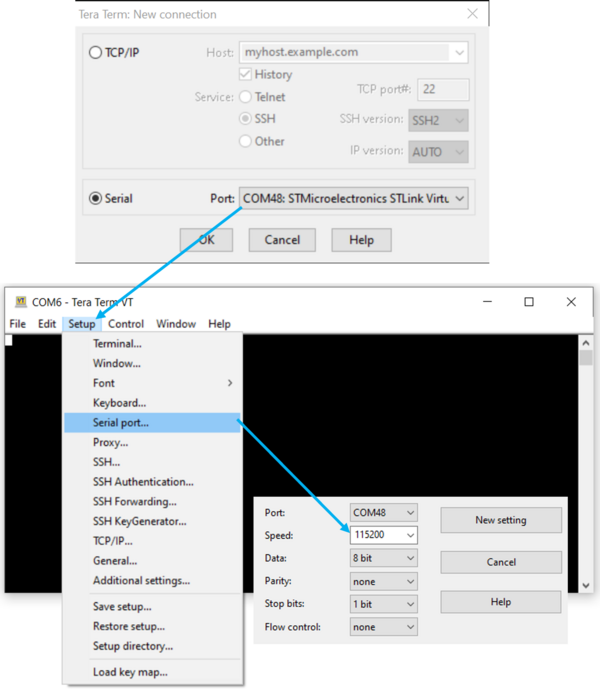
- Start Tera Term or another terminal emulator, as in the figure below.
- Select > Serial > select your COM port.
- Setup > Serial port > set Speed to 115200 baudrate, Data to 8 bit and Stop bit to 1bit > New setting.
- Press the reset button of the discovery board (B2 black button).
- The default installed code makes four led blinking and outputs the information shown in the terminal (see figure below): the memory configuration selected by the user, the Secure Manager version and the version of the installed ST Updatable Root of Trust (SMuRoT).
For more details about SMuRoT, refer to the Secure_Boot_for_STM32H5 article.
7. Using Secure Manager
Secure Manager is now installed, with the STM32H573 in TZ-Closed state. Now you can develop your own nonsecure application, using the usual development tools such as STM32CubeIDE.
The sections below show you how to do that using the example SMAK_Appli (number 3 referred here), provided in the X-CUBE-SEC-M-H5 Expansion package for STM32H5 MCUs, from developing and debugging, to using PSA services, such as firmware update or cryptography.
7.1. Python environment in the nonsecure application
The script project.py ensure the following functionnality:
- (prebuild) Launch the prebuild command (update the configuration). It is directly integrated in IDEs.
- (postbuild) Launch the postbuild command (generate the images). It is directly integrated in IDEs.
- (download) Launch the download command via STM32CubeProgrammer. This command allows to download the nonsecure application to the board.
This script is based on a configuration file project.ini (Application/ROT/SMAK_Appli/project.ini)
This configuration file allows to the user to customize the path of the input and output of the prebuild, postbuild and download command, according to the IDE used. It would be taken into account during the application building.
7.2. Building and running a nonsecure application
You can follow this article to get the SMAK_Appli running.
7.3. The example application
Now that SMAK_Appli is running, a user interface is accessible using the virtual COM port with the same configuration as in here. It showcases the Secure Manager features, accessing the secure services such as firmware update or using the embedded certificates.
7.4. Update of the user application
The following is describing two use cases to update the firmware:
- Using a script based on STM32CubeProgrammer: This option works only in state TZ-Closed.
- Using the PSA API: This is only way to update the firmware in state Closed/Locked.
7.4.1. Using download command
This scenario starts with a SMAK and previous application loaded into the DK.
- Update the application code, for example, edit the main.c:
const uint8_t UserAppId = 'A';
to
const uint8_t UserAppId = 'B';
- Build new version using the "Make" command. It will run:
- a prebuild command: It updates the memory configuration according to the Secure Manager configuration.
- a postbuild command: It generates the encrypted and signed firmware using STM32TrustedPackageCreator and the Secure Manager configuration.
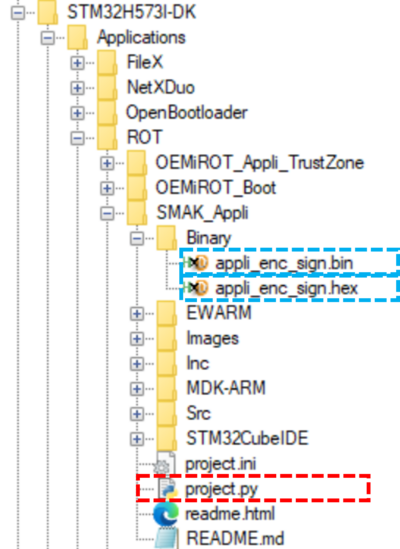
- Two binaries are generated in the binary folder:
- app_enc_sign.bin: Signed, encrypted firmware image and unconfirmed image, used for the firmware update.
- app_enc_sign.hex: Signed, encrypted but confirmed image.
- Flash the image to have a new application running, by running the following command in a terminal in Application/ROT/SMAK_Appli
$ python project.py download
- The new code is running
- In Firmware Update > Get all applications Status, we confirm that the firmware has been flashed with version 1.0.0
7.4.2. Using the PSA API
A step-by-step firmware update can be done using the PSA API. This demonstrates how over the air updates can be used and implemented.
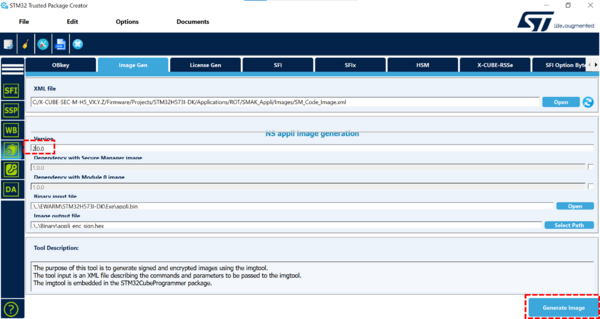
The first step is to prepare the image configuration, by updating the image version:
- In STM32TrustedPackageCreator >> Security panel >> Image Gen open Applications/ROT/SMAK_Appli/Images/SM_Code_Image_bin.xml
- Update the version to 2.0.0
- Click on Generate image
Then, upload the firmware:
- On the terminal, Select Firmware Update > Download Non-Secure App
- In the PC terminal app, select YMODEM data sending - select the appli_enc_sign.bin generated with the version 2.0.0
- Success confirmation will be shown:
- 2.0.0 version is in the download slot with a state of 0x1 Candidate:
Now, the installation can be completed.
- From the Firmware Update Menu, select Request Install Non-Secure App. The Download Slot state updates to 0x5 Reboot needed
- Select Install all requested Applications (reboot) from the Firmware Update Menu.
- The PSA API manages the secure reboot and the images are swapped. The new firmware (2.0.0) is now running, but is in state 0x4 pending install
- The previous firmware (1.0.0) is still preserved in the download slot.
- The new firmware needs to be accepted with Firmware Update >> Accept Non-Secure App. A reboot prior the acceptation will lead to a rollback to firmware 1.0.0. It is used to revert an update in case the firmware has an issue (e.g. cloud connection issue). for a case of a new update running into a problem.
- Check the image state with Get all applications Status from the Firmware Update Menu, and confirm:
- Active slot is running firmware 2.0.0 in state 0x2 installed.
- Previous firmware is not installable from the download slot anymore.
7.4.3. Enabling firmware dependency
An image may require another image to be installed first. If an image has this dependency, it cannot be installed until the required image is installed. The required image must be installed beforehand or at least listed prior to the installation of the dependent image. To have a more detailed view of this feature, check UM3254.
Here's an example in order to create a dependency between a nonsecure application and the Secure Manager Core. Open the STM32TrustedPackageCreator tool and follow the steps:
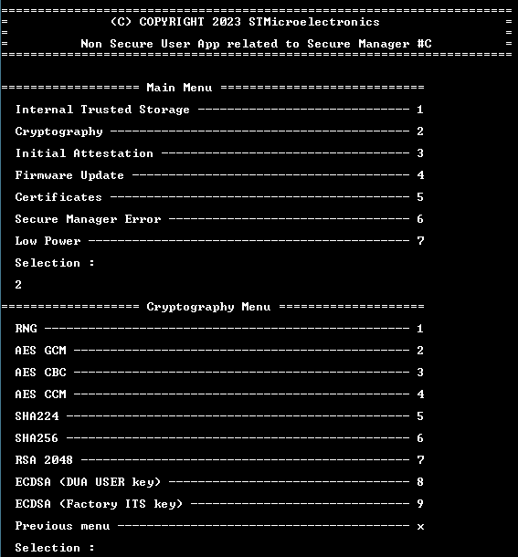
7.5. Cryptography example
The nonsecure user application example includes calls to the PSA API cryptography services:
- RNG: Generate a random of 16 bytes
- AES: Examples of encryption/decryption with a test key of 128 bits (imported and destroyed during the test)
- AES-GCM
- AES-CBC
- AES-CCM
- Hash:
- SHA224
- SHA256
- Asymmetric: Encryption/Decryption asymmetric example
- RSA 2048
- ECDSA (DUA User Key)
- ECDSA (Factory ITS Key)
All the menu options in the Cryptography section are self-contained tests with no user interaction. It is a good introduction about use of cryptography in a nonsecure application in a Secure Manager context.
7.6. Certificates Device Unique Authentication
In STM32H573, key pairs are provisioned in System Flash (DUA: Device Unique Authentication).
- ST DUA Key pair Init Attest: used to authenticate with a cloud (sign the initial attestation token).
- ST DUA Key pair User: used to create secure communication (TLS).
They are unique per device and have the following characteristics:
- Type: ECC Key pair (secp_r1)
- Algorithm: ECDSA
- Usage: Sign/Verif
In the SMAK_Appli example, the menu Certificates (5) allows the user to retrieve the X509 certificate of the DUA Initial Attest and DUA User of the device. It will display the certificate in PEM format. This menu calls APIs of certificates utility located in Utilities\Certificates. It gets the size and the certificate according to the certificate ID.
7.6.1. DUA User X509 certificate
In Certificates menu, select the DUA USER X509 certificate item. This example displays:
- The size of the certificate DUA User. This size depends on the key provision in the device. Its value will change.
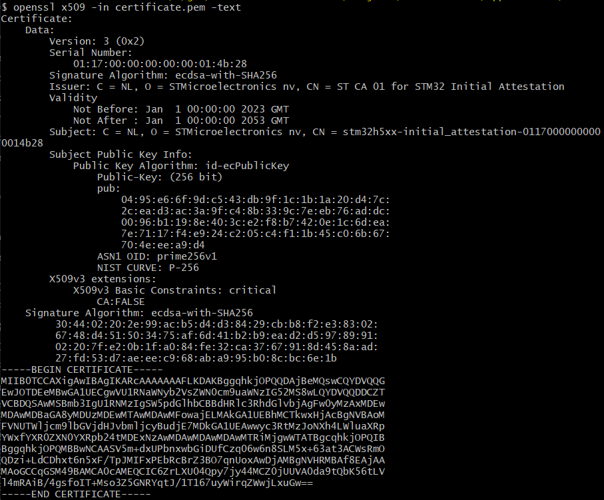
- The certificate in PEM format. This content can be saved a certificate.pem file to be visualized by a trustedfirmware tools (middleware provided in the X-CUBE-SEC-M-H5), or it can be visualized with OpenSSL.
Once the certificate is saved:
- Open a bash terminal.
- Run the following command.
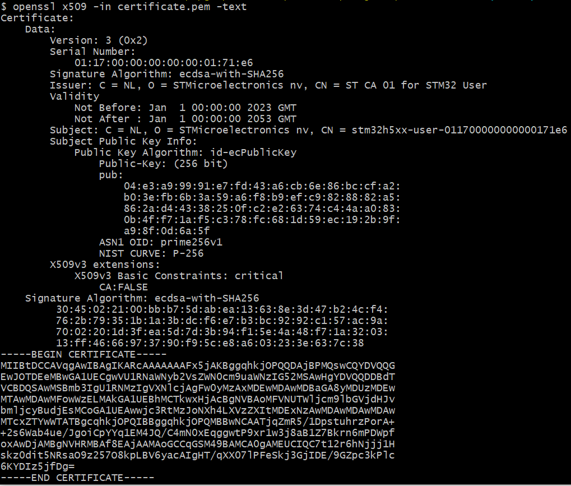
openssl x509 -in certificate.pem -text
- Below, an example of DUA User certificate
- Run the following command to verify the certificate authenticity with the ST Root CA certificate, located in Utilities\Certificates\st_ca_01_dua_user_certificate.pem:
openssl verify -CAfile st_ca_01_dua_user_certificate.pem certificate.pem
The certificate.pem can be exchanged with another device.
7.6.2. DUA Initial Attestation X509 certificate
In Certificates menu, select the DUA Initial Attestation X509 certificate item. This example displays:
- The size of the certificate DUA Initial Attestation. This size depends on the key provision in the device. Its value will change.
- The certificate in PEM format. This content can be saved a certificate.pem file to be visualized by a trustedfirmware tools (middleware provided in the X-CUBE-SEC-M-H5), or it can be visualizes with OpenSSL.
Save the content as certificate.pem and then use openssl to display the content:
openssl x509 -in certificate.pem -text
The public key of this certificate can be used with the Initial Attestation token to verify the token signature. Obtain an extract in PEM format with the following command:
openssl x509 -in certificate.pem -pubkey -noout > pubkey.pem
The public key of this certificate can be extracted in ANS1 format to verify the field INSTANCE_ID of the decoded token (Initial Attestation) with the following command:
openssl x509 -in certificate.pem -pubkey -noout | openssl pkey -pubin -outform der | openssl asn1parse -inform der -out pubkey_der.bin -noout && dd if=pubkey_der.bin of=pubkey.bin bs=1 skip=26 count=65
7.7. Initial attestation
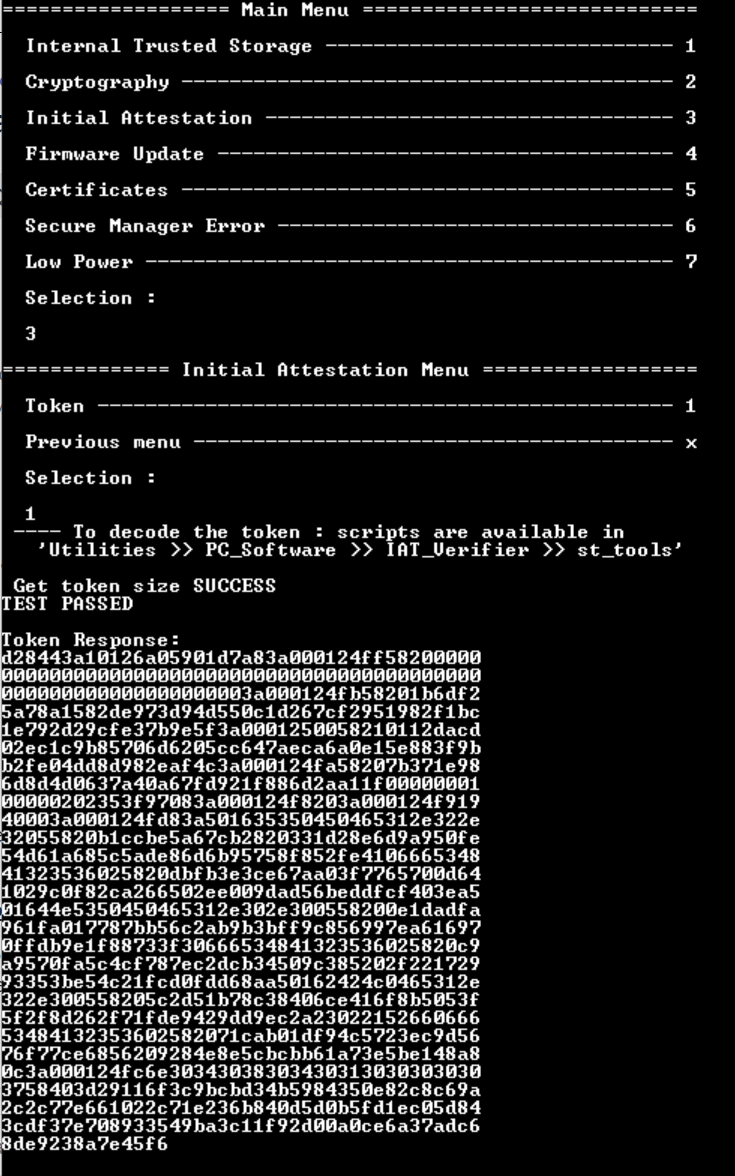
The Initial Attestation token contains information about the installed firmware, and the device state. Obtain it from the menu Initial Attestation >> Token:
To see the token content, a tool is included in the package under:
../Utilities/PC_Software/IAT_Verifier/st_tools/
Before using it, make sure that the prerequisites below are met:
- Save the token as eat.txt to the folder.
- Make sure Python version 3 or higher is installed.
- Check st_tools/readme.txt.
- Optional DUA Initial Attestation pubkey.
Now you can run st_tools/checkiat.sh.
Note: python is called in the script by using a path environment variable.
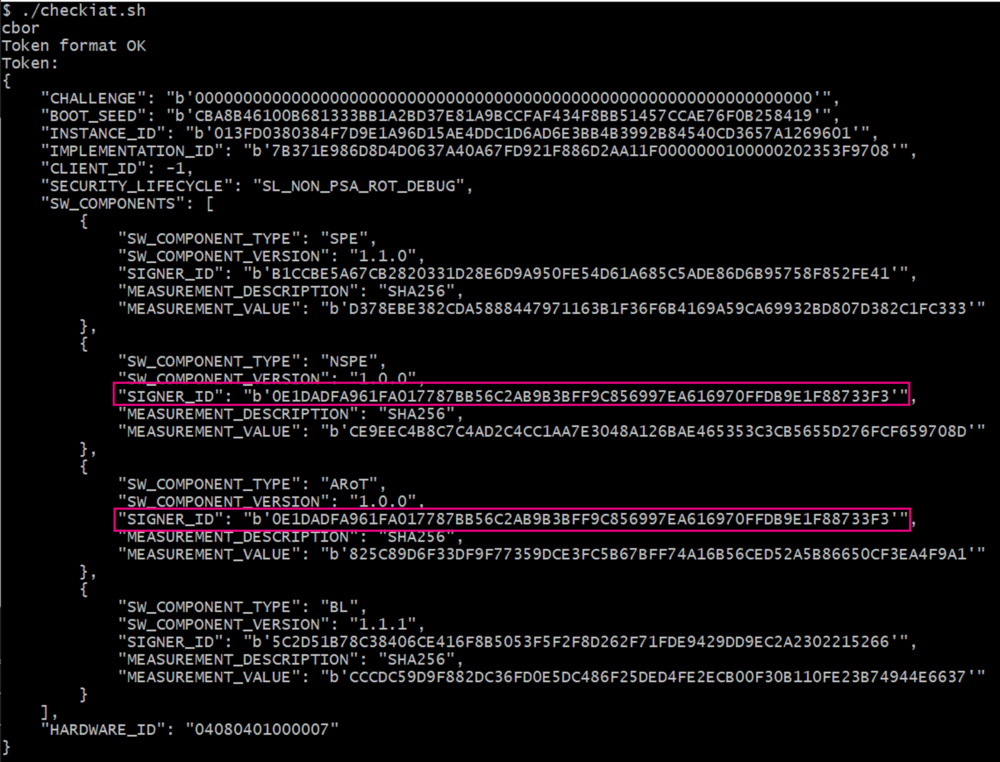
Below an example of a decoded token with a nonsecure application (NSPE) and Secure Module (ARoT)
For the Secure Module, the SIGNER_ID means:
- In the case of a module with a license (developed by third-party entity), the hash of the public third-party key.
- In the case of a module without a license (developed by OEM), the hash of the public key.
See the initial attestation psa specification v1.0.0 to have more information on each field.
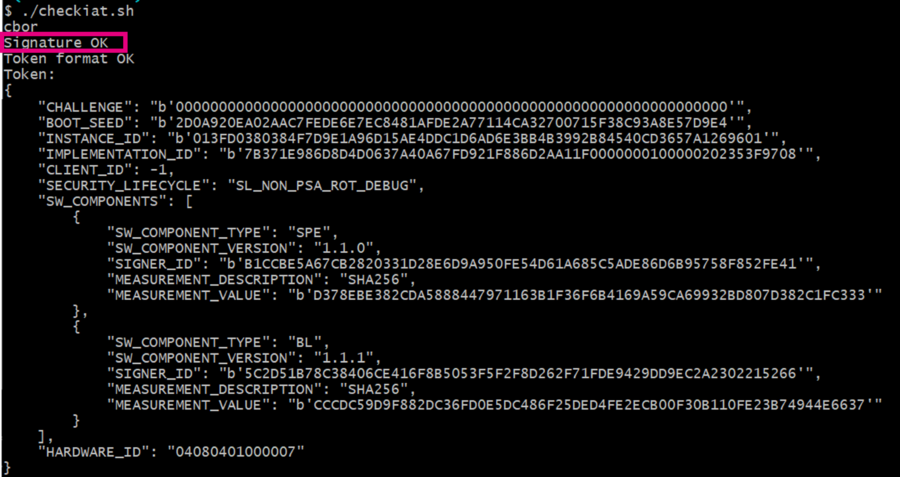
One of the features of the checkiat.sh is to verify the signature with the public key of initial attestation.
- Get the public key of initial attestation (referred here)
- Modify the script to enable the signature verification (script is in readonly mode, change the permission before)
- Set the path to the key file in pem format
- Uncomment the check_iat command line with the key argument
- Run checkiat.sh
7.8. Low Power
The menu Low Power of the non-secure application shows the following examples with the secure manager specificities:
- Sleep mode: wake up after 20 seconds or with user button
- Stop mode: wake up after 30 seconds or with user button
- Standby mode: wake up after 33 seconds
Note: The Secure Manager wakes up the system every 10 seconds in low power mode. It is necessary to verify the system wakes up from the low power exit condition. See UM3254 for further explanation.
7.9. Secure Manager Error
In Secure Manager Error menu from the nonsecure application, it is shown examples of features that allow the user to understand what's going on in the system:
- Generation of PSA API Errors and display the code error table (Menu 1 to 6)
- Activation/Deactivation of the PSA API logger (Menu 7)
7.9.1. PSA API logger
In the nonsecure application, there is a PSA API Logger implemented as example. This feature allows to trace the PSA APIs call with their parameters and return value if any. For more detailed information, refer to UM324.
To activate the PSA API logger feature, select 7. To test the feature, run a Cryptography example as it is shown below.
7.9.2. Error Code
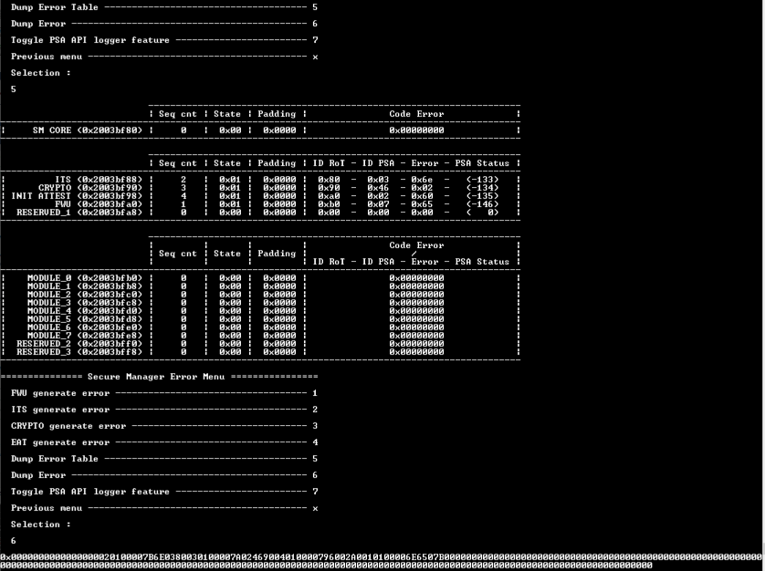
The Secure Manager allows to log errors from the secure to the nonsecure in a table located in SRAM1 (before the SRAM Secure/NonSecure interface area configured by the user in Section General_configuration). Each secure entity can log the last error occurring in their scoop, in this table (each RoT Secure Service, the Secure Manager Core and the module if any). For more details, refer to UM3254.
- To generate PSA API error, select the menu between 1 to 4.
- To visualize the errors generated, select 5. The table displays the error with the following rules:
- Each line indicates secure entity that can log an error (some lines are reserved for future evolution). Only the last error will be saved per entity, until a reset will clean the table
- Each column indicates information about the entity and the error generated:
- Seq cnt: Indicate when the error occurs compared to the others
- State: Indicate the lifecycle of the entity for the PSA RoT services and the Module entity
- Code Error: Indicate the codified errors. For PSA RoT services, this field contains the ID of the RoT service and the ID of the PSA API call that generate the error, the detail error, and the PSA API return status. For having the explanation of the detailed error code, see the file error_codes.h in Middleware/secure_manager/api/interface/error_code/error_codes.h
- To visualize the error code table as a vector to simplify sharing the error codes with the support, select 6
8. Troubleshooting
This section summarizes common errors generated when using the Secure Manager, the provided scripts and tools, and the nonsecure application example.
8.1. Python setup & usage
| Error | Possible root cause | Remedy |
|---|---|---|
| Could not fetch URL during pip install | Trying to use pip behind a proxy | Before running the pip install command. On Unix use export PIP_PROXY=http://your.proxy.domain:port
set PIP_PROXY=http://your.proxy.domain:port
|

|
python version is python 2.x.y | Ensure that when calling python from terminal, it's using python 3.10 or above. You can verify the version of python with the command below:python --version
|
| python is not installed or only python3 is available | Ensure python is followed.
Ensure python install directory is in your path |
8.2. Provisioning & regression scripts
The analysis starts with finding the error message on the provisioning.py and the regression.py, with -v argument, the terminal, or the command screen.
8.3. Project build, download and debug
| Error | Probable root cause | Remedy |
|---|---|---|
| Secure Manager configuration has been changed and the application does not boot after build and project.py download | Project not correctly updated with the latest configuration | Force the reconfiguration by doing a full rebuild of the application |
| Prebuild/postbuild not working after using and moving SMAK_Template | Project relative path to ROT_Provisioning not up to date | Edit the [sm].path in project.ini with the relative path to SM directory. |
| Postbuild not working | ROT_Provisioning folder not in the same drive as the project | Keep it in the same drive. |
| python project.py -v download fails | Product state is Closed or Locked | Ensure product state is TZ-Closed or use PSA FWU service to download application image. |
| python project.py download unstable | Download speed too high leading to unstable communication | Add --speed=reliable to your download command |
| Fail to attach debugger | Product state is Closed or Locked | Check product state running python da.py --discovery script. If Closed, debug can be opened with python da.py --dbg-auth. If Locked, the discovery command will fail. |
| Fail to connect to target | Early fault (in SystemInit for example) in the nonsecure | Try again |
Prebuild failing
|
No python alias available or python not installed | Ensure Python is followed
Ensure python install directory is in your path |
8.4. Application execution
| Error | Probable root cause | Remedy |
|---|---|---|
| Error -132 while using psa_fwu_write() | Data offset should be 16 bytes aligned | Ensure it's aligned |
| Infinite loop when using HAL driver to write in flash | Writing in secure area | Reset is needed |
| Error when calling psa api with large data | SRAM Secure/NonSecure interface area size too small | Increase it during SM installation |
| Application stuck in SystemClockInit() | nonsecure try to setup LSI | Remove LSI configuration from nonsecure |
| Application stuck in Error_Handler | nonsecure try to setup and/or use the LPTIM6 | Remove the LPTIM6 configuration from nonsecure. The LPTIM6 is reserved for the Secure Manager. The nonsecure cannot use it. |
| nonsecure ty to setup HSI48 | Remove HSI48 configuration from nonsecure |
If you need to reach support, start by sharing the following information:
- Running software component version. In order to retrieve the versions, call psa_fwu_query with the following image ID:
- 0x0001 for Secure Manager Core
- 0x1F01 for SMuRoT
- 0x0101 for nonsecure application
- 0x0201 for secure module 0
- The error code array. Check error_code_api_get_error function in error_code_api.c from SMAK_Appli project to retrieve the 128B.
