How to start with OEMuRoT on STM32N6 MCUs
Literature
- UM2237 STM32CubeProgrammer software description
- AN5054 Secure programming using STM32CubeProgrammer
- BootRom wiki article
- Secure Boot wiki article
- Security features for STM32N6MCUs wiki article
- OEMuRoT for STM32N6
Prerequisites
- Hardware
- STM32HN6 discovery board
- Discovery MB1860- STM32N6 (need USBC cable)
Required tools
- IAR: v9.40.1 + IAR patch to support STM32N6 (delivered with V0.5.0) + IAR Patch EWARMv9_STM32N6xx_V0.6.2
- IAR patch is available in the STM32CubeFW: STM32Cube_FW_N6_Vx.x.x\Utilities\PC_Software
- STM32CubeN6 FW version 1.0.0 or later
- STM32CubeProgrammer version 2.18.0
- Tera Term / Putty or equivalent terminal emulator
- STM32Cube Firmware
- Download the STM32Cube_FW_N6 Cube firmware (it is recommended to place it close to form the C: to avoid long windows paths).
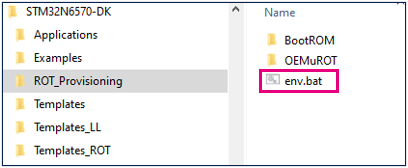
- A directory STM32N6-DK is included in "STM32Cube_FW_N6\Projects" .
- Open the env.bat file If the STM32CubeProgrammer has not been installed in the default folder:C:\Program Files\STMicroelectronics\STM32Cube\STM32CubeProgrammer, the customized installation path needs to be updated:
1. Introduction
OEMuRoT properties
- It is a secure boot with secure update capabilities
- stored in an external flash memory
- Code provided in STM32CubeN6 firmware
- MCU Boot based
- OEMuRoT crypto keys stored in OTP area
2. Step 1 Configuration management - secrets provisioning
The secrets are provisioned in OTP fuses. Once fused, the secrets can not be modified anymore.
To provision secrets, the device must be in Secured_unlocked state and in development mode. While in development mode, debug is open which allows STM32CubeProgrammer to program OTP fuses.
2.1. BootRom secrets provisioning
BootRom secrets are:
- Keys used to sign the OEMuRoT_Boot firmware
- Keys used to encrypt/decrypt the OEMuRoT_Boot firmware
- RMA password
To generate and provision the secrets, if not already done, refer to the following chapters:
Security:How to install a trusted application on STM32N6 MCUs#Keys Generation
Security:How to install a trusted application on STM32N6 MCUs#Keys provisioning
2.2. OEMuRoT secrets provisioning
Launch the script keys_generation.bat to generate the OEMuRoT secrets in Keys folder
Folder path: Projects\STM32N6570-DK\ROT_Provisioning\OEMuROT
- Configure your board in Dev Boot mode:
- If you are using STM32CubeFW N6 v1.0.0,
Open keys-programming.bat script with an editor and replace line 15:
set connect_no_reset=-c port=SWD ap=1 mode=Hotplug
by
set connect_no_reset=-c port=SWD ap=1
Save the modifications.
- Launch the script keys_programming.bat
Folder path: Projects\STM32N6570-DK\ROT_Provisioning\OEMuROT\Keys
2.3. Debug Authentication password provisioning
When using STM32CubeFW N6 v1.0.0, you must create your password via STM32CubeProgrammer:
- Open the STM32CubeProgrammer and connect your board in Dev Boot mode:
- Go to the shield
 and select PROV tab.
 - Choose a password (size between 4 and 16 characters)
- Select the path where you want to provision the password
- Click "Start Provisioning"
Once the success messages received, the password is provisioned in OTP and can't be changed anymore.
The generated file "password.bin" will be used to do Debug Authentication
2.4. OEMuRoT provisioning script
The script drives OEM to
- Provision secrets
- Compile OEMuRoT_Boot firmware
- Compile User application Secure and Nonsecure
- Generate trusted images
Then, script automatically flashes
- OEMuRoT_Boot image
- user application image(s)
- User data
Launch provisioning.bat script from folder: Projects\STM32N6570-DK\ROT_Provisioning\OEMuROT.
The step 1 of the script is done. Press a key and start step 2.
3. Step 2: Images generation
3.1. OEMuROT_Boot image generation
OEMuROT_Boot firmware secure boot properties:
- Executed at HDP level 1
- Launches a user application in HDP Level 2
- Secure firmware update
Many Secure boot capabilities' parameters can be updated like:
- Number of user application images and data images
- Load and Run in external or internal RAM / Execute in place option
- SWAP or overwrite mode
OEMuRoT default parameters in STM32CubeFW:
- Load and run Internal RAM
- Overwrite mode
- 1 Secure application image
- 1 Nonsecure application image
- 1 secure data image
- 1 nonsecure data image
To generated application images:
- Open the postbuild.bat file located in Projects\STM32N6570-DK\Applications\ROT\OEMuROT_Boot\EWARM
 The postbuild The script is automatically launched after the IAR project compilation. By default, this script signs the OEMuRoT_Boot firmware, but does not encrypt it. In this step by step we are showing how to encrypt and sign the OEMuRoT_Boot firmware so the script must be edited. In order to encrypt the OEMuRoT_Boot firmware, the crypted variable must be set to 1:
- Save the postbuild.bat script and close it.
- Launch the Project.eww file in the Projects\STM32N6570-DK\Applications\ROT\OEMuROT_Boot\EWARM folder

- Compile the project

After build success, the trusted image is created during the postbuild script.
3.2. Application image generation
OEMuRoT_Appli is an example of secure and non secure application managed by OEMuRoT
To generate application images:
- Launch the Project.eww file in Projects\STM32N6570-DK\Applications\ROT\OEMuROT_Appli\EWARM folder

- Select the project secure
- Compile the project
- Select the project Nonsecure
- Compile the project
User application must be flashed encrypted and signed
The trusted images have been signed and encrypted during the postbuild script but
this could be done thanks to the STM32TrustePackageCreator tool
3.3. Data images generation
Data secure and nonsecure provided in STM32CubeFW
To update the data examples provided (optional)
- Enter the xml file corresponding to data image secure or nonsecure in Projects\STM32N6570-DK\ROT_Provisioning\OEMuROT\Images
- Update the parameters (input/ output..)
- Click on
⇒ an encrypted and signed file is generated: s_data_enc_sign.bin
4. OEMuRoT - Execute application
- Set the device in flash boot mode and open Tera Term:
5. Load a new user application
In this example, we update the non secure application, but the same process can be applied for the secure application, the secure Datas, or/and the non secure Datas.
First, the non secure application display can be modified before updating a new application.
- Open the project non secure in IAR
- Open main.c file nonsecure
- Modify line 47
- Rebuild the code → a new trusted image nonsecure is generated
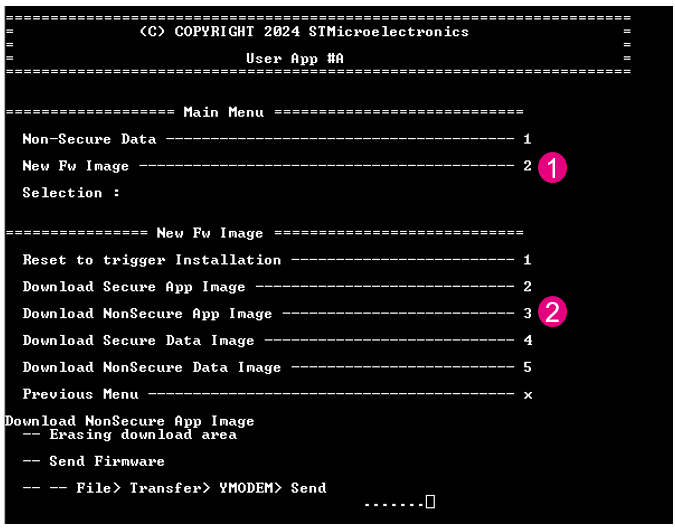
Go back to the Tera Term window, with the device connected in Flash boot mode and press reset to display the application menu. To load a new nonsecure application:
- Enter “2” to select “New Fw Image”
- Select “3” “Download Nonsecure App Image”
- In Tera Term panel, go to File → Transfer → YMODEM → Send
- Select the new secure application to download: rot_tz_ns_app_enc_sign.bin
rot_tz_ns_app_init_enc_sign.bin contains magic at the end of the binary file. It is used by the provisioning script.
rot_tz_ns_app_enc_sign.bin does not contain the magic and it is used to download a new application. The size of this binary is smaller, the download time is thus reduced.
Result:
- You get the Success message
- Press the reset button and see the update displayed
6. Lock the device
To lock the device, refer to the wiki article:Security:How to install a trusted application on STM32N6 MCUs#Lock the device and execute trusted application
7. Load new OEMuRoT (FSBL) in Secured-locked state
OEMuRoT stands for OEM Updatable root of trust. It means that the OEMuROT_Boot firmware, the first stage bootloader that is called by the BootRom, can be updated. Even if the device is in secured-locked state this firmware can be updated.
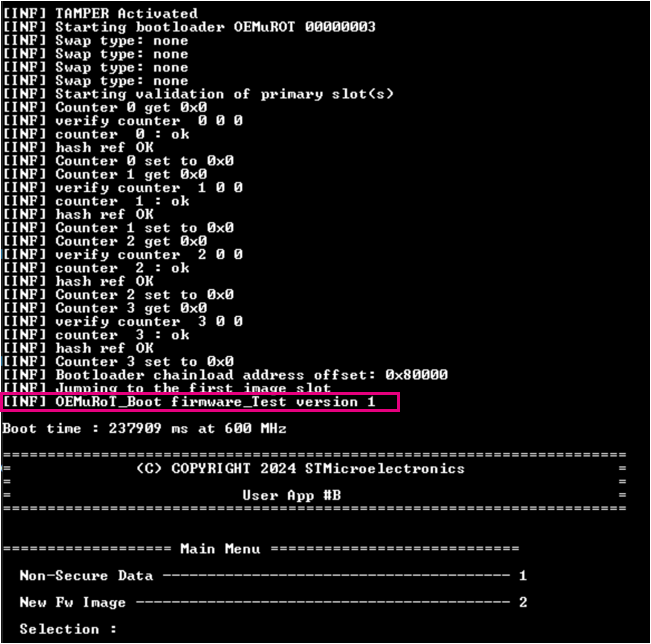
First we will generate a new OEMuROT_Boot firmware. This firmware will have the same functionalities than the OEMuROT_Boot firmware already installed but the display to Teraterm will be different in order to visualize the modifications easily.
- To load this new OEMuRoT_Boot firmware we need specified files that you can load from Github.
Please load the application from Github:BootRom_traces
Download the code:
click to "Code", then "Download ZIP" :
Copy/paste the folderLoad_new_FSBL_locked_state to Projects\STM32N6570-DK\ROT_Provisioning folder:
- First modify the OEMuROT_Boot firmware code.
When a new OEMuRoT_Boot version is uploaded, its version must be upper than the previous one. By default the version installed with STM32CubeFW is 0. In this example we will install version 1.
Open the OEMuROT_Boot firmware IAR project : double click on Project.eww located in Projects\STM32N6570-DK\Applications\ROT\OEMuROT_Boot\EWARM folder.
Add a line of code before the firmware jumps to the user application : at line 153 of the file bl2_main.c located in Middlewares\Third_Party\mcuboot\bl2\ext\mcuboot folder add, for example indicate which version number you are uploading :
BOOT_LOG_INF("OEMuRoT_Boot firmware_Test version 1");
- Rebuild the project: a new binary file OEMuROT_Boot.bin is generated. This binary file is automatically generated to Projects\STM32N6570-DK\Applications\ROT\OEMuROT_Boot\Binary folder.
- Rename OEMuROT_Boot.bin to binary.bin and copy/ paste it to Projects\STM32N6570-DK\ROT_Provisioning/Load_new_FSBL_locked_state\NOR_Binary folder :
- Go to Projects\STM32N6570-DK\ROT_Provisioning/Load_new_FSBL_locked_state folder
- The script Sign_newFSBL.bat will sign the new binary generated with the keys programmed in OTP.
Launch the script Sign_newFSBL.bat
- Two new signed binaries are generated in NOR_Binary folder:
- binary_trusted.bin : the new FSBL to be loaded
- OpenBootloader_STM32N6570-DK-trusted.stm32 : the signed OpenBootloader
- Connect your board in Serial mode:
- Open STM32CubeProgrammerand connect the board via USB1:
- Go to "Memory & File editing" tab and select "Open file" :
- Open the FlashLayout.tsv file located in Projects\STM32N6570-DK\ROT_Provisioning\Load_new_FSBL_locked_state\NOR_Binary folder
- Browse the Binaries path and download the file → this will load the new FSBL
Success message:
- Set the device now in Flash boot mode to execute the new FSBL
8. Debug Authentication
- Open the STM32CubeProgrammer
- The N6 Discovery board must be configured in Flash boot mode.
- Click to Discover and the discover window is displayed:
After this discover command, you have the possibility to open the debug.
Select the password file password.bin generated in "OEMuRoT secrets provisioning" paragraph, and click to "Open Debug" :

You get this success message:
Debug nonsecure is now opened. The board is automatically connected to the STM32CubeProgrammer.
In the "Memory & File editing" tab, you can read the nonsecure Data @ 0X2404000:
Disconnect STM32CubeProgrammer and you can debug the non secure application in IAR.
Don't disconnect your board (don't power ON/OFF the board), to let the debug opened.
Launch the Project.eww file in Projects\STM32N6570-DK\Applications\ROT\OEMuROT_Appli\EWARM folder
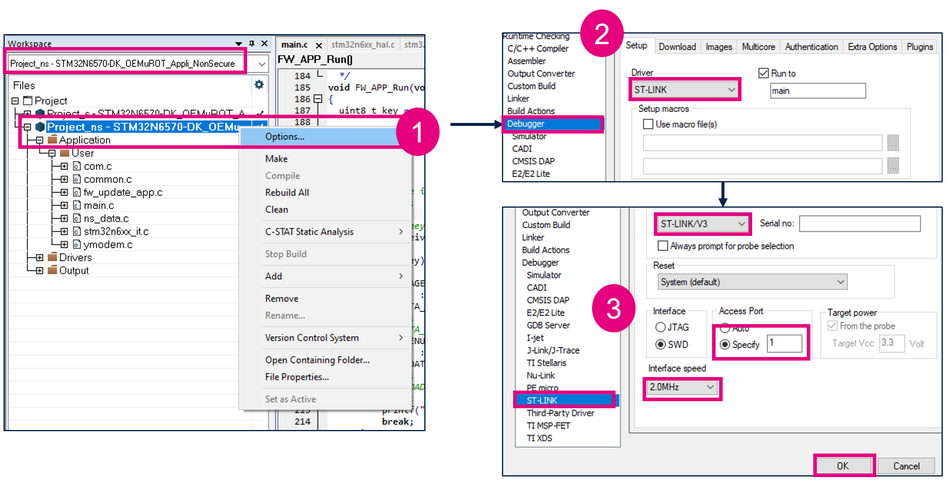
Modify the Project nonsecure properties:
- Right click on Project-ns project and select "Options..."
- In "Debugger" select "ST-LINK" driver
- In "ST-LINK" select "ST-LINK/V3" emulator. Then choose access port = 1 and set Interface speed to 2MHZ.
Click OK
- Add a breakpoint in main.c file nonsecure, line 195
- Select "Project -> Attach to Running Target"
You can now debug the nonsecure code in IAR.


