1. STM32WB - BLE P2P Server and Arduino
This is a description on how to create the proprietary application P2P Server thanks to the Arduino IDE.
Chapter 7.4 of the following application note describes the P2P Server application specification:
- AN5289-Building wireless applications with STM32WB Series microcontrollers[1]
1.1. Arduino configuration for P-NUCLEO-WB55
- Add the support of STM32 MCU in Arduino IDE[2]:
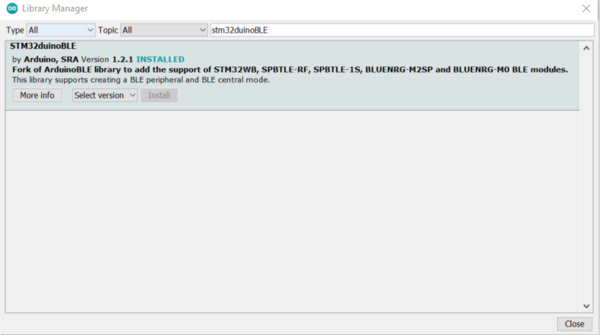
- Include STM32duinoBLE library:
- STM32duinoBLE[5]
- From the "Tools > Manage Libraries..." menu, select the STM32duinoBLE library:
- STM32duinoBLE[5]
| STM32duinoBLE library |
|---|
- Configuring IDE:
- Connect the Nucleo-64 WB55 board to the computer USB port.
- Launch the Arduino software.
- Select the Nucleo-64 WB55 board in two steps:
- From the "Tools > Board" menu, select the STM32 boards groups: Nucleo-64
- Then from the "Tools > Board part number" menu, select the P-NUCLEO WB55RG.
| Arduino Nucleo-64 WB55 configuration |
|---|
1.2. BLE stack configuration for P-NUCLEO-WB55
BLE stack configuration for P-NUCLEO-WB55:
- For release v1.12.0 and previous use full stack (stm32wb5x_BLE_Stack_full_fw.bin)
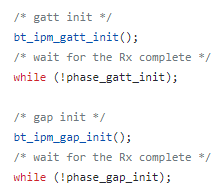
- For release v1.13.0 and next use HCI layer stack (stm32wb5x_BLE_HCILayer_fw.bin) and do the following modification in stm32BLEDuino library:
- In HCISharedMemTransport.cpp file comment the following lines:
| HCISharedMemTransport.cpp modification |
|---|
1.3. Sketch STM32WB_P2P_Server.ino
The following Arduino's Sketch demonstrates the P2P Server application including debug traces on the UART hyperterminal.
- Compile and upload STM32WB_P2P_Server.ino
/**
******************************************************************************
* @file    STM32WB_P2P_Server.ino
* @author  WBL BLE Application Team
* @brief   Arduino STM32WB P2P Server Application (Custom STM)
******************************************************************************
* @attention
* This example creates a P2P server Application
* P2P service                     - 0000FE40-cc7a-482a-984a-7f2ed5b3e58f
* Led control Characteristic      - 0000FE41-8e22-4541-9d4c-21edae82ed19 (Read|WritewithoutResponse)
*                                     Byte 0 - Board Selection
*                                     Byte 1 - LED Status (1 : ON; 0 : OFF)
* Button control Characteristic   - 0000FE42-8e22-4541-9d4c-21edae82ed19 (Notify)
*                                     Byte 0 - Board Selection
*                                     Byte 1 - LED Status (1 : ON; 0 : OFF)
* To be supported by Smart Phone application ST BLE Sensor, the advertsing data shall contain the AD Element Manufacturer as following:
* Manufacturer_data:
*   0x01,                   // SKD version
*   0x83,                   // CFG_DEV_ID_P2P_SERVER1
*   0x00,                   // GROUP A Feature
*   0x00,                   // GROUP A Feature
*   0x00,                   // GROUP B Feature
*   0x00,                   // GROUP B Feature
* };
*
* The two characteristics are used :
*  -- to control (Write) the LED1 of Nucleo64-WB55 board LED
*  -- or to Notify the remote device by pushing SW1 f Nucleo68-WB55 board.
*
*  The circuit:
*  - Nucleo68-WB55
*  You can use a generic BLE central app, like ST BLE sensor or ST BLE Toolbox, to interact with the services and characteristics.
*  created in this sketch.
*
*  This example code is in the public domain.
*
******************************************************************************
*/
/* Includes ------------------------------------------------------------------*/
#include <STM32duinoBLE.h>

/* Private typedef -----------------------------------------------------------*/
typedef struct __attribute__((packed)) {
    byte boardSelection;
    byte ledStatus;
} P2P_STM32WB_led_t;
P2P_STM32WB_led_t ledControl;

typedef struct __attribute__((packed)) {
    byte boardSelection;
    byte ButtonStatus;
} P2P_STM32WB_button_t;
P2P_STM32WB_button_t buttonInfo;

/* Private variables ---------------------------------------------------------*/
const int buttonPin = PC4; // set buttonPin to digital pin PC4
const int ledPin = LED_BUILTIN; // set ledPin to on-board LED
const int buttonPushed = 1;
const int boardWB_1 = 1;

int buttonPushCounter = 0;   // counter for the number of button presses
int buttonState = 0;         // current state of the button
int lastButtonState = 1;     // previous state of the button

/* Private variables ---------------------------------------------------------*/
/* UUID for P2P Service-------------------------------------------------------*/
BLEService P2PService("0000FE40-cc7a-482a-984a-7f2ed5b3e58f");

/* create switch characteristic and allow remote device to read and write -----*/
BLECharacteristic ledCharacteristic("0000FE41-8e22-4541-9d4c-21edae82ed19", BLERead | BLEWriteWithoutResponse,sizeof(ledControl),true);

/* create button characteristic and allow remote device to get notifications --*/
BLECharacteristic buttonCharacteristic("0000FE42-8e22-4541-9d4c-21edae82ed19", BLENotify,sizeof(buttonInfo),true);

/* Manufacturer Advertising Data element structure ----------------------------*/
static const uint8_t manufacturer_data[6] = {
    0x01, // BlueST Protocol - SDK Version
    0x83, // Device ID - STM32WB P2P Server
    0x00, // GROUP A Feature
    0x00, // GROUP A Feature
    0x00, // GROUP B Feature
    0x00, // GROUP B Feature
};

HCISharedMemTransportClass HCISharedMemTransport;
BLELocalDevice BLEObj(&HCISharedMemTransport);
BLELocalDevice& BLE = BLEObj;

/**
* @brief  Connection Event Handler
* @param  BLE Central Device
* @retval None
*/
void blePeripheralConnectHandler(BLEDevice central) {
  // central connected event handler
  Serial.print("==> Connection established with central: ");
  Serial.print(central.address());
    if (BLE.connected()) {
      Serial.print(" -- RSSI = ");
      Serial.println(BLE.rssi());
    }
}

/**
* @brief  Disconnection Event Handler
* @param  BLE Central Device
* @retval None
*/
void blePeripheralDisconnectHandler(BLEDevice central) {
  // central disconnected event handler
  Serial.print("==> Disconnection event with central: ");
  Serial.println(central.address());
}

/**
* @brief  Event Handler when Characteristic Written
* @param  BLE Central Device
* @param  Characteritic
* @retval None
*/
void LedCharacteristicWritten(BLEDevice central, BLECharacteristic characteristic) {
  byte data[sizeof(ledControl)];
  // central wrote new value to characteristic, update LED
  if (ledCharacteristic.written()) {
    Serial.println("==>Led Characteritics written:");
    Serial.print("Data Received: ");
    ledCharacteristic.readValue(data, sizeof(ledControl));
    Serial.print(ledCharacteristic.valueLength());
    Serial.print(" ");
    Serial.print("bytes -- ");
    for (int i = 0; i < sizeof(ledControl); i++) {
      Serial.print("0x");
      Serial.print(data[i], HEX);
      Serial.print(" ");
    }
    Serial.println();
    ledControl.boardSelection=data[0];
    ledControl.ledStatus=data[1];
    Serial.print("Board Selected:");
    Serial.println(ledControl.boardSelection);
    Serial.print("Value:");
    Serial.println(ledControl.ledStatus);

    if(ledControl.ledStatus){
      Serial.println("==>LED1 ON");
      digitalWrite(ledPin, HIGH);
    }
    if(!ledControl.ledStatus){
      Serial.println("==>LED1 OFF");
      digitalWrite(ledPin, LOW);
    }
  }
}

/**
* @brief  Arduino main Setup
* @param  None
* @retval None
*/
void setup() {
  Serial.begin(115200);
  while (!Serial);

  pinMode(ledPin, OUTPUT); // use the LED as an output
  pinMode(buttonPin, INPUT_PULLUP); // use button pin as an input

  //Project P2P server
  Serial.println("======================================");
  Serial.println("== STM32WB - P2P Server Application ==");
  Serial.println("======================================");

  // begin initialization
  if (!BLE.begin()) {
    Serial.println("==>starting BLE failed!");

    while (1);
  }

  //Set the device name in the built in device name characteristic.
  BLE.setDeviceName("STM32WB-Arduino");
  //set the local name peripheral advertises
  Serial.println("==> Advertising Name - P2P_Server");
  BLE.setLocalName("P2P_Server");
  //Set the manufacturer data value used when advertising.
  BLE.setManufacturerData(manufacturer_data, sizeof(manufacturer_data));

  //Set the advertising interval in units of 0.625 ms.
  //Defaults to 100ms (160 * 0.625 ms) if not provided.
  BLE.setAdvertisingInterval(160); // 160 * 0.625 ms

  // set the UUID for the service this peripheral advertises:
  //BLE.setAdvertisedService(P2PService);

  // add the characteristics to the service
  P2PService.addCharacteristic(ledCharacteristic);
  P2PService.addCharacteristic(buttonCharacteristic);
  // assign event handlers for characteristic
  ledCharacteristic.setEventHandler(BLEWritten, LedCharacteristicWritten);

  // add the service
  BLE.addService(P2PService);

  //configure data to Notify when SW1 pushed
  buttonInfo.boardSelection = boardWB_1;
  buttonInfo.ButtonStatus=buttonPushed;

  // start advertising
  BLE.advertise();

  String address = BLE.address();
  Serial.print("==>Local address is: ");
  Serial.println(address);

  Serial.println("==>Advertising Started, waiting for connections...");

  // assign event handlers for connected, disconnected to peripheral
  BLE.setEventHandler(BLEConnected, blePeripheralConnectHandler);
  BLE.setEventHandler(BLEDisconnected, blePeripheralDisconnectHandler);
}

/**
* @brief  Arduino Loop
* @param  None
* @retval None
*/
void loop() {
  // poll for BLE events
  BLE.poll();

  // read the SW1 Button input pin:
  buttonState = digitalRead(buttonPin);
  // compare the buttonState to its previous state
  if (buttonState != lastButtonState) {
    // if the state has changed, increment the counter
    if (buttonState == LOW) {
      // if the current state is HIGH then the button went from off to on:
      buttonPushCounter++;
      //Serial.println("on");
      Serial.print("==> Number of time button is pushes: ");
      Serial.println(buttonPushCounter);

      //check if connection is established by Central device
      if(BLE.central()){
        //check if Notification is enabled
        if (buttonCharacteristic.subscribed()) {
          Serial.println("buttonCharacteristic is subscribed:");
          Serial.println("==>Notification of Button Pushed is sent");
          buttonCharacteristic.writeValue((byte*) &buttonInfo, sizeof(buttonInfo));
        } else {
           Serial.println("buttonCharacteristic is NOT subscribed:");
           Serial.println("==>Notification is NOT sent");
        }
       }
    } else {
      // if the current state is LOW then the button went from on to off:
      //Serial.println("off");
    }
    // Delay a little bit to avoid bouncing
    delay(50);
  }
  // save the current state as the last state, for next time through the loop
  lastButtonState = buttonState;
}
/************************************ STMicroelectronics *****END OF FILE****/
1.4. Debug traces
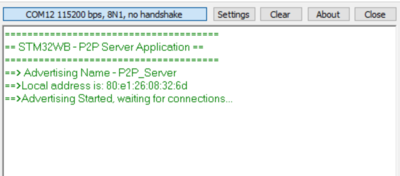
At startup, the HyperTerminal displays the following traces
| Startup Debug Trace |
|---|
2. Smart Phone application - ST BLE Sensor
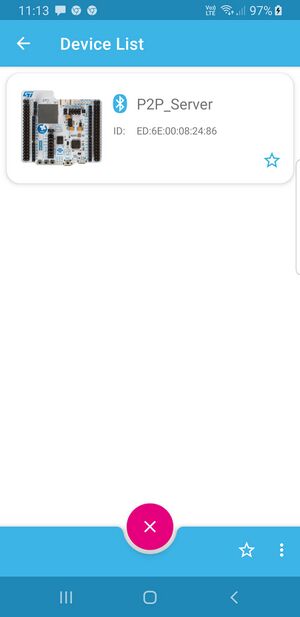
- Download ST BLE Sensor or ST BLE ToolBox application on the smartphone.
- Scan and connect to P2P_Server
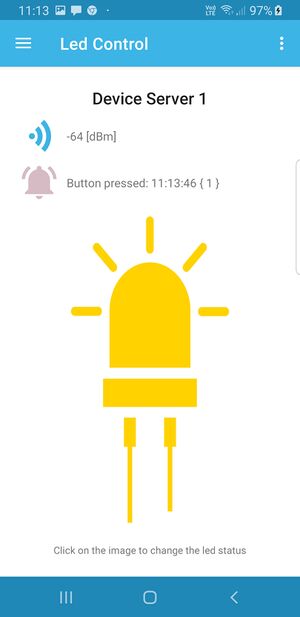
- Toggle SmartPhone LED or push SW1 button of the Nucleo-64 WB55 board.
| ST BLE Sensor Scan | ST BLE Sensor Connect |
|---|---|
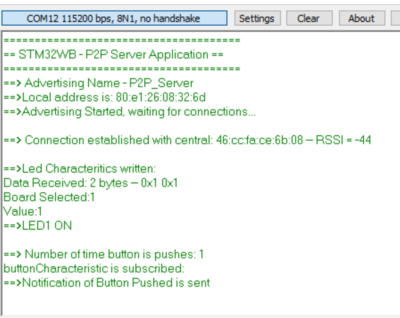
- Debug trace displays all the sequences at the application level
| Arduino Nucleo-64 WB55 traces |
|---|
3. References
