OEM-iROT stands for Original Equipment Manufacturer immutable Root of Trust. The users can develop OEM-iROT on all the STM32H5xx devices.
1. Introduction
This wiki article describes OEMiROT process steps developed in STM32CubeH5 firmware and to read before the How to articles about OEMiROT :
For more information about OEMiROT operations possibilities, refer to OEMiROT for STM32H5.
2. OEM-iROT services
- 1) The secure boot (Root of Trust services):
- It is an immutable code that runs after every system reset. It activates STM32 runtime protections and verifies the authenticity and integrity of the application code before every execution.
- Integrity: to ensure that no corrupted or maliciously modified firmware is about to run.
- Authenticity: to verify that firmware comes from a trusted and known source to prevent unauthorized entities from installing and executing code.
- Integrity: to ensure that no corrupted or maliciously modified firmware is about to run.
- It is an immutable code that runs after every system reset. It activates STM32 runtime protections and verifies the authenticity and integrity of the application code before every execution.
- 2) The Secure Firmware Update:
- It is an immutable code that detects if a new firmware image is available, checks its authenticity and verifies the integrity of the code before installing it after decryption.
3. OEM-iROT process in STM32CubeH5 firmware examples
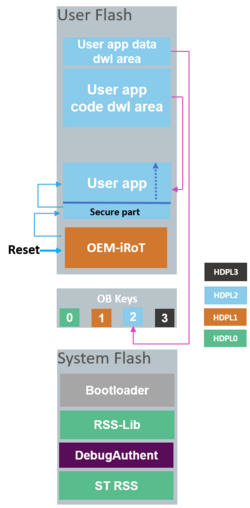
At reset, the OEM-iROT firmware in user flash memory first runs in HDPL1. It is the user's responsibility to develop a root of trust firmware that:
- Checks first the authenticity and integrity of the user application
- Jumps secondly to the user application or bootloader depending on the authenticity and integrity checks.
After successfully checking the authenticity and integrity of the user application, OEM-iROT can jump directly into HDPL2 or HDPL3 (installation of the user application is possible in HDPL2 or HDPL3). User Application can be a fully secure application, a fully nonsecure application, or a combined secure/ nonsecure application. If parameters configured in the User Root of Trust are not respected or if Authenticity and integrity checks fail, OEM-iROT executes the bootloader to download the new user application and user data. The user is responsible for activating all the required security protections during the User Application execution.
3.1. OEM-iROT provisioning steps
3.1.1. Step 1 - OEM-iROT and Debug Authentication configuration
3.1.1.1. OEM-iROT configuration
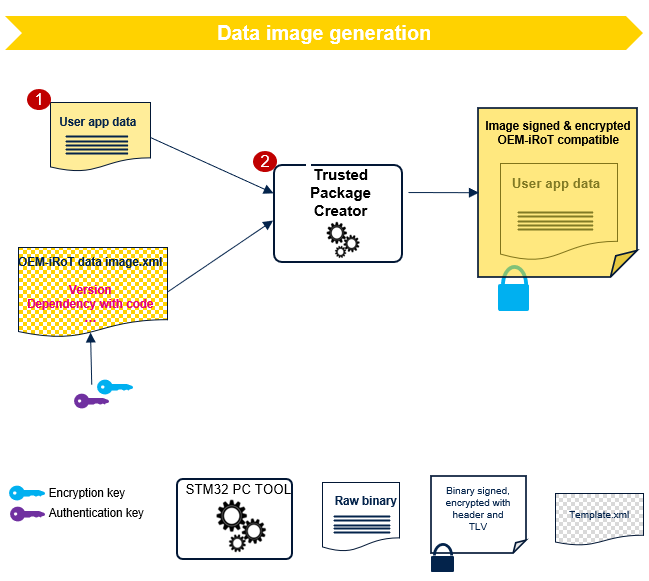
STM32TrustedPackageCreator tool generates OEM-iROT configuration file (.obk) based on template provided in STM32CubeH5 Software package. This configuration file generates keys used to:
- At the binary generation step:
- Encrypt the data
- Sign the user application
- In the device:
- Decrypt the data
- Check signature (authorization)
The user configures all other parameters directly in his Root of Trust firmware located in HDPL1 in User Flash.
This code must be able to perform the authenticity and integrity checks of the User application and data images.
It also configures the number of User applications and images:
- Number of data images
- Number of code images
The OEMiROT_boot applications, available for each OEMiROT example in the folders Applications\ROT\OEMiROT_Boot\Inc\flash_layout.h, include the definition of all these parameters.
3.1.1.2. DA configuration
STM32TrustedPackageCreator also generates the Debug Authentication configuration file (.obk) based on template provided in STM32CubeH5 software package. This file configures the conditions to reopen a protected device and the debugger.
Depending on the additional configuration of the user application, the generation of files might happen.
For more details about debug authentication mechanisms, please refer to Introduction to Debug Authentication for STM32H5 MCUs.
3.1.2. Step 2 – Code and data image generation
STM32CubeH5 FW package delivers user application projects for each OEM-iROT example in Applications\ROT folders.
The compilation of the user application projects generates a binary file. This binary file is an input file to generate the encrypted code images .hex.
Associated with an XML configuration file User can update the firmware area size and the version of the image.
STM32CubeH5 firmware package also delivers binaries data file examples in the ROT_Provisioning\OEMiROT\Binary folder.
3.1.2.1. User application code image generation
During compilation, any IDE generates the binary code file of the user application.
The image creation is performed automatically by the IDE during the user application compilation by calling STM32TrustedPackageCreator in a post-build command.
STM32TrustedPackageCreator can be launched separately to generate the encrypted and signed image file using the same encryption and authenticity keys provisioned during the OEM-iROT configuration.
STM32TrustedPackageCreator uses a configuration file to generate images.
XML files examples are available for each OEM-iROT project example in the STM32Cube_FW (ROT_Provisioning\OEMiROT\Config) and are editable using STM32TrustedPackageCreator.
3.1.2.2. User Data Image generation
STM32TrustedPackageCreator needs to be launched separately to generate the encrypted and signed image file using the same encryption and authenticity keys provisioned during the OEMiROT configuration. The code image generation of the user application also uses these keys.
STM32TrustedPackageCreator uses an XML configuration file for each OEM-iROT project example in the STM32Cube_FW (ROT_Provisioning\OEMiROT\Images ). These files are editable using STM32TrustedPackageCreator.
3.1.3. Step 3 – Product state setting
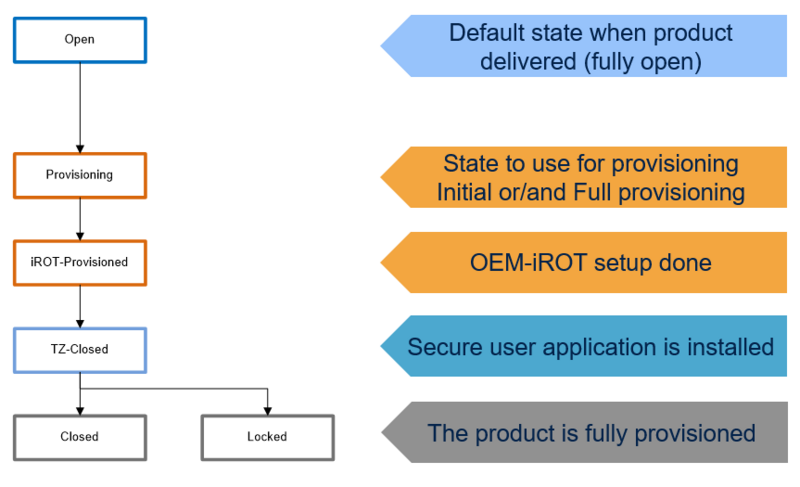
The following figure shows the possible product state.
(for more details, refer to product lifecycle and Debug Authentication articles).
The provided script Provisioning.bat given as an example in STM32CubeH5 firmware guides the user during this phase.
At the end of the provisioning script execution, the user can choose the product state can be chosen that automatically sets the corresponding option byte.
The product state is chosen depending on the user application development phase and the wanted security level.
- Open:
- This state is mainly used during the development phase since the device is fully open.
- Debug is fully open.
- The Trust Zone can be disabled or enabled (TZEN option byte programming).
- Bootloader is usable.
- This state is mainly used during the development phase since the device is fully open.
- Open:
- * Provisioning:
- This state is used during the provisioning.
- It is the device state during the provisioning script execution (Provisioning.bat given as an example in STM32CubeH5 firmware).
- So, this state is not part of the proposed state selectable at the end of the script execution.
- The debug is only available when executing a nonsecure user application.
- The Trust Zone can be disabled or enabled (TZEN option byte programming).
- Bootloader is usable.
- Secure Firmware install can be launched in this state (not anymore possible in the following states).
- This state is used during the provisioning.
- Provisioned:
- In this state, the OEM-iROT setup is done.
- Debug is available only when executing a nonsecure user application.
- Debug access for secure applications can be available by launching the Debug Authentication (see Debug Authentication setting).
- The OEM-iROT can launch the bootloader if the verification of the code located in the next isolation level is failing (authentication, integrity, or missing code)
- In this state, the OEM-iROT setup is done.
- TZ-Closed:
- The Trust Zone closed state is used when
- the OEM-iROT and the secure user application are provisioned (case 1)
- the OEM-iROT and the uROT+Secure user application are provisioned (case2) (see section 5.1.2).
- For case 2, the uROT allows updating the next isolation level (Code and Data).
- uROT can launch the bootloader if the verification of the code located in the next isolation level is failing (authentication, integrity, or missing code).
- uROT can launch the bootloader if the verification of the code located in the next isolation level is failing (authentication, integrity, or missing code).
- The debug is only available when executing a nonsecure user application.
- Debug access for secure applications can be available by launching the Debug Authentication (see Debug Authentication setting).
- Closed:
- This state occurs with the fully provisioned product.
- The debug is fully closed but can be opened by launching the Debug Authentication (see Debug Authentication setting).
- This state occurs with the fully provisioned product.
- Locked:
- This state is used with the fully provisioned product without any more changes.
- Locked is a final unchangeable product state. No method can modify the embedded firmware and product configuration.
- The debug is definitively closed and cannot be reopened through debug authentication.
- No regression is possible anymore
- This state is used with the fully provisioned product without any more changes.
4. How to start with STM32 and OEM-iROT
You can refer to the following pages for getting started examples of OEM-iROT.
Pages in category "How to start with OEMiRoT on STM32H5"
The following 4 pages are in this category, out of 4 total.


