1. Introduction
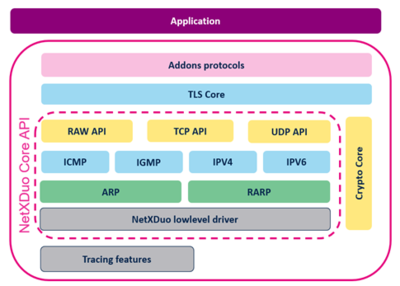
Azure® RTOS NetX Duo is a dual IPv4 and IPv6 TCP/IP network stack designed specifically for deeply embedded, real-time, and IoT applications. It has various sets of features. Alongside the TCP/IP IPv4/IPv6 network stack, it provides a crypto library implementing the standard crypto and hash methods, and a TLS/DTLS library to support secure network connections.
- The NetX Duo core offers a full TCP/IP IPv4IPV6 compliant stack with 3 types of API: TCP/IP, UDP/IP and RAW API.
- The Crypto core implements the common crypto cipher suites and hashing algorithms useful for securing connections and exchanging encrypted data: AES, 3DES, HMAC, RSA, SHA1, SHA224, SHA256, SHA384, SHA512, MD5, HMAC-SHA1, and so on (each algorithm has its own implementation file .c and header file .h, which facilitate the selection and the integration of the required algorithms by applications).
- The TLS core implements the secure connection API. Based on both the Crypto core and NetX Duo core, it supports the TLS and DTLS protocols with their different variants. (TLS 1.0 TLS 1.2, TLS 1.3).
It also supports the X509 public signed certificates protocol.
- Addon protocols are a pre-supported set of network applicative protocols that ease the integration of the networking feature in the end user application. The main supported protocols are the following:
DHCP, DNS, mDNS, HTTP, HTTPS, FTP, TELNET, MQTT, SMTP, POP3, SNTP, SNMP, and so on.
Further details are available in the NetX Duo official documentation[1]
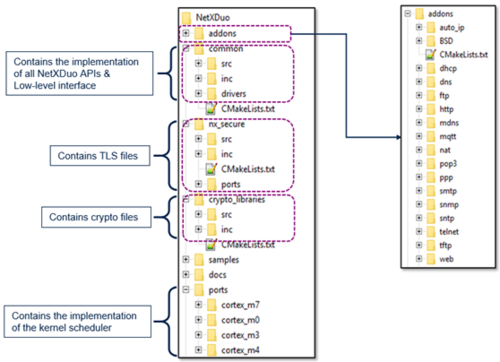
NetX Duo folders are organized as described below:
2. STM32 Integration
NetX Duo can run on any networking hardware, such as Ethernet, WiFi modules, cellular modems, and so on. It requires a low-level driver to interact between the physical layer already chosen, and the NetX Duo core requests (initialize, transmit data, receive data).
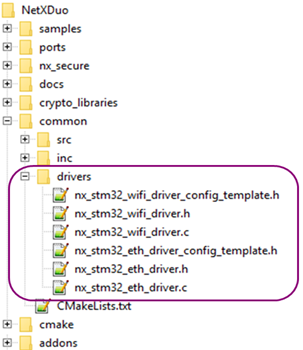
To achieve the interaction between the NetX Duo stack and the required PHY, the software architecture should follow the arborescence below.
The following hardware configurations are currently supported:
- Ethernet: Depending from the board, several Ethernet PHY external components are supported:
- lan8742/
- nx_stm32_phy_driver.c: the PHY driver source file for 10/100BT LAN8742[2] PHY using the BSP component under Drivers/BSP/Components/lan8742 (available in the X-CUBE-AZRTOS-H7 package).
- rtl8211/
- nx_stm32_phy_driver.c: the PHY driver source file for 10/100/1000BT RTL8211[3] PHY using the BSP component under Drivers/BSP/Components/rtl8211 (available in the STM32N6 Cube package).
- nx_stm32_eth_driver.c: the MAC-level driver source file using STM32 ETH IP.
- nx_stm32_eth_driver.h: the header file for MAC driver.
- nx_stm32_phy_driver.h: the common header file for Ethernet PHY drivers.
- lan8742/
- Template : directory with source templates for new network drivers
- nx_custom_driver.c : NetXDuo driver source code to be customized depending from the HW.
- ethernet/nx_stm32_phy_driver.c: template for Ethernet PHY code.
- WiFi: this support focuses specifically on WiFi modules supporting Bypass mode and STM32 boards that provide an MXCHIP EMW3080 module.
To enable this connection mode, the user should configure it with flags in the mx_wifi_conf.h file.
- "mx_wifi_conf_template.h": this application-level config file should be copied into the application source tree and renamed mx_wifi_conf.h. It is then customized according to the application and driver needs.
The following main configuration flags must be taken into consideration:
       "MX_WIFI_USE_SPI" - communicate with MXCHIP with SPI instead of UART.
       "MX_WIFI_NETWORK_BYPASS_MODE" - use Bypass mode instead of AT commands.
       "MX_WIFI_TX_BUFFER_NO_COPY" - no copy of TX buffer required.
       "WIFI_SSID" - defines the name of the access point.
       "WIFI_PASSWORD" defines the password of the access point.
- "Nx_driver_framework.c": the default processing entry point for the NetX Driver used as an interface between NetXDuo core and the EMW3080 Phy liaison.
- "Nx_driver_framework.h": the driver header file containing the driver defines and data structure.
- "Nx_driver_emw3080.c": a Phy interface to link commands between the nx_driver_framework and the Mxchip module.
- "Nx_driver_emw3080.h": the driver header file containing the driver defines and data structure.
- "Mx_wifi_azure_rtos.c": contains all tx and nx allocations required by mxchip.
After low-level configuration, it is called by the application code when an IP instance is created:
/* Create an IP instance by linking the nx network driver */

/* ETHERNET STM32H7 example:  */
  ret = nx_ip_create(&EthIP, "NetX IP Instance 0", NULL_IP_ADDRESS, NULL_IP_ADDRESS,
&EthPool, nx_stm32_eth_driver, pointer, IP_MEMORY_SIZE, DEFAULT_PRIORITY);

/* WIFI STM32U5 example: */
ret = nx_ip_create(&IpInstance, "Main IP Instance", NULL_IP_ADDRESS, NULL_IP_ADDRESS,
& AppPool, nx_driver_emw3080_entry, pointer, MEMORY_SIZE, DEFAULT_PRIORITY);
2.1. Known limitations
- The BSD API support is not fully-compliant. This may impact the portability of legacy applications. More details are available in the official NetX Duo documentation[1]
3. How to use NetX Duo
The main APIs needed to use NetX Duo are described in the table below: (further details and a full API description are available from the NetX Duo official documentation[1] )
| Function Name | Short Description |
|---|---|
| nx_tcp_socket_create( ) | Create a TCP socket |
| nx_udp_socket_create( ) | Create a UDP socket |
| nx_tcp_server_socket_listen( ) | Set up TCP socket to listen |
| nx_udp_socket_bind( ) | Bind UDP socket to the PORT |
| nx_tcp_server_socket_accept( ) | Accept a TCP remote client socket connection |
| nx_tcp_socket_receive( ) | Receive a packet from a TCP remote client |
| nx_udp_socket_receive( ) | Receive a packet from a UDP remote client |
| nx_tcp_socket_disconnect( ) | Disconnect the TCP server socket |
| nx_tcp_server_socket_unaccept( ) | Reject the TCP server socket |
| nx_tcp_server_socket_relisten( ) | Set up server socket for listening again |
The main steps to use NetX Duo are:
- Define NX_APP_MEM_POOL_SIZE on app_azure_rtos_config.h from MX. For example, 100 Kbytes.
#define NX_APP_MEM_POOL_SIZE 102400
- Create a Byte Pool “nx_app_byte_pool” with a size of NX_APP_MEM_POOL_SIZE in app_azure_rtos.c
if (tx_byte_pool_create(&tx_app_byte_pool, "Tx App memory pool", tx_byte_pool_buffer, TX_APP_MEM_POOL_SIZE) != TX_SUCCESS)
{}
Then in MX_NetXDuo_Init, the user should follow this routine (allocate, create).
- Allocate memory from the byte pool:
  /* Allocate the memory for packet_pool.  */
  if (tx_byte_allocate(byte_pool, (VOID **) &pointer, NX_PACKET_POOL_SIZE, TX_NO_WAIT) != TX_SUCCESS)
  {
    return TX_POOL_ERROR;
  }
- Create a pool AppPool:
    /* Create a packet pool.  */
    status = nx_packet_pool_create(&pool_0, "NetX Main Packet Pool", SAMPLE_PACKET_SIZE,
                                   (UCHAR *)sample_pool_stack , sample_pool_stack_size);
- Then create and configure an IP instance that belongs to the pool already created.
- Enable the needed NetX Duo components depending on the target application:
| Function Name | Short Description |
|---|---|
| nx_arp_enable( ) | Enable the Address Resolution Protocol (AutoIP Protocol need ARP) (Require memory allocation) |
| nx_icmp_enable( ) | Required for Ping |
| nx_udp_enable( ) | Enable UDP traffic (DNS & DHCP need UDP) |
| nx_tcp_enable( ) | Enable TCP traffic |
4. Migration to NetX Duo
In order to migrate a development project from an existing network stack (such as LwIP or others) to NetX Duo, there is no straightforward automatic procedure. However, there are usually some similarities between APIs, and these can be helpful when performing this task. Some comparative examples are provided below.
| Action | NetXDuo | LwIP |
|---|---|---|
| DHCP Serice | /* create the DHCP client */
ret = nx_dhcp_create(&DHCPClient, &IpInstance, "DHCP Client");
/* Create an IP @ change callback */
ret = nx_ip_address_change_notify(&IpInstance, ip_address_change_notify_callback, NULL);
/* start DHCP client */
ret = nx_dhcp_start(&DhcpClient);
|
/* Start DHCP process to get IP@*/
dhcp_start(netif);

/* Get Client data */
dhcp = (struct dhcp *)netif_get_client_data(netif, LWIP_NETIF_CLIENT_DATA_INDEX_DHCP);

/* Wait until getting DHCP data */
if (dhcp_supplied_address(netif))
{
  DHCP_state = DHCP_ADDRESS_ASSIGNED;
}
|
| HTTP Service | /* Create the HTTP Server. */
status = nx_http_server_create(&HTTPServer, "WEB HTTP Server", &IPInstance, &ram_disk,
pointer, SERVER8STQCK, &WebServerPool, NX_NULL, webserver_request_notify_callback);
/* Start the WEB HTTP Server. */
status = nx_http_server_start(&HTTPServer);
/* Web Server callback when a new request from a web client is triggered */
static UINT webserver_request_notify_callback(NX_WEB_HTTP_SERVER *server_ptr, UINT request_type, CHAR* resource, NX_PACKET *packet_ptr);
/* Extract the client request type from the client request */
nx_web_http_server_type_get(server_ptr, server_ptr->nx_web_http_server_request_resource, temp_string, &string_length);
|
/* Create a new TCP connection handle */
conn = netconn_new(NETCONN_TCP);

/* Bind to port 80 (HTTP) with default IP address */
err = netconn_bind(conn, NULL, 80);

/* Put the connection into LISTEN state */
netconn_listen(conn);

/* Accept any incoming connection */
accept_err = netconn_accept(conn, &newconn);

/* Read the data from the port, blocking if nothing yet there.
   We assume the request (the part we care about) is in one netbuf */
recv_err = netconn_recv(conn, &inbuf);

/* Get the data pointer and length in netbuf */
netbuf_data(inbuf, (void**)&buf, &buflen);
|
5. STM32 NetX Duo applications
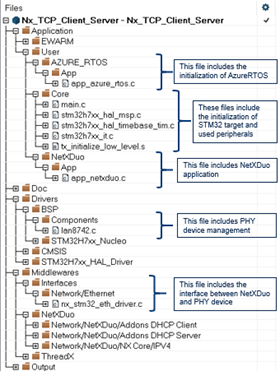
The following figure shows the project architecture and main application files for an STM32H7 example using Ethernet.
STM32 Packages provide the following set of applications (the list of supported applications may differ between products and boards):
| Application | Short Description |
|---|---|
| Nx_TCP_Echo_Server | Demonstrates how to develop a NetX TCP server to communicate with a remote client using the NetX TCP socket API. [4] |
| Nx_TCP_Echo_Client | Demonstrates how to develop a NetX TCP client to communicate with a remote sever using the NetX TCP socket API. [5] |
| Nx_UDP_Echo_Server | Demonstrates how to develop a NetX UDP server to communicate with a remote client using the NetX UDP socket API.[6] |
| Nx_UDP_Echo_Client | Demonstrates how to develop a NetX UDP client to communicate with a remote sever using the NetX UDP socket API.[7] |
| Nx_WebServer | Demonstrates how to develop Web HTTP server based application. It is designed to load files and static/dynamic web pages stored in an SD Card or OCTOSPI memory using a Web HTTP server, the code provides all required features to build a compliant Web HTTP Server.[8] |
| Nx_MQTT_Client | Demonstrates how to exchange data between client and server using MQTT protocol in an encrypted mode supporting TLS v1.2.[9] |
| Nx_SNTP_Client | Demonstrates how to develop a NetX SNTP client and connect with an STNP server to get a time update.[10] |
6. References
- ↑ 1.0 1.1 1.2 Microsoft official documentation
- ↑ LAN8742 product page
- ↑ RTL8211 product page
- ↑ Demonstrates how to develop a NetX TCP server to communicate with a remote client using the NetX TCP socket API
- ↑ Demonstrates how to develop a NetX TCP client to communicate with a remote sever using the NetX TCP socket API
- ↑ how to develop a NetX UDP server to communicate with a remote client using the NetX UDP socket API
- ↑ Demonstrates how to develop a NetX UDP client to communicate with a remote sever using the NetX UDP socket API
- ↑ Demonstrates how to develop Web HTTP server based application. It is designed to load files and static/dynamic web pages stored in an SD Card or OCTOSPI memory using a Web HTTP server, the code provides all required features to build a compliant Web HTTP Server
- ↑ Demonstrates how to exchange data between client and server using MQTT protocol in an encrypted mode supporting TLS v1.2
- ↑ Demonstrates how to develop a NetX SNTP client and connect with an STNP server to get a time update


