This article aims to explain How to use the the latest X-LINUX-QT Developer Package for the STM32 microprocessor series.
1. Prerequisites[edit source]
Refer to the detailed prerequisites here.
2. Building QT application using CMake[edit source]
2.1. Update the SDK environment for CMake[edit | edit source]
| The OE_CMAKE_TOOLCHAIN_FILE variable needs to be set to allow building CMake projects with the installed SDK |
Follow below steps if you need to add the missing OE_CMAKE_TOOLCHAIN_FILE variable to your SDK configuration
- Open terminal and load the environment setup
source /opt/st/stm32mp2/4.2.4-openstlinux-6.1-yocto-mickledore-mpu-v24.06.26/environment-setup-cortexa35-ostl-linux
- Export the OE_CMAKE_TOOLCHAIN_FILE variable
export OE_CMAKE_TOOLCHAIN_FILE="$OECORE_NATIVE_SYSROOT/usr/lib/cmake/Qt6/qt.toolchain.cmake"
2.2. Download the Demo example source code[edit | edit source]
 mkdir -p /opt/st/demos/Qt
 cd /opt/st/demos/Qt
 git clone https://github.com/KDABLabs/KDBoatDemo.git -b qt6
2.3. Build the Demo example[edit | edit source]
cd KDBoatDemo
 cmake -S . -B config_default
-- Toolchain file defaulted to '/opt/st/stm32mp2/4.2.4-openstlinux-6.1-yocto-mickledore-mpu-v24.06.26_x-linux-qt_v2.0.0/sysroots/x86_64-ostl_sdk-linux/usr/lib/cmake/Qt6/qt.toolchain.cmake'
-- The C compiler identification is GNU 12.3.0
-- The CXX compiler identification is GNU 12.3.0
-- Detecting C compiler ABI info
-- Detecting C compiler ABI info - done
-- Check for working C compiler: /opt/st/stm32mp2/4.2.4-openstlinux-6.1-yocto-mickledore-mpu-v24.06.26_x-linux-qt_v2.0.0/sysroots/x86_64-ostl_sdk-linux/usr/bin/aarch64-ostl-linux/aarch64-ostl-linux-gcc - skipped
-- Detecting C compile features
-- Detecting C compile features - done
-- Detecting CXX compiler ABI info
-- Detecting CXX compiler ABI info - done
-- Check for working CXX compiler: /opt/st/stm32mp2/4.2.4-openstlinux-6.1-yocto-mickledore-mpu-v24.06.26_x-linux-qt_v2.0.0/sysroots/x86_64-ostl_sdk-linux/usr/bin/aarch64-ostl-linux/aarch64-ostl-linux-g++ - skipped
-- Detecting CXX compile features
-- Detecting CXX compile features - done
-- Performing Test CMAKE_HAVE_LIBC_PTHREAD
-- Performing Test CMAKE_HAVE_LIBC_PTHREAD - Success
-- Found Threads: TRUE
-- Performing Test HAVE_STDATOMIC
-- Performing Test HAVE_STDATOMIC - Success
-- Found WrapAtomic: TRUE
-- Performing Test HAVE_EGL
-- Performing Test HAVE_EGL - Success
-- Found EGL: /opt/st/stm32mp2/4.2.4-openstlinux-6.1-yocto-mickledore-mpu-v24.06.26_x-linux-qt_v2.0.0/sysroots/cortexa35-ostl-linux/usr/include (found version "1.5")
-- Performing Test HAVE_GLESv2
-- Performing Test HAVE_GLESv2 - Success
-- Found GLESv2: /opt/st/stm32mp2/4.2.4-openstlinux-6.1-yocto-mickledore-mpu-v24.06.26_x-linux-qt_v2.0.0/sysroots/cortexa35-ostl-linux/usr/include
-- Found XKB: /opt/st/stm32mp2/4.2.4-openstlinux-6.1-yocto-mickledore-mpu-v24.06.26_x-linux-qt_v2.0.0/sysroots/cortexa35-ostl-linux/usr/lib/libxkbcommon.so (found suitable version "1.5.0", minimum required is "0.5.0")
-- Could NOT find WrapVulkanHeaders (missing: Vulkan_INCLUDE_DIR)
-- Could NOT find WrapVulkanHeaders (missing: Vulkan_INCLUDE_DIR)
-- Configuring done
-- Generating done
-- Build files have been written to: /opt/st/demos/Qt/KDBoatDemo/config_default
 cmake --build config_default --target all
[  7%] Running qmlimportscanner for KDABBoatDemo
[  7%] Built target KDABBoatDemo_qmlimportscan
[ 15%] Automatic MOC for target KDABBoatDemo
[ 15%] Built target KDABBoatDemo_autogen
[ 23%] Automatic RCC for imagesMaps2.qrc
[ 30%] Automatic RCC for data.qrc
[ 38%] Automatic RCC for images.qrc
[ 46%] Automatic RCC for imagesMaps.qrc
[ 53%] Building CXX object CMakeFiles/KDABBoatDemo.dir/KDABBoatDemo_autogen/mocs_compilation.cpp.o
[ 61%] Building CXX object CMakeFiles/KDABBoatDemo.dir/main.cpp.o
[ 69%] Building CXX object CMakeFiles/KDABBoatDemo.dir/KDABBoatDemo_autogen/EWIEGA46WW/qrc_imagesMaps.cpp.o
[ 76%] Building CXX object CMakeFiles/KDABBoatDemo.dir/KDABBoatDemo_autogen/EWIEGA46WW/qrc_imagesMaps2.cpp.o
[ 84%] Building CXX object CMakeFiles/KDABBoatDemo.dir/KDABBoatDemo_autogen/EWIEGA46WW/qrc_images.cpp.o
[ 92%] Building CXX object CMakeFiles/KDABBoatDemo.dir/KDABBoatDemo_autogen/EWIEGA46WW/qrc_data.cpp.o
[100%] Linking CXX executable KDABBoatDemo
[100%] Built target KDABBoatDemo
2.4. Deploy the Demo example to your running board[edit | edit source]
- Copy the Example's binary into your connected board
 cd /opt/st/demos/Qt
 scp config_default/KDABBoatDemo root@192.168.7.1:/home/root/.
2.5. Run the Demo example on your board[edit | edit source]
- Connect to your running board
ssh root@192.168.7.1
- Run the Demo's example (windowed mode)
./KDABBoatDemo
- Check the running Demo example on your board's display
- Run the Demo's example (Full screen mode)
./KDABBoatDemo --fullscreen
- Check the running Demo example on your board's display
3. Building QT application using STM32CubeIDE[edit source]
3.1. Update the SDK environment for CMake[edit | edit source]
| The OE_CMAKE_TOOLCHAIN_FILE variable needs to be set to allow building CMake projects with the installed SDK |
Please follow below steps if you need to add the missing OE_CMAKE_TOOLCHAIN_FILE variable to your SDK configuration
- Open terminal and load the environment setup
source /opt/st/stm32mp2/4.2.4-openstlinux-6.1-yocto-mickledore-mpu-v24.06.26/environment-setup-cortexa35-ostl-linux
- Add the missing OE_CMAKE_TOOLCHAIN_FILE variable to the qt6 environment file
echo "export OE_CMAKE_TOOLCHAIN_FILE=\"\$OECORE_NATIVE_SYSROOT/usr/lib/cmake/Qt6/qt.toolchain.cmake\"" >> $OECORE_NATIVE_SYSROOT/environment-setup.d/qt6.sh
3.2. Install the STM32CubeIDE[edit | edit source]
- Please follow instructions from here to know how to install and use the STM32CubeIDE.
3.3. Select the updated OpenSTLinux SDK by the X-LINUX-QT Developer Package[edit | edit source]
- Please follow instructions from here to know how to install the STM32MPU OpenSTLinux Developper Package for the STM32CubeIDE.
- Please select the updated STM32MPU OpenSTLinux Developper Package by the X-LINUX-QT Developer Package.
3.4. Download the Demo example source code[edit | edit source]
 mkdir -p /opt/st/demos/Qt
 cd /opt/st/demos/Qt
 git clone https://github.com/KDABLabs/KDBoatDemo.git -b qt6
3.5. Build the Demo example[edit | edit source]
- Import the Project from STM32CubeIDE
- Start a new STM32 CMake Project

- Select Project with existing CMake sources

- Fill the Project name and source directory
- Project name = KDBoatDemo
- Source directory = /opt/st/demos/Qt/KDBoatDemo

- Configure default toolchain
- Select OpenSTLinux SDK for the Toolchain field
- Select your installed OpenSTLinux SDK (openstlinux-6.1-yocto-mickledore-mpu-v24.06.26) for the Version field

- Build the Project
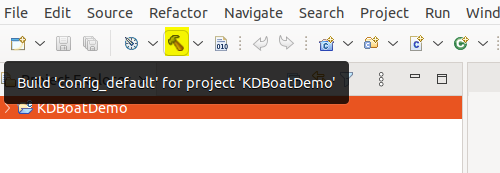
- Select the project from the list and press the Build button

- Wait until the build is finished and make sure it is done successfully

3.6. Deploy the Demo example to your running board[edit | edit source]
- Copy the Example's binary into your connected board
 cd /opt/st/demos/Qt
 scp config_default/KDABBoatDemo root@192.168.7.1:/home/root/.
3.7. Run the Demo example on your board[edit | edit source]
- Connect to your running board
ssh root@192.168.7.1
- Run the Demo's example (windowed mode)
./KDABBoatDemo
- Check the running Demo example on your board's display
- Run the Demo's example (Full screen mode)
./KDABBoatDemo --fullscreen
- Check the running Demo example on your board's display
4. Building Qt applications using Qt Creator[edit source]
The Qt™ Creator[1] tool is used to build, debug and run applications demos on target.
4.1. Install the Qt Creator[edit | edit source]
- The Qt™ Creator can be downloaded and installed following this link
- The Qt™ online installer can be dowloaded cliking on this link
- Installing the X-LINUX-QT Developer Package configures also the new STM32MPU Kit for the already installed Qt™ Creator IDE.
4.2. Select the new Kit installed by the X-LINUX-QT Developer Package[edit | edit source]
| Qt6 6.5.3 must be installed in order to have the list of Examples for that Qt version. |
Once the Qt™ Creator is launched and the Welcome to Qt™ Creator is displayed:
- Go to the Examples from the list on the left ,
- Then select the new Qt6 6.5.3 from the dropdown list.
The supported examples are then displayed.
4.3. Select the project example[edit | edit source]
- You may search for a specific example in the Search bar in front of the selected Kit
- Select the example you are looking for (just a simple click on it)
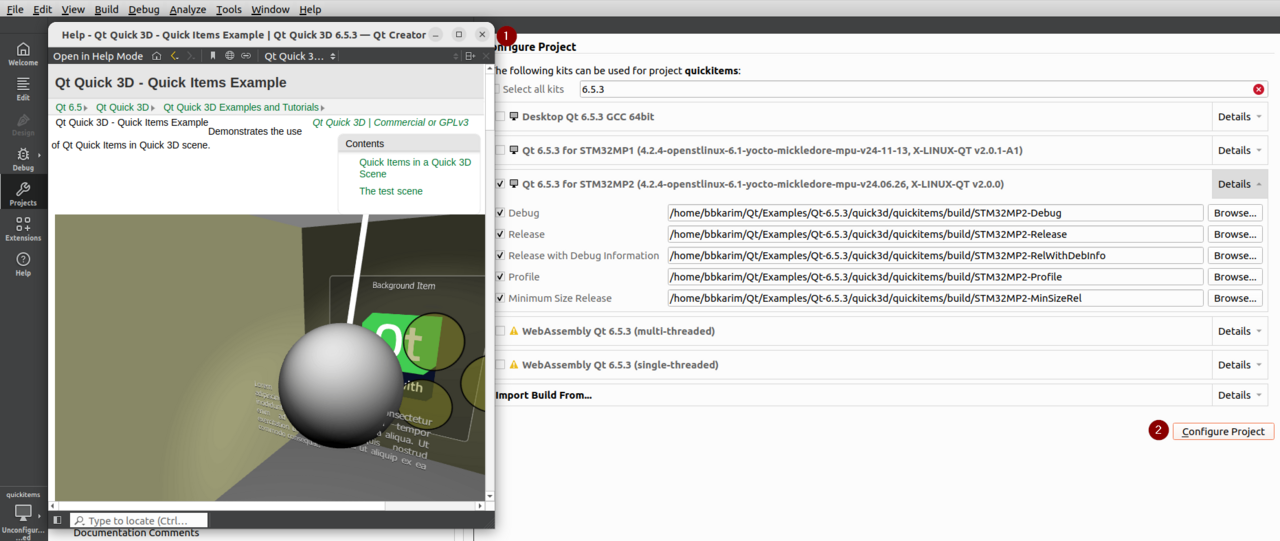
- Close the Help window if not needed
4.4. Configure the project example[edit | edit source]
- Make sure the new added Kit by X-LINUX-QT Developer Package is selected
- Press the Configure Project button
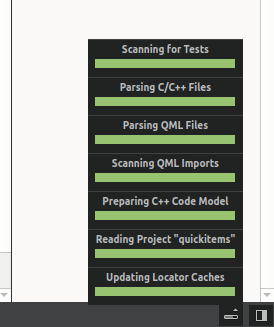
- Make sure all configuration steps are successfully done (Green Bars)
4.5. Configure the STM32 MPU Kit[edit | edit source]
- Select the Configure Project button from the vertical bar on the left
- Select the new Kit added by the X-LINUX-QT Developer Package
- Select Run Settings
- On the right panel, scroll down till the Environment section
- Press the Details button
- Add the below environment variables
XDG_RUNTIME_DIR=/run/user/1000
QT_QPA_PLATFORM=wayland
QT_VULKAN_LIB=/usr/lib/libvulkan.so.1
4.6. Build and run the project[edit | edit source]
- Make sure your board is connected to your host machine via the USB DRD TypeC connector.
- Follow instructions from the Hardware setup section and check how to get your board connected to your host machine.
- Once in the Run Setting panel, you shouldn't have the below notice at the bottom of the screen.
- Press the Run button from the vertical bar on the left
- That will build, deploy and run the selected example on the connected board.
- If everything went well, then the example will be running on the connected board.
5. References[edit source]
Pages in category "X-LINUX-QT How To"
The following 3 pages are in this category, out of 3 total.


