


1. Overview[edit | edit source]
This step explains how to get the Starter Package, then install and boot the STM32MP135x-DK Discovery kit  with the Starter Package.
2. Open a terminal[edit | edit source]
Open a terminal on the host computer.
All the commands preceded by have to be executed from the host computer terminal.
- Create your STM32MPU workspace directory on the host computer:
mkdir $HOME/STM32MPU_workspace
cd $HOME/STM32MPU_workspace
3. Check the host computer Internet access[edit | edit source]
- An Internet access through http and https protocols must be provided.
The command below enables checking for Internet access through http/https protocols:
wget -q www.google.com && echo "Internet access over HTTP/HTTPS is OK !" || echo "No internet access over HTTP/HTTPS ! You may need to set up a proxy."
If an 'OK' message is returned, the network is correctly configured.
In this case, skip the rest of this section.
Otherwise, a proxy for http/https protocols is required.
The best solution is to set this proxy through the shell variables http_proxy and https_proxy:
export http_proxy=http://<MyProxyLogin>:<MyProxyPassword>@<MyProxyServerUrl>:<MyProxyPort>
export https_proxy=http://<MyProxyLogin>:<MyProxyPassword>@<MyProxyServerUrl>:<MyProxyPort>
Check again the Internet access using the command:
wget -q www.google.com && echo "Internet access over HTTP/HTTPS is OK !" || echo "No internet access over HTTP/HTTPS ! You may need to set up a proxy."
4. Install the tools[edit | edit source]
4.1. STM32CubeProgrammer[edit | edit source]
- Create your "STM32MPU tools" directory on the host computer:
mkdir $HOME/STM32MPU_workspace/STM32MPU-Tools
mkdir $HOME/STM32MPU_workspace/STM32MPU-Tools/STM32CubeProgrammer-x.y.z
- Create a temporary directory in your STM32MPU workspace:
mkdir $HOME/STM32MPU_workspace/tmp
cd $HOME/STM32MPU_workspace/tmp
4.2. Installing the STM32CubeProgrammer tool[edit | edit source]
| STM32CubeProgrammer for Linux® host PC | STM32CubeProgrammer for Windows® host PC | |
|---|---|---|
| Download |
Version v2.20.0
unzip en.stm32cubeprog.zip | |
| Installation |
$> ./SetupSTM32CubeProgrammer-2.20.0.linux
$> export PATH=<my STM32CubeProgrammer install directory>/bin:$PATH
$> ln -s <my STM32CubeProgrammer install directory>/bin/STM32_Programmer_CLI /home/bin/STM32_Programmer_CLI |
|
| User manual |
| |
| Detailed release note |
| |
4.3. Preparing the USB serial link for flashing[edit | edit source]
It is recommended to use the USB (in DFU mode) for flashing rather than the UART, which is too slow.
Below indications on how to install the USB in DFU mode under Linux and Windows OS, respectively.
- For Linux host PC or Windows host PC with VMWare:
The libusb1.0 package (including USB DFU mode) must be installed to be able to connect to the board via the USB port. This is achieved by typing the following command from the host PC terminal:
sudo apt-get install libusb-1.0-0
To allow STM32CubeProgrammer to access the USB port through low-level commands, proceed as follows:
cd <your STM32CubeProgrammer install directory>/Drivers/rules

sudo cp *.* /etc/udev/rules.d/
- For Windows host PC:
Run the “STM32 Bootloader.bat” file to install the STM32CubeProgrammer DFU driver and activate the STM32 microprocessor device in USB DFU mode. This driver (installed by STM32 Bootloader.bat) is provided within the STM32CubeProgrammer release package. It is located in the DFU driver folder, \Drivers\DFU_Driver.
In case of issue, refer to How to proceed when the DFU driver installation fails on Windows host PC.
To validate the installation, the DFU driver functionality can be verified by following the FAQ instructions provided in how to check if the DFU driver is functional.
5. Test[edit | edit source]
- Check that the STM32CubeProgrammer tool is properly installed and accessible:
STM32_Programmer_CLI --h
     -------------------------------------------------------------------
                       STM32CubeProgrammer vx.y.z
     -------------------------------------------------------------------
6. Download the image[edit | edit source]

- The STM32MP1 image (binaries) is delivered through one tarball file named
- en.FLASH-stm32mp1-openstlinux-6.6-yocto-scarthgap-mpu-v25.06.11.tar.gz for STM32MP135x-DK , STM32MP157x-DKx and STM32MP157x-EV1
- en.FLASH-stm32mp1-openstlinux-6.6-yocto-scarthgap-mpu-v25.06.11.tar.gz for STM32MP135x-DK
- Download and install the STM32MP1 image (binaries):
The software package is provided AS IS, and by downloading it, you agree to be bound to the terms of the software license agreement (SLA0048). The detailed content licenses can be found here.
| STM32MP1 Starter Package image - STM32MP1-Ecosystem-v6.1.0 release | |
|---|---|
| Download |
|
| Installation |
cd <working directory path>/Starter-Package
tar xvf en.FLASH-stm32mp1-openstlinux-6.6-yocto-scarthgap-mpu-v25.06.11.tar.gz |
| Release note |
Details of the content of this software package are available in the associated STM32 MPU OpenSTLinux release note. |
 If you are interested in older releases, please have a look into the section
 - The binaries and the Flash layout files are in the <Starter Package installation directory>/stm32mp1-openstlinux-6.6-yocto-scarthgap-mpu-v25.06.11/images/stm32mp1/ directory. The most important ones are:
stm32mp1
├── arm-trusted-firmware                                                               TF-A binaries
│   ├── bl2                                                                            TF-A binary for FIP binaries creation
│   │   ├── tf-a-<board name>-<boot chain>-<storage>.bin
│   │   └── [...]
│   ├── debug                                                                          Debug binaries for TF-A
│   │   ├── debug-tf-a-<board name>-<boot chain>-<storage>.stm32                       Debug file for FSBL
│   │   ├── tf-a-bl2-<soc name>-<boot chain>-<storage>.elf                             Debug symbol file for TF-A
│   │   └── [...]
│   ├── fwconfig                                                                       TF-A device tree for FIP binaries creation
│   │   ├── <board name>-fwconfig-<boot chain>-<storage>.dtb
│   │   └── [...]
│   ├── metadata.bin                                                                   Meta data binary for METADATA partition for the supported boards
│   ├── tf-a-<board name>-<boot chain>-<storage>.stm32                                 TF-A binary for FSBL partition
│   └── [...]
├── fip                                                                                FIP binaries for FIP partitions and supported boot chains
│   ├── fip-<board name>-<boot chain>-<storage>.bin                                    FIP binary for FIP partition
│   ├── fip-<board name>-<boot chain>-<storage>.txt                                    Configuration file for FIP binary content
│   └── [...]
├── flashlayout_st-image-weston                                                        Flash layout files (description of the partitions) for the supported boot chains on supported boot devices and boards
│   ├── extensible                                                                     Flash layout files for microSD card boot device with no userfs partition but a rootfs partition extended to microSD card size
│   │   ├── FlashLayout_sdcard_<board name>-extensible.tsv                             (recommended setup for package repository service) microSD card boot device with rootfs partition extended to microSD card size
│   │   └── [...]
│   ├── fastboot
│   │   ├── FlashLayout_<boot device>_<board name>-fastboot.tsv
│   │   └── [...]
│   ├── fastboot-opteemin
│   │   ├── FlashLayout_<boot device>_<board name>-fastboot-opteemin.tsv
│   │   └── [...]
│   ├── optee
│   │   ├── FlashLayout_<boot device>_<board name>-optee.tsv
│   │   └── [...]
│   └── opteemin
│       ├── FlashLayout_<boot device>_<board name>-opteemin.tsv
│       └── [...]
├── Kernel                                                                              Debug binaries for Linux kernel
│   ├── config-6.6.78                                                                   Reference config file for Linux kernel
│   ├── [...]
│   └── vmlinux                                                                         Image of the Linux kernel
├── optee                                                                               OPTEE-OS binaries
│   ├── debug                                                                           Debug binaries for OPTEE-OS
│   │   ├── tee-<board name>-<boot chain>.elf                                           Debug symbol file for OPTEE-OS
│   │   ├── tee-<board name>-<boot chain>-programmer.elf                                Debug symbol file for OPTEE-OS configured for usb/serial
│   │   └── [...]
│   ├── tee-header_v2-<board name>-<boot chain>.bin                                   OPTEE-OS binary for FIP binaries creation (FIP partition)
│   ├── tee-header_v2-<board name>-<boot chain>-programmer.bin                        OPTEE-OS binary for FIP binaries creation (FIP-BOOT partition)
│   ├── tee-pageable_v2-<board name>-<boot chain>.bin                                 OPTEE-OS binary for FIP binaries creation (FIP partition)
│   ├── tee-pageable_v2-<board name>-<boot chain>-programmer.bin                      OPTEE-OS binary for FIP binaries creation (FIP-BOOT partition)
│   ├── tee-pager_v2-<board name>-<boot chain>.bin                                    OPTEE-OS binary for FIP binaries creation (FIP partition)
│   ├── tee-pager_v2-<board name>-<boot chain>-programmer.bin                         OPTEE-OS binary for FIP binaries creation (FIP-BOOT partition)
│   └── [...]
├── scripts
│   └── create_sdcard_from_flashlayout.sh
├── u-boot                                                                              U-BOOT binaries
│   ├── debug                                                                           Debug binaries for U-BOOT
│   │   ├── u-boot-<soc name>-<u-boot config>.elf                                       Debug symbol file for U-BOOT
│   │   └── [...]
│   ├── configuration-<soc name>-<u-boot config>_defconfig                              Reference configuration file for U-Boot
│   ├── u-boot-nodtb-<soc name>-<u-boot config>.bin                                   U-BOOT binary for FIP binaries creation
│   ├── u-boot-<board name>-<u-boot config>.dtb                                         U-BOOT device tree for FIP binaries creation
│   └── [...]
├── st-image-bootfs-openstlinux-weston-stm32mp1.bootfs.ext4                             Binary for bootfs partition on eMMC and microSD card devices
├── st-image-bootfs-openstlinux-weston-stm32mp1.bootfs.manifest
├── st-image-bootfs-efi-openstlinux-weston-stm32mp1.bootfs.vfat                         Binary for bootfs for EFI partition on eMMC and microSD card devices
├── st-image-bootfs-efi-openstlinux-weston-stm32mp1.bootfs.manifest
├── st-image-userfs-openstlinux-weston-stm32mp1.userfs.ext4                             Binary for userfs partition on eMMC and microSD card devices
├── st-image-userfs-openstlinux-weston-stm32mp1.userfs.manifest
├── st-image-vendorfs-openstlinux-weston-stm32mp1.vendorfs.ext4                         Binary for vendorfs partition on eMMC and microSD card devices
├── st-image-vendorfs-openstlinux-weston-stm32mp1.vendorfs.manifest
├── st-image-weston-openstlinux-weston-stm32mp1.rootfs.ext4                             Binary for rootfs partition on eMMC and microSD card devices
├── st-image-weston-openstlinux-weston-stm32mp1.rootfs.license
├── st-image-weston-openstlinux-weston-stm32mp1.rootfs-license_content.html             License summary for all packages needed to feed all partitions
├── st-image-weston-openstlinux-weston-stm32mp1.rootfs.manifest
├── st-image-weston-openstlinux-weston-stm32mp1.rootfs_nand_4_256_1024_multivolumde.ubi Binary for ubi partition on NAND device
└── [...]
Description:
<board name>:
* stm32mp135f-dk
* stm32mp157a-dk1, stm32mp157a-ev1, stm32mp157c-dk2, stm32mp157c-ed1, stm32mp157c-ev1, stm32mp157d-dk1, stm32mp157d-ev1, ,stm32mp157f-dk2, stm32mp157f-ed1, stm32mp157f-ev1
<soc name>:
* stm32mp13
* stm32mp15
<boot chain>:
* fastboot                  optee boot chain for flashing via fastboot
* fastboot-opteemin         opteemin boot chain for flashing via fastboot
* optee                     optee boot chain
* opteemin                  opteemin boot chain
<boot device>:
* emmc                      Boot via emmc storage
* nor-sdcard                Boot via nor storage for first stage (fsbl, fip) and files system are located on sdcard
* nand-4-256-1024-sdcard    Boot via nand storage for first stage (fsbl, fip) and files system are located on sdcard
* sdcard                    Boot via sdcard storage
* sdcard-EFI                Boot via sdcard storage and bootfs is configurated on EFI
<storage>:
* emmc                      emmc storage
* nor                       nor storage
* nand                      nand storage
* programmer-uart           storage programmation via UART
* programmer-usb            storage programmation via USB
* sdcard                    sdcard storage
<u-boot config>:
* default
* fastboot-emmc             Fastboot config enabled with MMC_DEV Id for emmc
* fastboot-sdcard           Fastboot config enabled with MMC_DEV Id for sdcard
* programmer                Programmer config enabled
7. Populate the SD card[edit | edit source]
- Set the boot switches to the boot from USB position.

- Connect the PC to the CN7/USB_OTG port of the STM32MP135x-DK board through the USB Type A to Type C cable.
- Power on the board.
- Press the reset button to reset the board.
- Launch STM32CubeProgrammer to get the GUI:

- On the right of the window, select USB (instead of STLINK, set by default) in the connection picklist and click the "Refresh" button. The serial number is displayed if the USB is detected. Then click "Connect".

- Select the "Open File" tab and choose the "FlashLayout_sdcard_stm32mp135x-dk-optee.tsv" file in the Starter Package installation folder ("$HOME/STM32MPU_workspace/STM32MPU-Ecosystem-v6.1.0/Starter-Package/stm32mp1-openstlinux-6.6-yocto-scarthgap-mpu-v25.06.11/images/stm32mp1/flashlayout_st-image-weston/optee")
- Fill the "Binaries Path" by browsing to the $[Starter_Pack_Path]/images/stm32mp1 folder.

- Click "Download" to start the flashing process.
- A progress bar indicates the process progress until a completion pop-up message is displayed.
8. Boot the board[edit | edit source]
- Set the boot switches to the boot from SD card position:
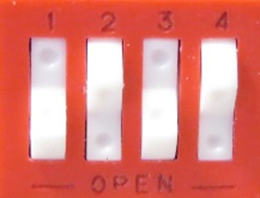
- Power on the board.
- Press the "Reset "button to reset the board.
- After few seconds, the board starts and automatically goes through the following screens


- If the board power supply does not supply enough current (3A), the red LED indicates the issue following the rules below:
LED blinking mode Console message Boot process Twice WARNING 500mA power supply detected Current too low, use a 3A power supply!
Continue and red LED stays ON 3 times WARNING 1500mA power supply detected Current too low, use a 3A power supply!
Continue and red LED stays ON forever ERROR USB TYPE-C connection in unattached mode Check that USB TYPE-C cable is correctly plugged
stop forever USB TYPE-C charger not compliant with USB specification stop




Arm® is a registered trademark of Arm Limited (or its subsidiaries) in the US and/or elsewhere. 