Template:ArticleMainWriter
Template:ArticleFirstDraftVersion
| This page is a candidate for renaming (move). The requested new name is: STM32MP1 Artificial Intelligence expansion packages . The supplied reason is: add a "s" to package(s) for article name coherency . -- vabriou. Wiki maintainers: remember to update the pages that link this page before renaming (moving) it. |
SUMMARY
The Artificial Intelligence expansion package contains AI frameworks to enable AI application examples that could be run on STM32MP1 hardware.
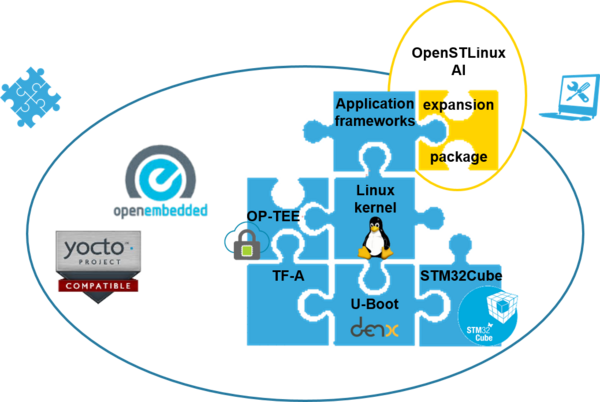
This package consists in an OpenEmbedded meta layer, named meta-st-stm32mpu-ai, to be added on top of the STM32MP1 Distribution Package. It brings a complete and coherent easy to build / install environment to take advantage of AI on STM32MP1 hardware.
1. Prerequisite[edit source]
Install the STM32MP1 Distribution Package, but do not initialize the OpenEmbedded environment (sourcing the envsetup.sh) before having installed the meta-st-stm32mpu-ai meta layer (see next chapter).
2. Installation of the meta layer[edit source]
- Clone following git repositories into <Distribution Package installation directory>/layers/meta-st
 cd <Distribution Package installation directory>/layers/meta-st
 git clone https://github.com/kraj/meta-clang -b thud
 git clone https://github.com/STMicroelectronics/meta-st-stm32mpu-ai.git -b thud
- Setup the build environment
 cd ../..
 DISTRO=openstlinux-weston MACHINE=stm32mp1 source layers/meta-st/scripts/envsetup.sh
- Add the new layers in that order
 bitbake-layers add-layer ../layers/meta-clang
 bitbake-layers add-layer ../layers/meta-st/meta-st-stm32mpu-ai
3. Build the software image[edit source]
- X-LINUX-AI-CV OpenSTLinux expansion package (AI Computer Vision software)
bitbake st-image-ai-cv
4. Flash the built image[edit source]
Follow this link to know how to flash the built image.
5. Launch the AI software[edit source]
- Power up the board
- The AI demo launcher should be displayed at the end of the boot sequence
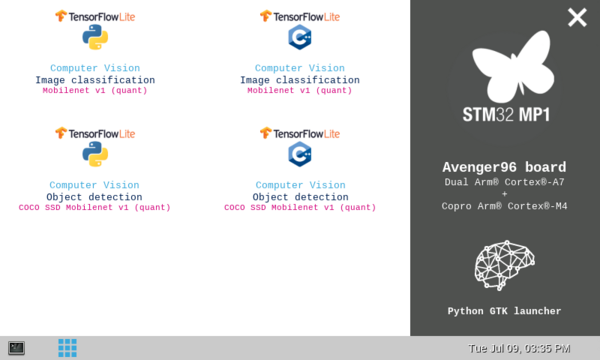
5.1. The AI demo launcher[edit source]
The AI demo launcher is a derivative of the GTK Demo Launcher application.
It is written in python3[1] and uses GTK[2] to display the user interface.
It allows to easily launch AI application examples.
A "single tap" on the touch screen or a "single click" with a mouse connected to the board is sufficient to launch the AI application.