This article explains how to update the bootloader objects of an SD™ card memory, for instance located on the STM32MP157x-EV1 Evaluation board ![]() , using STM32CubeIDE.
, using STM32CubeIDE.
![]()
1. Overview[edit | edit source]
The different steps to update an SD™ card with a customized trusted image are the following ones:
- Initialize the SD™ card with the Starter Package image by means of the STM32CubeProgrammer
- Within STM32CubeIDE:
- customize the trusted image, using the device trees generated by the embedded STM32CubeMX
- compile the corresponding Linux® device tree and bootloader images
- update them on the running STM32MP157x-EV1 Evaluation board

- Check that the new customization is correctly set up
All those steps are explained in the chapters below.
2. Initialize the SD™ card with the Starter Package[edit | edit source]
Initialize the SD™ card with the Starter Package image with STM32CubeProgrammer.
For that purpose, select the Starter package corresponding to the targeted STM32MP157x-EV1 Evaluation board ![]() and jump to chapter Downloading the image and flashing it on the board.
and jump to chapter Downloading the image and flashing it on the board.
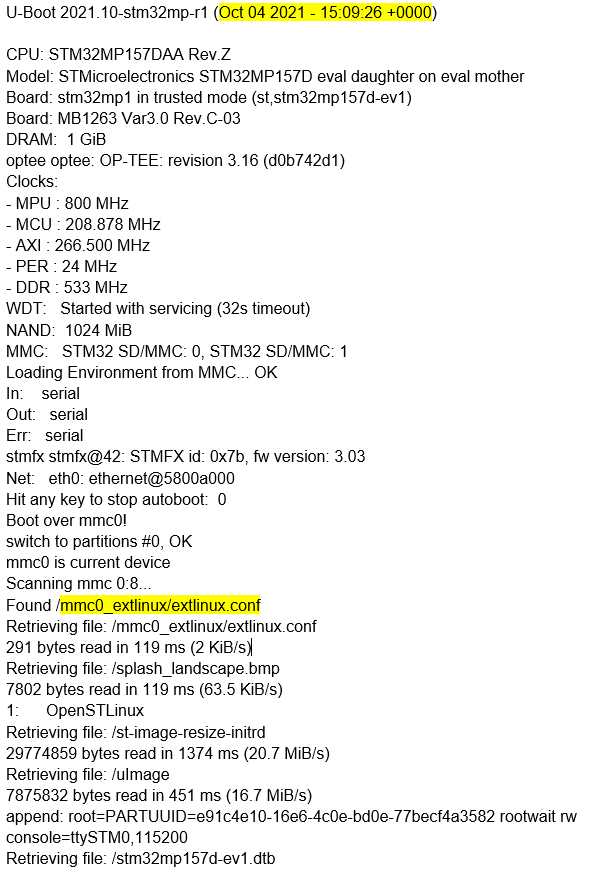
Before executing the next step, check the bootloader version, which is visible in boot messages:
- TF-A BL2 version, booting from the SD™ card memory

- U-boot version and extlinux.conf file used, booting from the SD™ card memory
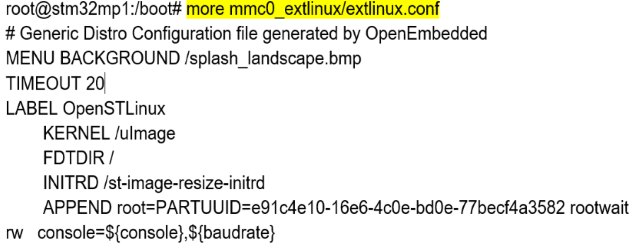
- extlinux.conf content before update
3. Customize and update the bootloader images on the running STM32MP157x-EV1 [edit | edit source]
3.1. Build the trusted image inside STM32CubeIDE with the new expected device trees[edit | edit source]
After the customization of hardware resources within the embedded STM32CubeMX, new device trees for Linux® and for the bootloader are generated.
The next step is to build an update of the new trusted image; this is covered also within STM32CubeIDE with:
- bootloader images generation, as explained in How to manage OpenSTLinux projects in STM32CubeIDE#Bootloader_projects
- and Linux® device tree compilation How_to_manage_OpenSTLinux_projects_in_STM32CubeIDE#Linux_project
Note that for Linux®, only the device tree needs to be updated as described hereafter.
3.2. STM32MP157x-EV1 board update with new Linux® device tree[edit | edit source]
In this step, the STM32MP157x-EV1 Evaluation board ![]() is up and running with network access: target status is green.
is up and running with network access: target status is green.
After having compiled the device tree generated by STM32CubeMX, you must:
- update the STM32MP15x target bootfs with the new .dtb under /boot
- and adjust /boot/mmc0_extlinux/extlinux.conf' to declare the new device tree and set it as default.
For that purpose, follow the steps explained below:
- select the Cortex-A Linux® Deployment shortcut configuration available from Linux® project Run As... menu.

- Validate your choice and use the Run button. You get in a dedicated Linux® Deployment console a message like this one:

- Check the content of extlinux.conf after the SD™ card Linux® device tree update (DEFAULT and LABEL have changed)

3.3. STM32MP157x-EV1 board update with new bootloader images[edit | edit source]
In this step, the STM32MP157x-EV1 Evaluation board ![]() is up and running with network access: target status is green.
is up and running with network access: target status is green.
After having built customized bootloader images, you must update the STM32MP157x-EV1 Evaluation board ![]() .
.
- Select the Cortex-A project in STM32CubeIDE and right-click to get the Cortex-A Bootloader Deployment shortcut.

The connection is automatically set and you need to scan the STM32MP15x target storage, using the Scan... button.
This storage list depends on the board and on the boot storage used.
Then, select the storage to update (SD-Card #0 here), and the TF-A BL2 and FIP image to update from FIP_artifacts/.
Here is the corresponding STM32 Cortex-A Bootloader Deployment configuration:

- Click on Run. You get in a dedicated Bootloader Deployment console the following message:

4. Check new bootloader version after customization with STM32CubeIDE[edit | edit source]
After the update, the new bootloader version can be checked by comparing the version appearing in boot messages: the TF-A BL2 and U-Boot versions are modified and Linux® uses the generated device tree.
Here are the new boot messages:
- TF-A BL2 updated version, booting from the SD™ card memory

- U-Boot updated version and Linux® device tree, booting from the SD™ card memory

![]()
Arm® is a registered trademark of Arm Limited (or its subsidiaries) in the US and/or elsewhere. ![]()